Tag Archives: quick

Hot Patterns 1196 | Metropolitan Urban Gypsy Blouse | Or a Tibi Knock-Off

11 Sep

katrina-2

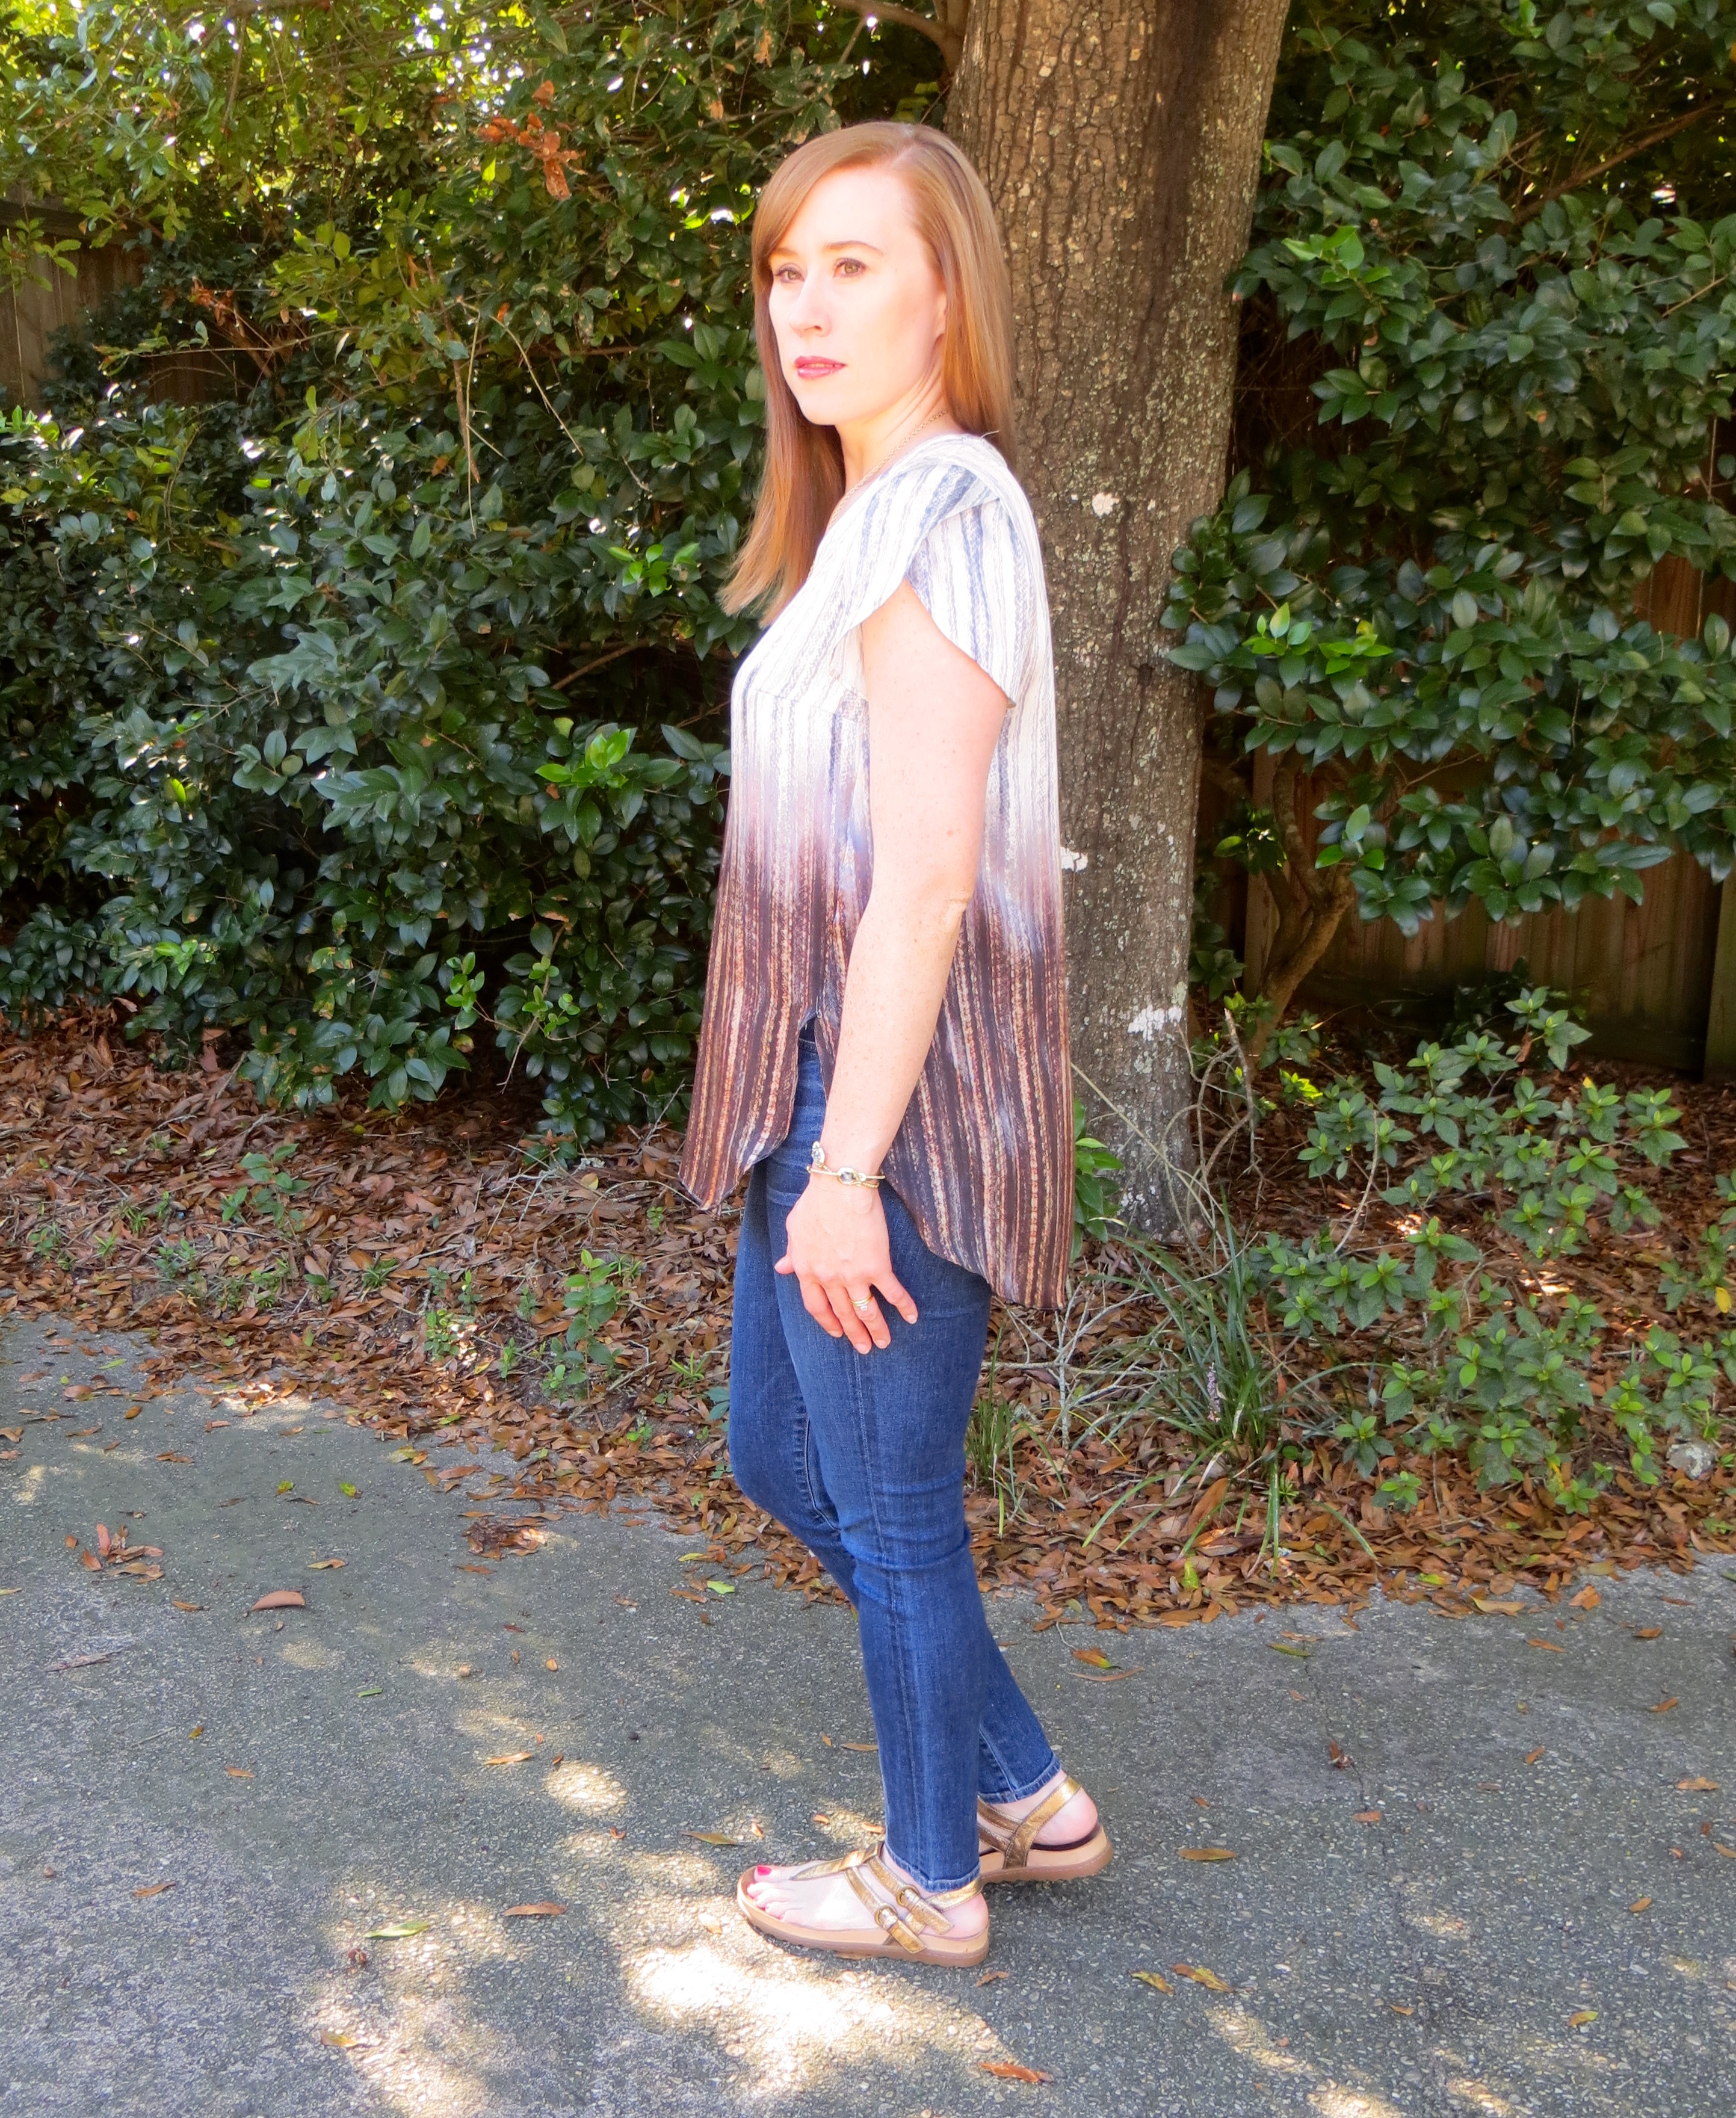
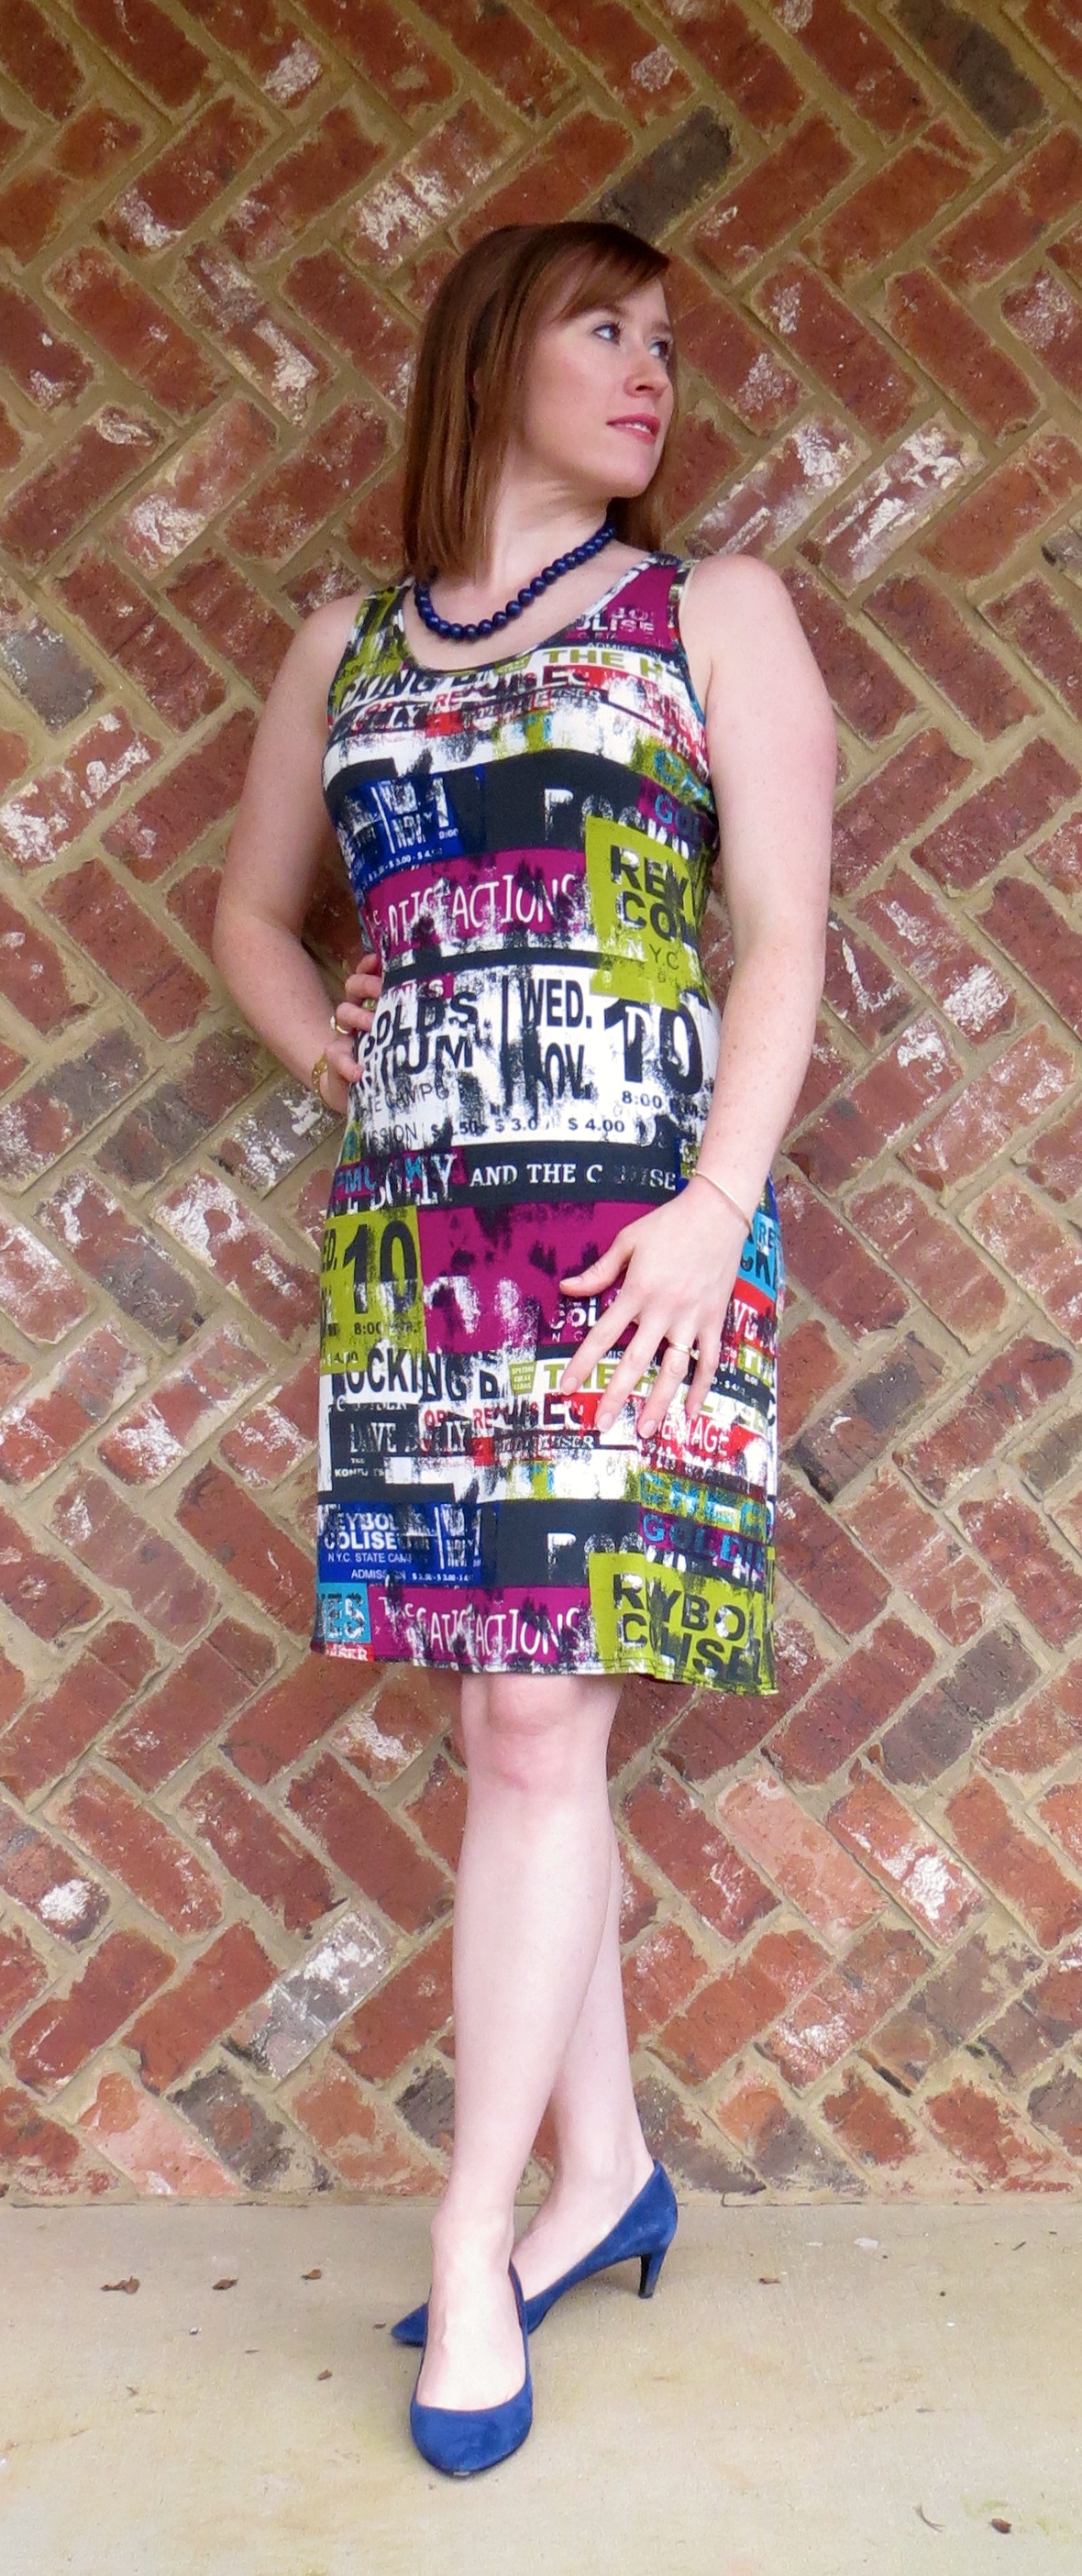
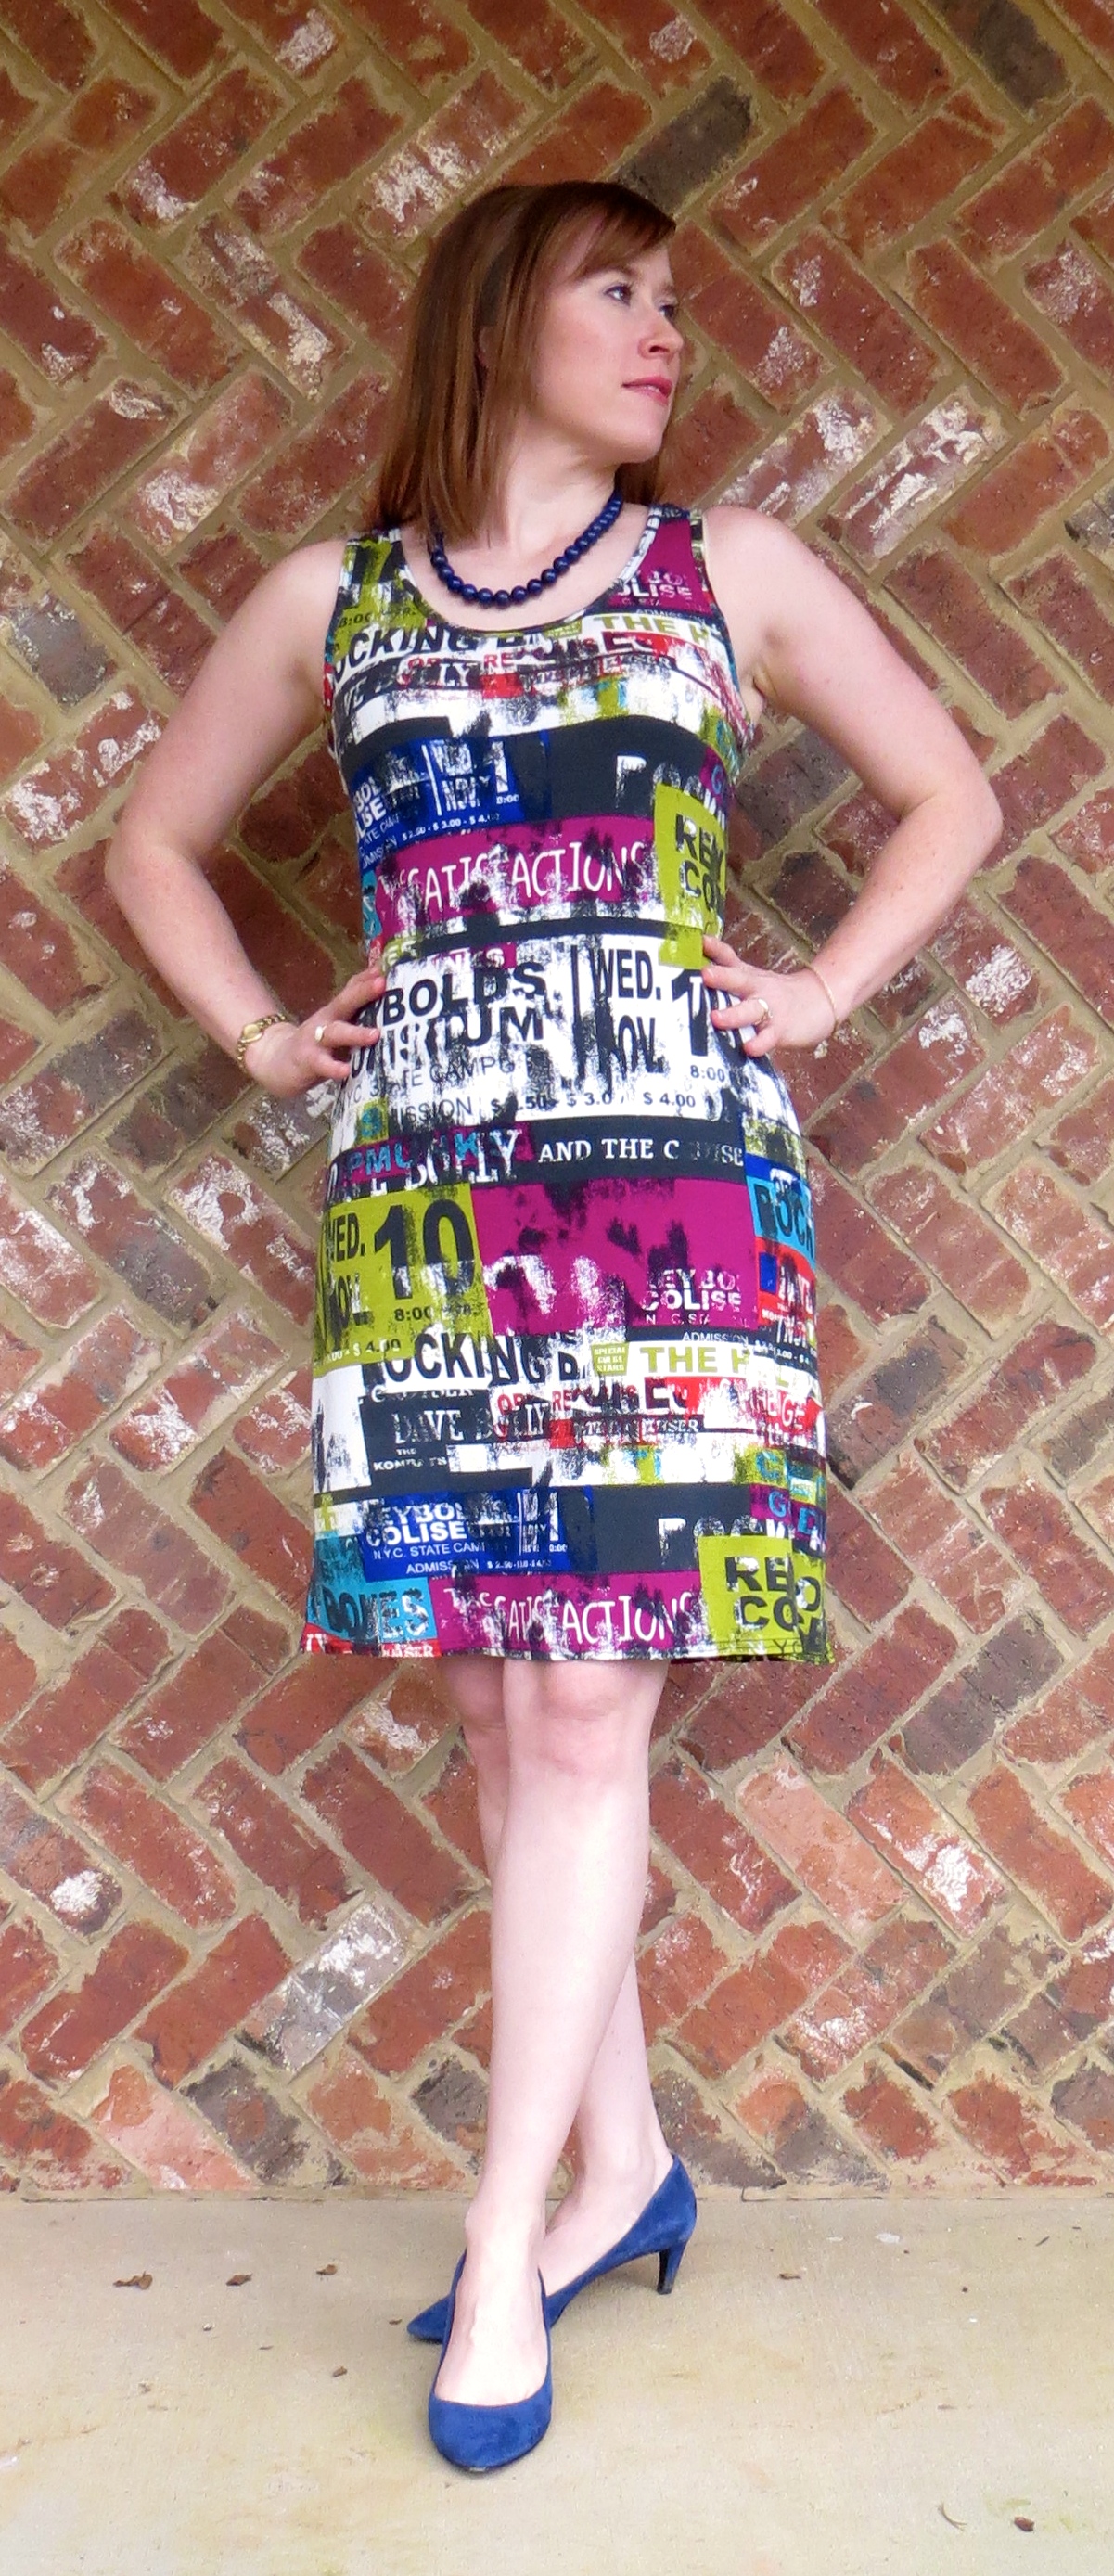
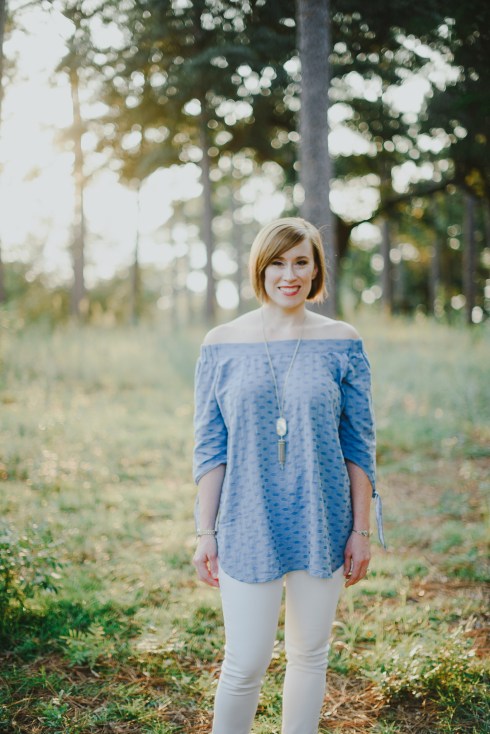
Hi, friends! I’m back with a new top, a new haircut, and some fancy professional photos for you! I’ve had this Hot Patterns Metropolitan Gypsy blouse sewn up for several months but never could coordinate photos of it. When I scheduled a photo shoot for my stepson’s casual senior (!!!) portraits, I had the photographer capture a few of my top to use on the blog. She did such a great job! Any locals looking for great wedding/family/baby/senior photographs, check out Haley Budlong.

katrina-7

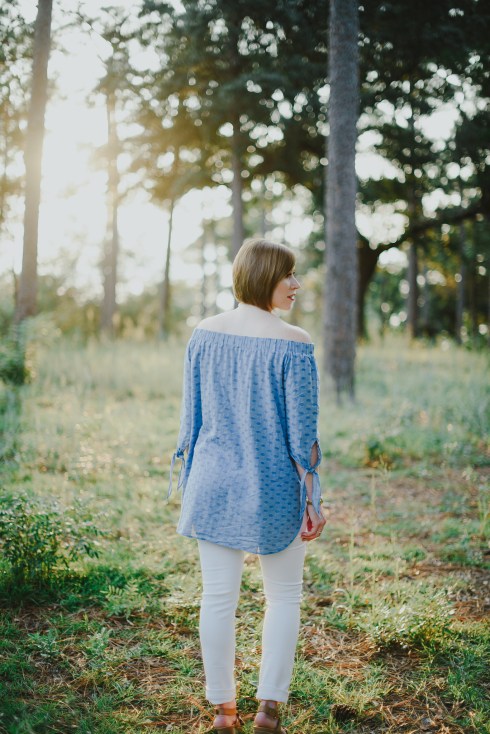
I was inspired by Erica Bunker’s version of this top so I just blatantly copied hers — with her permission, of course :-). This pattern is also a pretty accurate ringer for the Tibi off-the-shoulders blouse that retails for around $300. I checked one of these out in Nordstrom last month and I’m happy to report that it wasn’t constructed any better than mine.

katrina-4

I cut a straight size 12 but probably could have gone with the 10. I omitted the shelf bra, although I may try it on the next version to see if it helps to keep the elastic down and prevent it from riding up on my shoulders.

katrina-8

That being said, this top fits way better in the shoulders than any RTW off-the-shoudlers tops I have because I was able to select the right amount of elastic for my broad shoulders — 27″ to be exact, 3/4 of my shoulder circumference.

katrina-10

I opted for the tie detail on the sleeves and next time may try the elasticated sleeve opening. I used my narrow hem foot to finish the sleeves edges and just put a dab of Fray Chek at the very tips as that was a tricky place to get neat (thanks for that suggestion, Erica!)

katrina-9

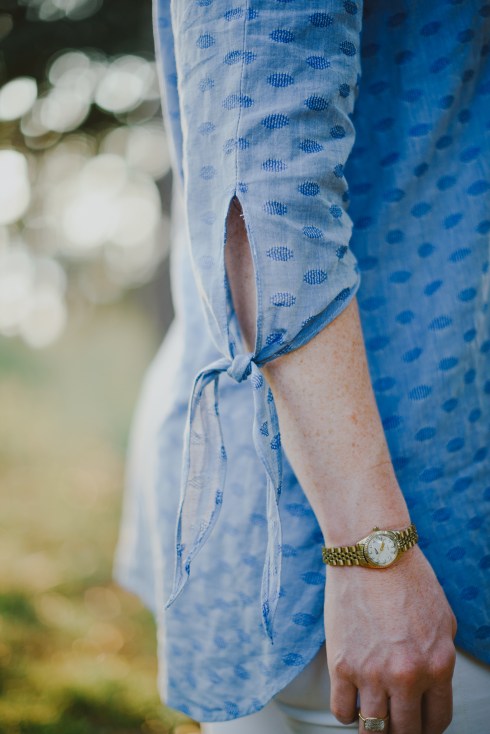
My fabric was a lovely cotton French dot jacquard from Emma One Sock. I was able to get this shirt out of less than 2 yards, much less than the pattern’s recommended 2 3/4 yards.

katrina-3

The pattern sewed up quickly in a single Saturday and the directions were brief but sufficient. I would definitely make this again and have a gorgeous green snake print silk set aside for just such an endeavor.

katrina-6

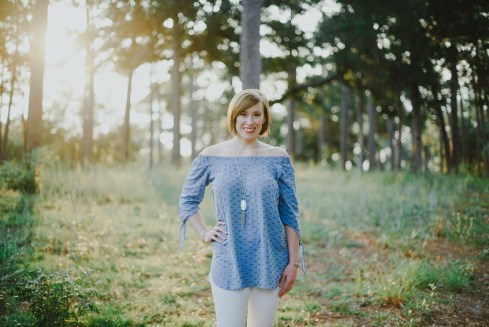
For this photo shoot, I kept my look simple and paired my top with my crisp white slim jeans, a Kendra Scott necklace and bracelet, and some tan platform wedges. What do you think about off-the-shoulders tops? Would you wear or sew one?

katrina-1

In-House Patterns | Chelsea Blouse and a Giveaway

30 Sep

Hi, friends! Happy Hump Day! Just a quick reminder that today is your last chance to enter my giveaway for two Butterick patterns. To enter, leave a comment on my last post here or my Facebook page and tell me your favorite fabric and pattern to work with. I will close the giveaway tonight and announce the winner in a few days.

IMG_3580

A little while back I shared with you my first version of the In-House Patterns Chelsea Blouse. My love for In-House Patterns is no secret on this blog. In my first version of the top, I told you the shoulders were a little wide, admittedly my fault because I added extra width to the pattern and cut a larger size than was probably needed. I knew I needed to give the pattern a second chance so here we are — take two.

IMG_3582

I sized down to a medium for this version and didn’t add any width to the shoulders. I think this time it is nearly perfect. I have concluded that one of my shoulders is wider than the other so I could probably alter my shirts for that, but on something this loosely fitting, I am not going to bother for now.

IMG_3590

I sewed this up in a Theory silk charmeuse earthtone ombre panel that I purchased from Emma One Sock. The fabric is gorgeous in person and of course feels wonderful against the skin. I cut it out in a single layer so I could place the pattern like I wanted it. My only gripe with sewing it was with the rolled hem foot (again) and you can see how the hemline is a little wavy. I find the rolled hem foot makes my bias edges stretch out some. Is this operator error or just a problem with that hemming method?

IMG_3585

Either way, I will still be wearing my top as we transition from hot hot to less hot here in the Deep South. It pairs well with many of my bottom pieces and I can’t wait until it is actually cool enough to pull out some boots and booties!

IMG_3575

Maria Denmark Rachel Wrap Dress

22 Sep

Howdy, friends! I hope your week is off to a good start. I have a completed sewing project to share with you today but first I want to give you an update to let you know that my entry in the Pattern Review Sewing Bee was selected to move on to the next round! You can see my entry for Round 2 here and I will get a post about it up soon (but I have to do some traveling for work first).

I promised a giveaway if I moved on, so here it is. I have two Butterick patterns — 6019 and 5895 — both Patterns by Gertie. You can see my rendition of 6019 here. If you would like to be considered for the patterns, just leave a comment on this post below or on my Susie Homemaker, MD Facebook page. I will keep the contest open until September 30 at midnight CST. In your comment, tell me your favorite pattern and your favorite fabric to work with — they don’t necessarily have to go together. The contest is open to anyone 18 years of age and older worldwide. I will announce the winner within a few days after the close of the contest.

IMG_3610

Now on to this garment! I have always been a fan of wrap dresses. I think many of us love the iconic style first brought to popularity by Diane von Furstenberg several decades ago. There is something universally flattering about the forgiving knit dress with a surplice neckline and cinched wrapped waist ties. I have long searched for the perfect pattern or RTW wrap dress. I have even tried on and purchased authentic DVF dresses only to find that they are anything but perfect for my body. They don’t come anywhere near close to covering my bust which isn’t conducive to a flattering look.

405

I have mocked up the popular modern Vogue 8379 but found the skirt to be too full. I have several other wrap style patterns in my stash but just haven’t had the gumption to sew any of them up. And a lot of cute indie wrap patterns have popped up on the market, too, but I have managed to resist. Until the Maria Denmark Rachel Wrap Dress came along. I am not sure why this dress won me over but it did and in a very quick fashion. I went from purchasing to printing to taping to cutting to sewing to wearing all in a matter of two days. That is unheard of in my world!

IMG_3614

I chose an inexpensive FabricMart ITY jersey for this first version just in case it was a flop. Thankfully it wasn’t even though my stepson’s first reaction was to tell me that it looked like a nightgown…

For my pattern modifications, I made an FBA since my biggest beef with wrap dresses is the gape-age in the bust. I created a side dart for a better fit and the added waist ease I removed at the side seam to keep the pattern true along the waist (there is no waistline so you have to cut the pattern in two to do the FBA then reattach the top and bottom).

IMG_3612

There is a FBA tutorial on Maria Denmark’s blog specifically for this pattern but I don’t recommend using it. She gives you a method that results in all dart intake being transferred to a waistline seam but since this dress doesn’t have a waistline seam, you end up with a bodice that won’t match back up with the skirt after the FBA. So take my advice, if you want to do an FBA on this dress, do the usual Palmer-Plescht method, not the one on Maria’s website.

My one other gripe with the pattern (well, other than the fact that it doesn’t include seam allowance, GRRRRR!!!), is that the shoulders are cut really narrow. I added 1″ to get to what you see in these photos and I could probably stand to add another 3/4″ to get the seam to fall where it should. My shoulders aren’t that broad!

IMG_3608

But overall I do love this dress. I love the figure skimming skirt and the neckline-hugging wide neckbands. I also love that it only has 4 pattern pieces so it’s easy to cut out and assemble.

I can definitely see myself making this dress up again after I tweak the pattern a little bit more. My goal is to modify it so that a camisole won’t be necessary for modesty at work. Let’s see if I can get the neckline just right! 🙂

Kirsten Kimono Tee HiLo Tunic Hack

19 Aug

IMG_3499

Howdy, folks! I hope you’re having a good Hump Day. Life is busy in these parts with back to school so sewing and knitting has been happening in waves around here. I have been on a mission to finish some knitting UFOs and I am pleased to report some nice progress in that department. I finished my Aiken pullover by Andi Satterlund (c. late 2014) last night and now just need to block it and I am down to the last sleeve on my Hi-Fi Pullover by Ruth Garcia Alcantud (c. late 2013). I find it easier to pull out knitting UFOs than sewing UFOs. What about you?

So for your viewing pleasure today I have another hack on the Kirsten Kimono Tee, a free pattern by Maria Denmark. You may remember my first blogged version here which involved combining a sequined knit fabric with a regular knit.

IMG_3501

That wrinkle is just from movement — it isn’t a dart.

For this version, I was trying to replicate a friend’s top that I liked so I altered the side seams and hemline to give the top a more relaxed fit and a high-low hem. My friend was sweet enough to send me measurements from her shirt so I was able to use that information to decide how much to add to the side seams and how much difference to have between the center front and center back hem. I also lengthened the sleeves some. I think my top turned out similar but not identical — I wouldn’t want her to think I am trying to be her twin 🙂

IMG_3502

I used a silky soft modal knit from my stash. I purchased it at Hart’s Fabric a few years ago and I think this is the one. Please don’t hold me to it because it’s been a while.

I used my serger to sew it up and fused the hems with double sided fusible stay tape from Emma Seabrooke. While I love her tapes in general, I didn’t love it in this application because the hem looks rumpled unless I iron it every time I wear it. It doesn’t have stretch like the body of the garment so it tends to look bad unless pressed thoroughly. Although not necessary, I stitched over the hems with the coverstitch function on my serger.

IMG_3504

I finished the neckline with a wide band that I serged on. Next time I think I would use a binding instead but the band is quick and neat and you can’t beat that!

This is my third version of the Kirsten Tee and the most worn to date. I am not retiring the pattern any time soon but I do think I will move on to trying a new knit top for some variety, maybe the Plantain Tee by Deer and Doe. Do you have a favorite knit top pattern? I’d love to hear about it in the comments!

Sallie Jumpsuit | Closet Case Files

5 Aug

IMG_3468

Hi, friends! Did you enjoy the chocolate overload yesterday? I’m back to drinking smoothies and eating kale so I can fit into the clothes I’ve been making. Too bad because those brownies are sooo good and I keep thinking about making another batch!

Here’s another recent make for you — the Sallie Jumpsuit by Heather Lou at Closet Case Files. I bought the pattern and sewed it up not long after it was released. And I’ve even worn it a few times since then but it’s taken me a couple tries to get photos that were good enough to post hence the delay in sharing it with you.

IMG_3475

This pattern is very quick and easy to make up. I think start to finish with assembling the pattern, cutting the fabric, and construction all the way down to the hem took me about four hours. The instructions are good and the methods yield nice results with a clean finished top.

I found certain parts were easier to do on my standard machine rather than my serger. For instance, the neckline seam and the side seams of the bodice were easier to construct with the sewing machine. I did go back over the neckline with the serger to add the clear elastic for stability since my standard serger foot has a nifty little slot for guiding in elastic and I think this is so much easier than adding it with the regular sewing machine, but I do think it is hard to get into the V exactly with the serger.

IMG_3477

I finished the waist and pants with the serger. I fused the hems with Emma Seabrooke fusible tape and didn’t bother stitching them. I used 1/2″ knit elastic for the waistband and it is very comfortable. My fabric is a cheap lightweight ITY knit from Hancock’s.

As for the fit, I selected a 12 at the bust and graded down to a 10 at the waist then back out to a 14 at the hips. I eliminated the pockets because I don’t really use them in lightweight knit garments. I measured the rise on the pattern and found it would be too short on me and that’s not a good look in a jumpsuit. So I added 1″ to the top of the center back and 1/2″ to the inner leg of the back piece, tapering to nothing down the inseam. I also scooped out the curve a little bit. I then shortened the front rise by about 1/2″.

IMG_3482

This all helped and the front rise is great but I need more length in the back rise on my next version as I still feel like my butt is eating the pants a little. I also plan to differentiate a front and back bodice piece on my next version as I need more ease to go over my chest. It doesn’t blouse at the center front like it does at the center back. And I think a forward shoulder adjustment would be helpful. Finally, I find the armhole to be very tight and restrictive, so next time I will lower that a bit.

IMG_3451

But overall, my jumpsuit is very wearable and I think I will definitely try the pattern out again (or maybe I already have…).

McCall’s 7121 | Stripe Matching Victory!

5 Jul

IMG_3215

Happy Sunday, friends! I hope you are all rested and ready for the week ahead. I have taken advantage of this long holiday weekend to catch up on my never-ending list of things I would like to sew. I have made a simple knit sheath dress from some floral print scuba knit, a psychedelic Closet Case Files Sallie Jumpsuit, a Watson bra, started on the Maison Fleur Halterneck Swimsuit, and just finished this cute little dress — McCall’s 7121.

M7121

Hopefully I will get around to sharing those other things with you but if I don’t, at least you know I’m back to sewing! And now that my knit fest is over, I have plans to start on some woven items like a dress and some blouses. I will keep you posted.

IMG_3213

Y’all know I love a good knit dress. Exhibits 1 and 2. And there are more that I haven’t even shown you but that make regular appearances in my wardrobe. So it’s not a surprise that I picked up this pattern when they went on sale for $1 at Hancock’s. But I think I love this one a little more because it has a waist seam and the skirt is a little more A-line. And since the front bodice is not cut on the fold, McCall’s added a little bit of bust shaping there in the front for you.

IMG_3214

And the stripes make it so fun and flattering. Plus, I get to show off my stripe matching skills! What, you thought I was hiding something under the belt? BAM!

IMG_3341

I chose my size based on the finished measurements, not the size chart, and I selected sizes that would yield zero to a little negative ease in the bust and waist. I made my standard adjustments of 1/2″ forward shoulder and 1″ swayback and I also decided to raise the neckline by 1.5″. After I stitched this up, I realized the armholes and back neckline were gaping and the waist was a little low so I pinched up the shoulder by 1.5″ and stitched a new shoulder seam, effectively fixing all three problems. I think using neck and armhole bindings would prevent the gaping but this pattern just calls for turning and stitching.

IMG_3345

Which, of course, I didn’t do! I decided to self-line the bodice for a clean finish at the neck and armscye. I did sew some clear elastic into the neckline and after I raised the shoulder seams, it lies smoothly. Finally, I serged some clear elastic into the waist seam and hemmed with a twin needle.

IMG_3212

Easy peasy for a great wardrobe builder. I think my next version will be hacked into a peplum top with some great black floral scuba knit that is calling to me from my fabric stash…

McCall’s 6706 | Carolina Herrera Skirt

12 Mar

Howdy, friends! I have another completed sewing project for you today! But before you get too excited, this is a project I completed sometime last year (probably Summer 2014), and just never got a chance to get good enough photos to blog.

Luckily, we finally had some pretty weather this past Sunday and there is a cute spot outside our new condo, so I took advantage and enlisted my handsome stepson to play photographer. Unfortunately, I didn’t realize until after the photo shoot that there was a large smudge on the lens so you will have to excuse the blur around my feet 🙂

IMG_3170

This skirt started with the fabric. I found it at Promenade Fine Fabrics in New Orleans, one of my favorite fabric haunts. It was milled for Carolina Herrera and is a silk organza with blue flowers with black outlines embroidered on it. Maybe there’s a better term for the way this fabric is embellished but I don’t know it. The black outline appears to be clipped to have exposed threads, kind of reminds me of velvet, but the blue looks like embroidery. Any info on this type of fabric would be appreciated. The fabric was very pricey ($58/yd) so I knew it had to become something that didn’t require much yardage and that I could make without any errors.

M6706

I decided on McCall’s 6706 (rendered once before in a drapey rayon challis), to create a simple, elegant, pleated knee-length skirt.

carolina-herrera-bal-harbour-shops-boutique-opening-carolina-herrera3-photo-by-manny-hernandez

Then I found this photo of the designer herself wearing a very similar skirt in an almost identical fabric. I never could find any garments in the exact fabric.

IMG_3201

I decided to underline the fashion fabric with plain silk organza so I could finish the raw edges like I did in my red Hollyburn skirt and to give it a little more opacity and body.

IMG_3200

I also lined the skirt with a bone colored silk crepe de chine from Promenade. At first I thought I would line it with black, but the neutral silk really made the white of the organza stand out.

IMG_3199

Finally, I decided to use some fabulous, authentic Petersham ribbon for the waistband. This notion also came from Promenade and Herbert says that it is some of the only truly legit Petersham that is still made. I wish you could feel it through the computer — it is so thick and luxurious. Another pricey option ($32/yd), I purchased just enough to go around my waist twice for the waistband and facing.

IMG_3177

Construction was pretty straightforward. As I mentioned above, I underlined the skirt panels with organza then hand basted the pleat lines and lightly pressed the pleats into place then machine basted them across the top.

IMG_3179

For the lining, I basted it to the skirt along the top then treated it and the outer skirt as one piece when applying the waistband. I laid the Petersham ribbon directly on the waist seam line and used my edgestitch foot to stitch just inside the outer border of the ribbon. Then I matched the other piece of ribbon (the waistband facing) up with the top and edgestitched along the top border to connect the two. The I did one final row of stitches to secure the bottom of the facing to the bottom of the waistband. Fortunately, these stitches just melt right into the ribbon and you can’t see them, otherwise I would have been doing a lot of handstitching!

IMG_3174

I finished the lining with a 1/4″ machine hem and the outer skirt is finished with a 1″ hand stitched hem, catching my stitches in the organza underlining.

All in all, I love this skirt even though it was not the cheapest project. It is one of a kind and I feel like it looks like a designer piece. I think I will be able to enjoy wearing it for many years so I don’t mind the little splurge to create it.

What about you, my fair readers, have you ever splurged a little bit on a project? Did you play it safe with a pattern you knew would sew up well or did you do something more daring? I would love to hear in the comments!

I hope to be back soon 🙂

Simplicity 1810 | Paint Splattered Silk Dress

21 May

IMG_2713


Hi, y’all! Do you remember me showing you this dress in my Me Made May roundup? I promised to tell you more about it so here goes:


1810


The pattern is Simplicity 1810, a wardrobe pattern with pieces for a dress, top, and pants. I made the knee-length dress.

I was attracted to this pattern first of all because it looked really easy but also because of the cute yoke and pleat details at the shoulder. I also like the way the waist ties originate from the back darts, ensuring the back of the dress lays smoothly without a bunch of awkward gathers.


IMG_2722


I didn’t make a muslin of this pattern but I did do a really shoddy tissue fitting on my dressform. I cut a size medium and shortened the bodice by 1/2″, took in 1/2″ swayback adjustment, then added 3/4″ back over the hip to account for my booty. It ends up, I probably should’ve only added 1/4″ here but oh well.


IMG_2730


I followed the directions exactly as written with the addition of French seams for the side seams and topstitching on the waist ties.


IMG_2715


My fabric is a luscious silk crepe de chine with a paint splattered print. I picked it up from Sawyer Brook with a simple dress like this in mind.


IMG_2735


As I also mentioned in my MMM post, I rushed to finish this dress to wear to see the Molly Ringwalds. I thought the fabric fit the 80s music theme pretty well. There was some serious Project Runway-style stress going on in my house that evening, and we were *only* 1.5 hours late because of my dress 🙂

If you have been holding this pattern in your stash like I was, pull it out and whip up a dress or top — it only took me about 4-5 hours total.


IMG_2724


Thanks for reading and I’ll be back tomorrow with an exciting new make for you!

Oven-Roasted Bacon

5 Mar

Or, the only bacon I can cook without burning…

Me cooking bacon had become a joke in our house — it always ended up burned no matter the method I employed. Enter the oven-roasting technique. Now my bacon cooking is no longer a laughing  matter. Instead it is a finger-licking, lip-smacking matter. My husband may never fry bacon in the skillet again, either.

The method is great because it yields consistent results, practically no mess, and — the best part — flat bacon slices!

To get started, line a baking sheet with foil, making sure to completely cover the pan. This step ensures clean up takes about two seconds.

IMG_2320

Next, lay your bacon flat and not overlapping on the baking sheet. We like Wright’s Hickory Smoked Bacon, but you can use your favorite.

Put the sheet in the oven on the center rack and shut the door. Turn the oven on and heat to 400 degrees (you do not have to preheat). At the same time, set your timer for 18 minutes.

IMG_2333

When the time is up, check the bacon. It should be sizzling and just starting to brown/curl around the edges. If it’s not, give it a few more minutes but watch it closely.

IMG_2336

If it is, take it out and transfer the bacon slices to a plate lined with paper towels to absorb the excess oil. Cool briefly then chow down.

IMG_2337

To clean up, drain your bacon grease into a small cup or bowl if you want to save it for future recipes; discard it if not. Next, carefully peel the foil off the pan and throw it in the trash.

Now sit down to your delicious breakfast. And stay tuned, I have another breakfast delicacy coming your way soon!

Adapted from this recipe.

McCall’s 6559 Again — Poster City

2 Mar

IMG_2122

Hello, again! Are you shocked by my three posts in as many days? Can I just tell you what a backlog of things I have to share — both food and sewing related. But I digress…

This dress is the first installment in my “resort collection,” or the things I sewed up to go on a cruise at the beginning of February (a total of 5 things).

You have seen me in this pattern before but in the maxi length version.

images

I made only minor adjustments to this version beyond what I made in the last one — only widened the back armhole to normal instead of racer-style, raised the neckline 1″, and took another 1/2″ out for a swayback adjustment and added it back in over my derriere to keep the hem level. I also trimmed the seam allowances down to 1/4″ to make it easier to serge.

The fabric is an awesome rayon/lycra 4-way knit that I got from Emma One Sock a little while back — called “Poster City.” And this is your lucky day! She still has some in stock!!

IMG_2118

I constructed the entire thing on my serger, using a 4-thread overlock for the seams and my coverstitch function for the bands and hem. I used the elastic foot to insert elastic into the neckline for stability. This could also be used for the shoulder seam if sleeves were included.

IMG_2126

I don’t guess there’s much else to say about this one other than it won’t be my last!

IMG_2119