Archive | March, 2014

Vogue 8747 — A Classic White Blouse

31 Mar

Hi, friends! I hope your week is off to a good start. I have another finished sewing project for you tonight — a classic white button-front blouse. This shirt fits a definite hole in my wardrobe. While I have several white shirts, none of them would be considered the classic, wear-with-anything staple.


IMG_2553


I have had this pattern, Vogue 8747, in my stash for a while. The current Pattern Review Fitted Blouse contest is what convinced me to pull it out and sew it up. Fortunately, my muslin didn’t reveal too many alteration challenges.


V8747


I cut the size 14 with a C bust cup and the fit was pretty close to perfect right out of the gate. I made a 3/8″ high round back adjustment and moved the shoulder seams forward 1/2″. I shortened the bodice 1/2″ above the waistline. The sleeves were a bit too wide at the wrist so I took them in about 1″ tapering up to just above the elbow. Finally, I added 1″ to each back princess seam at the hem tapering up to the waistline since my hips fell in a larger size. I meant to add the width at the side seam but got my pattern piece backwards when making the adjustment. Fortunately, it looks fine like this!


IMG_2528


The pattern is pretty straightforward to sew up. If you have made a few shirts with button bands, collar stands, and cuffs, you won’t really need to look at the directions. And I prefer the directions in Pam Howard’s Craftsy class for shirt construction if you are looking to make a button-down.


IMG_2558


The fabric has been in my stash for a little while — a white cotton sateen from Theory. I got it from the roll ends section of Emma One Sock (surprised?). She described it as a bottom weight fabric but I think it is perfect for a dress shirt since it is not so sheer to require an under layer. If you have ever felt a Theory dress shirt, you know how soft that cotton is. This shirt feels like a dream!


IMG_2591


For construction, I decided I didn’t like the look of top stitching on the fabric, so I used my stitch in the ditch foot to invisibly finish the cuffs, button band, and collar stand. I also used a downloadable sleeve placket instead of the included pattern piece. There are great instructions for placket insertion on the Threads website. As with most commercial patterns, the sleeve head has too much ease so I put the excess into little gathers at the top to match the gathers on the front of the shirt.


IMG_2646


Finally, I used my new button-hole cutter to open the button holes. What a great little gadget!


IMG_2650


Enjoy the rest of your week. I hope to be back later this week with something tasty!


IMG_2583

A Little Housekeeping…

19 Mar

Happy Wednesday, friends! I hope your week is going well. I am writing this post to cover a few loose ends that are dangling around. First, I have entered my recent Elisalex dress in the Pattern Review New to Me Pattern Company contest. If you are a Pattern Review member, I would love to have your vote — go here.

My next piece of news is that I hosted a sewing workshop at my house today for girls in my stepson’s school. We sewed poodle skirts for their upcoming sock hop! It was lots of fun but unfortunately I don’t have any pics yet. I will try to get some Friday at the event.

This was my first time to really “teach” someone about sewing and I enjoyed it immensely. One of the young ladies had never touched a needle or thread before and the other two were beginners. I am pleased to say, after only 2.5 hrs, each girl left with a completed skirt waiting only for a hand stitched appliqué. We made self-drafted circle skirts and inserted a simple zip and one piece waistband. Since we made the skirts from felt, they didn’t require a hem. Yay!

I prepared a few treats for the girls to sustain them during our sewing — my mother’s lemon bars and some Ghirardelli brownies (don’t tell, but I like those better than scratch made!).

Per my husband’s recommendation, I put out some of my hand sewn-garments for the girls to look at for inspiration — I would love to inspire the next great seamstress! As I was pulling things from my closet, I was shocked by how many completed garments I have that I consider wearable. Come on Me Made May 2014!!!

Here’s a photo for you of some of the clothes I put out on display.

IMG_2497

Other pair of curtains are waiting on their hem (for the past 18 months, lol!).

And here are a few pictures of my sewing room. I don’t think I’ve ever shown it to you so I figured I should take pictures while it was clean for this special occasion. As soon as the creativity strikes back up, it will be messy again!

IMG_2501

IMG_2502

IMG_2506

IMG_2507

Finally, if you are a Pattern Review member, I would love to have your vote in the New to Me Pattern Company contest where I entered my Elisalex dress. You can vote here. Thanks and have a great rest of the week!

Elisalex and The Leggy Roses

10 Mar

IMG_2422

Hi, friends! Ready to see another finished garment? This is one of my favorites so far. The fit is great and I am proud of my construction techniques. I am also entering it in the PatternReview New To Me Pattern Company contest and the Sew Dolly Clackett contest.

I think my version looks very similar to this one on the BHL website.

I think my version looks very similar to this one on the BHL website.

First let’s talk about the pattern — Elisalex dress from By Hand London. This is my first time using a pattern from this company and I was pleased with the experience. I recently got over my worry that the Elisalex dress would make my hips look even more gigantuan. There are a ton of great versions and hacks of this dress around the internet. Dolly Clackett has made 15 versions as of this writing (as best I can tell)! Seeing the dress on women with shapes similar to mine made me feel better about trying the pattern.

brocade_dancingroses

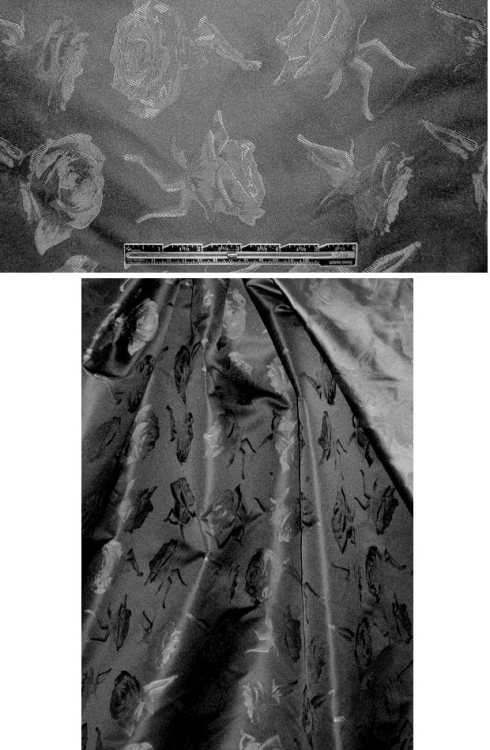
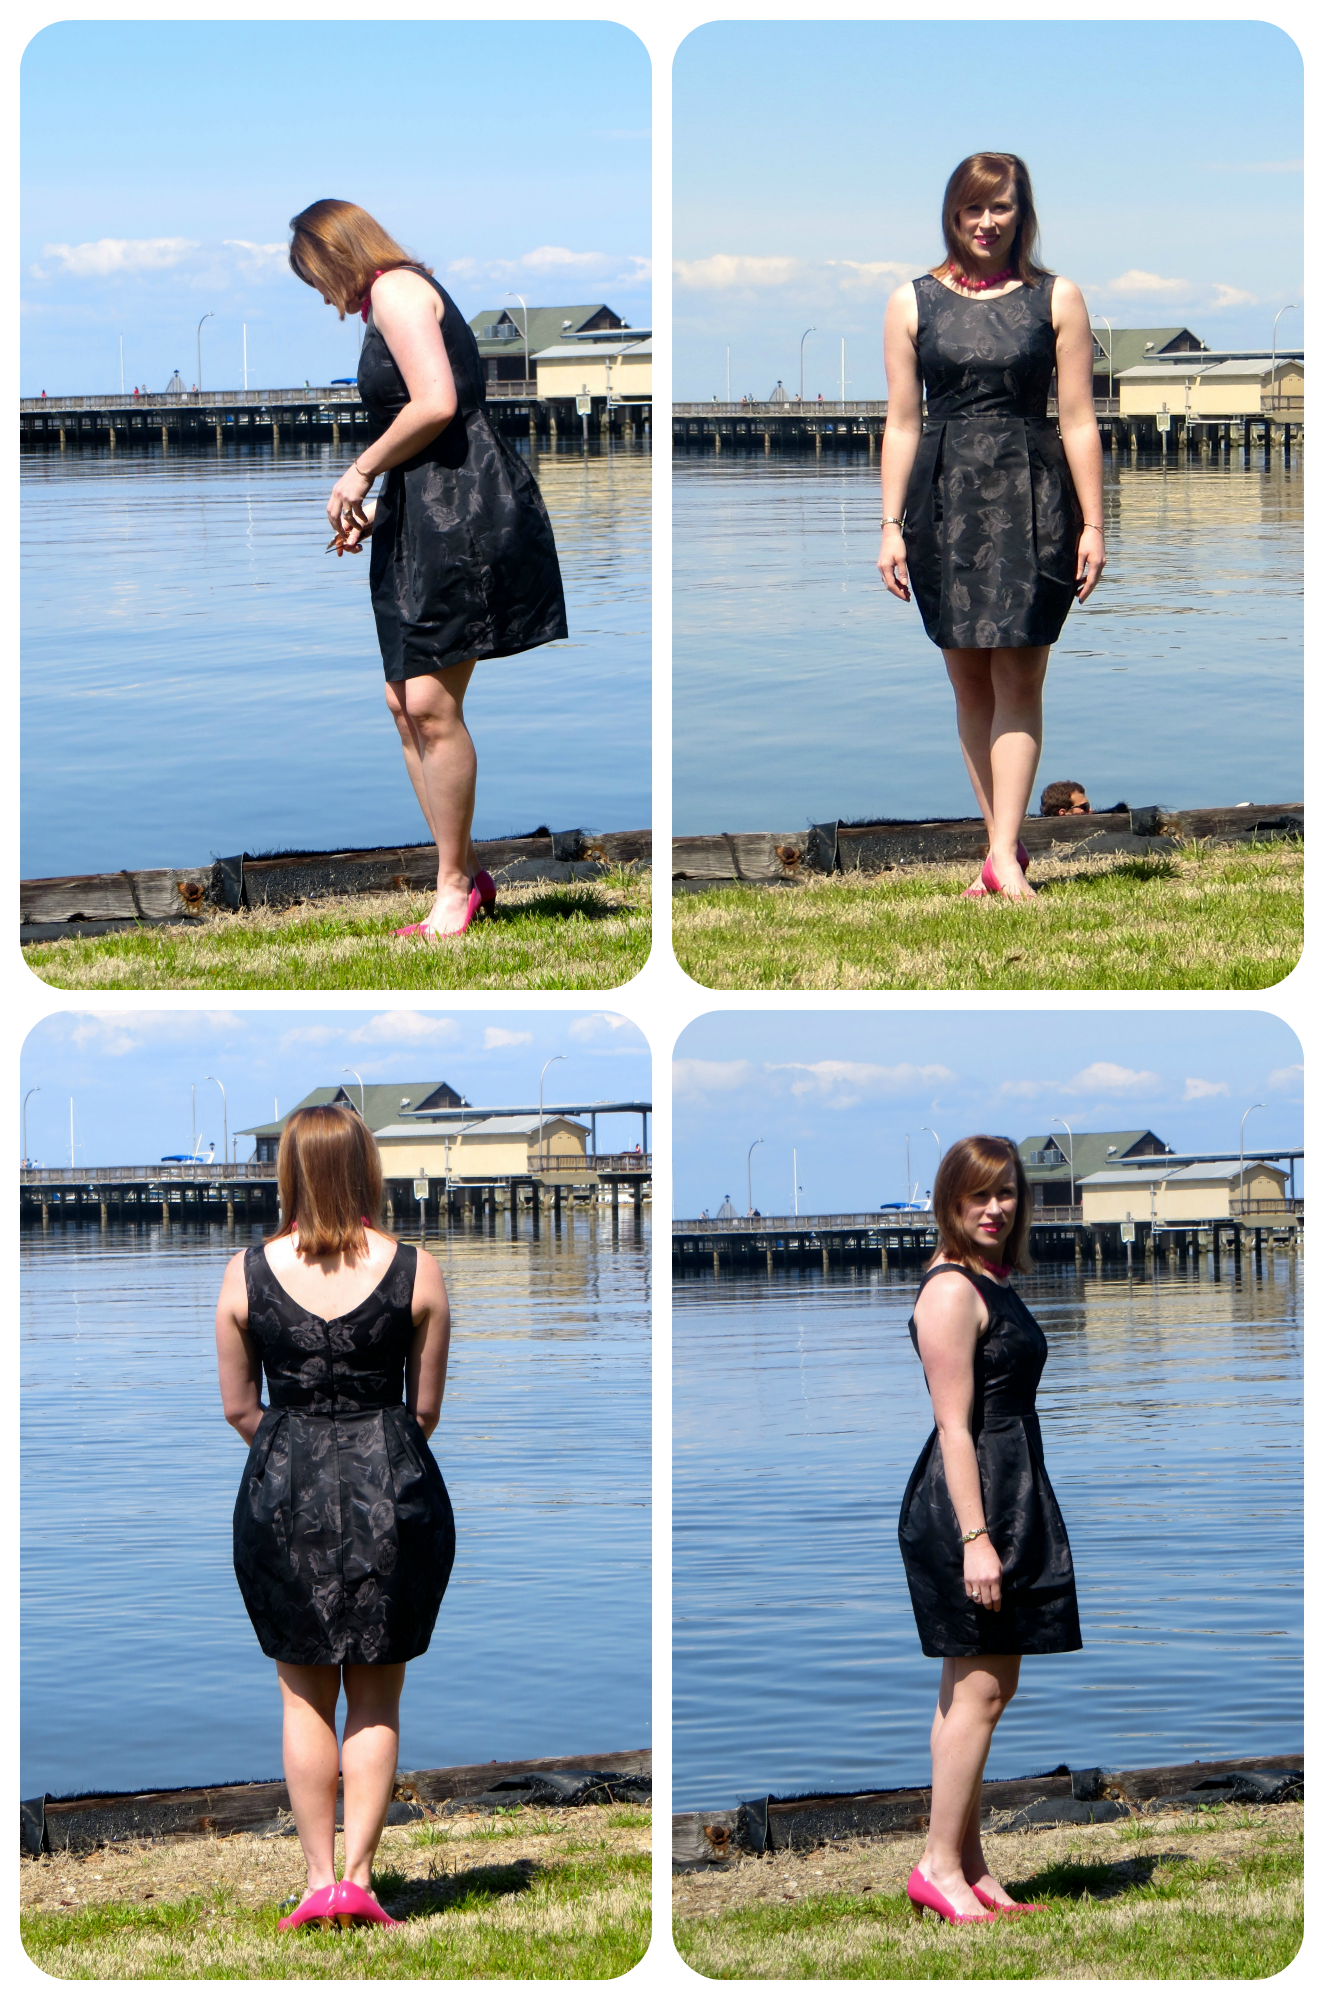
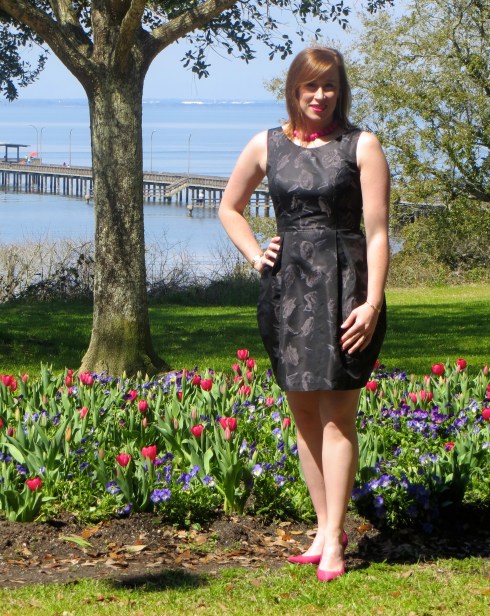
When I got the urge to make a dress a few weeks ago, I started browsing patterns and fabric. I selected a few potential patterns then found the fabric, and knew it would be a perfect match for the Elisalex dress. The fabric is a Thakoon silk/poly blend brocade with a crisp drape. I purchased it as a roll end from EmmaOneSock, which I think has to be my favorite fabric store of all because of the unique and high quality selection she offers as well as her wonderful customer service. The black background is scattered with what appears to be roses on first glance. However, upon closer inspection, you will notice that all the roses have female legs!

For the lining, I chose a hot pink silk charmeuse from my stash. I used a walking foot for the lining construction and this was a lifesaver!

Garnished with a beautiful matching azalea bloom.

Garnished with a beautiful matching azalea bloom.

I had right at 1.375 yards of this 55″ wide fabric and was temporarily disheartened when I saw the Elisalex called for 2.5 yards for the sleeveless version of the dress. After reading lots of reviews and blog posts about the dress, though, I decided I could probably squeeze this dress out with some modifications.

Elisalex bay front

My major modifications were to shorten the skirt by 10″ and to take in the hip seams by 2 sizes, tapering back to my size at the waist. As a result, I was able to get my dress cut out of my length of fabric. Yay!

elisalex tulips

Alright, so for all the alterations I made to get this great fit:

1. There is a helpful sew along for this dress on the By Hand London website. They recommend choosing your size based on your waist measurement then adjusting the bust to fit, if needed. I made a 3/4″ full bust adjustment to the US10. In the final version, I had to let out the side seams 1/4″ each and add 1/2″ to the front bodice length, so I think next time I will make a 1″ FBA and then compare the length to my current pattern. I will also lower the bust point a little next time.

2. I moved the shoulder seams forward by 1/2″ at the armscye and 1/4″ at the neckline.

3. I took a 1/2″ wedge out of the back neckline to prevent gaping. This seems to be a common alteration for most people who make the dress.

Now let’s talk about construction modifications:

1. I drafted a neckline facing because I like the way it looks and it prevents lining from peeking out at the neckline. I finished the edge of the facing with my serger (and hot pink thread), then I edgestitched it on top of my bodice lining pieces and then treated them as one for the rest of construction. Next time I will make an all-in-one facing to include the armholes and I may consider finishing the edge of the facing with bias binding.

Elisalex lining

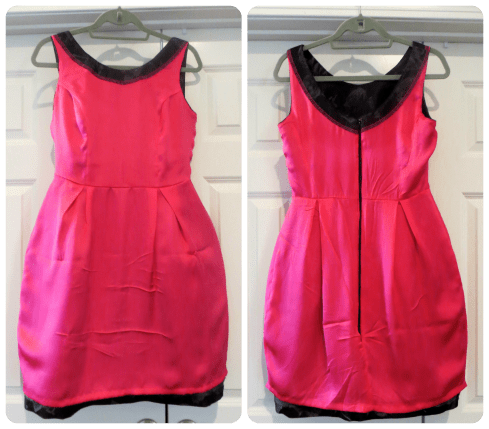
2. I made a full lining instead of only lining the bodice. I cut the lining skirt a little shorter than the shell skirt and cut it a little more slender at the hips as well. After attaching the bodice lining to the bodice shell, I attached the lining skirt to the bodice lining.

IMG_2452

Look at the matching of the waistline across the zipper and the pleats at the princess seams!

3. I used a tutorial in the recent Threads magazine (#171) to install the zipper — a lapped zipper completely done by machine in a dress with a full lining! This is an awesome technique and I am so glad I found it. I strayed from the directions only in that I hand picked the overlap because I like to give my fancier garments a small element of handwork. And handpicking always works better for me since I can really get the waist seam lined up straight.

IMG_2460

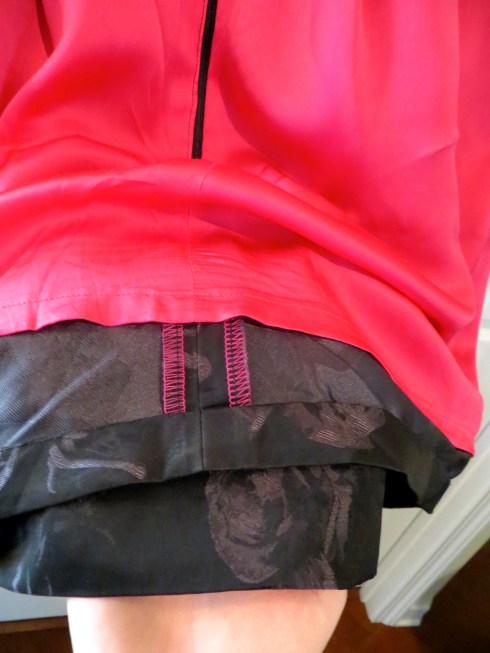
4. I hand stitched a nice blind hem on the shell fabric. If you are making this pattern, add a small allowance at the side seams for the hem. On such a tapered skirt, the turned up portion of fabric is smaller than what you are stitching to so adding a little ease in the hem at the side seams fixes this and prevents puckering.

elisalex hanging

So those are the gory details about my latest project. It was definitely a satisfying make and one I think I will cherish for quite a while.

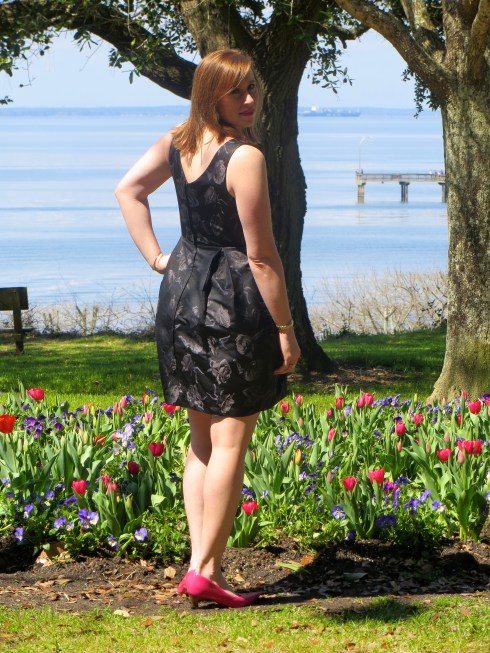
Like I mentioned before, I have entered this dress into two different contests. If you are a Pattern Review member and would like to vote in that contest, your chance starts on 3/18 and ends on 3/24. As for the Dolly Clackett contest, I think my dress suits Roisin because it is one of her favorite patterns and the fabric is very quirky, like one she would choose.  I also paired the dress with some fun shoes — hot pink heels — another trademark of the aforementioned lady.

Mr. Homemaker prefers the other side of the camera lens :)-

Mr. Homemaker prefers the other side of the camera lens :)-

And just a note on the scenes in my dress photos. All these were taken by my sweet husband at our local bay front park. This is one of my favorite times of year because everything is starting to bloom and the azaleas are coming out. Thanks for reading!

IMG_2431

Heavenly Dark Chocolate Waffles

6 Mar
I am stealing Bon Appetit's photo because it looks so much more appetizing than mine. But I promise mine were delightfully tasty!

I am stealing Bon Appetit’s photo because it looks so much more appetizing than mine. But I promise mine were delightfully tasty!

Are you prepared to enter breakfast Nirvana? If so, go ahead and make these waffles this weekend, or tomorrow, or maybe even for dinner tonight. They are that good!

Keeping up with my recent habit of finding recipes in magazines, this one came from the February issue of Bon Appetit. Out of the entire section of chocolate recipes, these waffles spoke to me the most. So we had them for breakfast that very Saturday. And Sunday. And the next Saturday. And my stepson heats the leftovers up in the toaster on school mornings…

Suffice it to say, this recipe will become a permanent staple in our weekend breakfast routine. Yes, it is a little fussy, but if you prepare everything before you start mixing, it really doesn’t take that long to throw together. And the effort is SO worth it!

chocolate waffle prep

At first I thought the idea of syrup on a chocolate waffle was abominable but it ends up that it is quite delicious. And with some bacon and a glass of milk on the side, it is perfect.

The original recipe makes about 12 waffles but I reduce it to 1/2 or 1/3 most of the time to serve 2 or 3 people (2 or 3 waffles apiece). But I am including the full-sized version here — waffles for 6! Plus, if you make a full batch but don’t eat them all, they do freeze really well and are easy to pop in the toaster to heat back up (just stick it in frozen).

So what are you waiting for? Add this to your shopping list and you recipe queue immediately!

finished choc waffles

Dark Chocolate Waffles

  • 2 cups all-purpose flour
  • ½ cup unsweetened cocoa powder (I used Dutch-processed)
  • ¼ cup packed brown sugar
  • 2 teaspoons baking powder
  • 1 teaspoon baking soda
  • 1 teaspoon kosher salt
  • 3 large eggs, separated
  • 2 cups buttermilk
  • ½ cup olive oil
  • 1 teaspoon vanilla extract
  • 6 oz. bittersweet chocolate (at least 70% cacao), finely chopped
  • Nonstick vegetable oil spray
  • Unsalted butter and warm pure maple syrup (for serving)

Preheat oven to 250°. Whisk flour, cocoa powder, brown sugar, baking powder, baking soda, and salt in a large bowl. Make a well in the center

and add egg yolks, buttermilk, oil, and vanilla. Blend with a fork, then gradually incorporate dry ingredients, mixing until just combined.

Using an electric mixer on medium-high speed, beat egg whites in a small bowl until soft peaks form. Working in 2 batches, fold egg whites into batter just until combined. Fold in chopped chocolate.

Heat a waffle iron until very hot; lightly coat with nonstick spray. Working in batches, cook waffles until cooked through. Transfer to a wire rack set inside a baking sheet, cover loosely with foil, and keep warm in oven until ready to serve.

Serve waffles with butter and syrup.

DO AHEAD: Batter with egg whites can be made 4 hours ahead. Cover and chill. Cooked waffles can be wrapped in plastic wrap and frozen then reheated with one or two rounds in the toaster.

Adapted from Bon Appetit February 2014.

IMG_2130

Oven-Roasted Bacon

5 Mar

Or, the only bacon I can cook without burning…

Me cooking bacon had become a joke in our house — it always ended up burned no matter the method I employed. Enter the oven-roasting technique. Now my bacon cooking is no longer a laughing  matter. Instead it is a finger-licking, lip-smacking matter. My husband may never fry bacon in the skillet again, either.

The method is great because it yields consistent results, practically no mess, and — the best part — flat bacon slices!

To get started, line a baking sheet with foil, making sure to completely cover the pan. This step ensures clean up takes about two seconds.

IMG_2320

Next, lay your bacon flat and not overlapping on the baking sheet. We like Wright’s Hickory Smoked Bacon, but you can use your favorite.

Put the sheet in the oven on the center rack and shut the door. Turn the oven on and heat to 400 degrees (you do not have to preheat). At the same time, set your timer for 18 minutes.

IMG_2333

When the time is up, check the bacon. It should be sizzling and just starting to brown/curl around the edges. If it’s not, give it a few more minutes but watch it closely.

IMG_2336

If it is, take it out and transfer the bacon slices to a plate lined with paper towels to absorb the excess oil. Cool briefly then chow down.

IMG_2337

To clean up, drain your bacon grease into a small cup or bowl if you want to save it for future recipes; discard it if not. Next, carefully peel the foil off the pan and throw it in the trash.

Now sit down to your delicious breakfast. And stay tuned, I have another breakfast delicacy coming your way soon!

Adapted from this recipe.

Megan Nielsen Tania Culottes — Take 1

3 Mar

Hi, friends! Today I am showing you more of my “resort collection” that I created for my recent cruise vacation (you can see the first installment here).

IMG_2236

When I first saw the Tania culotte pattern from Megan Nielsen, I wasn’t sold on it. I guess I have too many scary memories of culottes from the 80s.

But as more and more versions popped up across the interwebs, the ingenious design started to grow on me and I gave in. For those of you not familiar with this pattern, it appears to be a cute circle skirt but it has pleats in the front and back that disguise the shorts aspect of the garment. Really cool if you ask me!

IMG_2252

I decided to make my first version up without any alterations. I just chose my size based on my waist, and cut it out and stitched it up. This first version is definitely wearable but is a little short in the crotch. In subsequent versions, I have added a little length to the back crotch.

You will notice from the pattern cover that these culottes run short. On this version, I cut the medium for everything except I cut the XL for the length. Even with the extra 1″ or so, they are still really short and a good gust of wind will have you inadvertently revealing your bloomers.

images

For my fabric, I chose a cheap ($1.99/yd) poly crepe with great drape. I picked this up from a recent FabricMart sale and it was perfect for this application.

IMG_2228

For construction, I followed the instructions for the most part. I sewed down the waist facing by topstitching from the right side. I installed an invisible zipper and attached the waistband facing to the zipper by machine.

For the hem, I let the culottes hang for a few days then my husband helped me level it up with his laser level (thanks, honey!). The rolled hem function on my serger made quick work of what would have otherwise been a very tedious job — these things have miles of hem!

IMG_2165

These shorts are definitely lots of fun to wear on non-windy days. I already have one other finished pair and another almost done on my sewing table. Stay tuned!

IMG_2184

McCall’s 6559 Again — Poster City

2 Mar

IMG_2122

Hello, again! Are you shocked by my three posts in as many days? Can I just tell you what a backlog of things I have to share — both food and sewing related. But I digress…

This dress is the first installment in my “resort collection,” or the things I sewed up to go on a cruise at the beginning of February (a total of 5 things).

You have seen me in this pattern before but in the maxi length version.

images

I made only minor adjustments to this version beyond what I made in the last one — only widened the back armhole to normal instead of racer-style, raised the neckline 1″, and took another 1/2″ out for a swayback adjustment and added it back in over my derriere to keep the hem level. I also trimmed the seam allowances down to 1/4″ to make it easier to serge.

The fabric is an awesome rayon/lycra 4-way knit that I got from Emma One Sock a little while back — called “Poster City.” And this is your lucky day! She still has some in stock!!

IMG_2118

I constructed the entire thing on my serger, using a 4-thread overlock for the seams and my coverstitch function for the bands and hem. I used the elastic foot to insert elastic into the neckline for stability. This could also be used for the shoulder seam if sleeves were included.

IMG_2126

I don’t guess there’s much else to say about this one other than it won’t be my last!

IMG_2119

Flirty Skirt — McCall’s 6706

1 Mar

IMG_2106

Hi, friends! I am finally sharing a completed sewing project with you. It feels like it has been ages!! Want to know the best part? It’s been about 6 months since I made this but since I wore it to work recently, I decided to snap some pictures and share it with you.

IMG_2096

Be warned, though, this photo shoot took place after 10 hours at work and seeing 40+ patients. You will see wrinkles, stringy hair, and a tired face. And since I conducted this photo shoot with the timer on my camera, my head or feet may be missing in some photos 🙂

M6706

This skirt is made from McCall’s 6706, a great little pattern for a quick and satisfying project. I have not become a huge fan of the hi-low hems yet, but I thought this skirt made in some free fabric would be a great way to test it out. The fabric was a remnant given to me when I went fabric shopping in NYC. It came from Elliot Berman and I am guessing it is rayon challis. It was easy to sew and has a light, floaty feel.

IMG_2103

As for the pattern, it was very easy to sew up and required minimal fitting. All you have to do is select your size based off the finished waist measurement printed on the tissue. I looked for the size that was closest to my waist +1″ of ease. Since it is so full in the hips, adjustments there will likely not be necessary.

IMG_2111

I installed an invisible zipper and finished the waistband facing by stitching in the ditch from the right side. The hem is a narrow 1/4″ machine hem using this tutorial. No hand stitching on this baby!

IMG_2114

My only regret is that I should have used a sturdier interfacing in the waistband.

IMG_2116

And that I don’t look good from behind in this hi-low hem skirt 😦

Oh well. Live and learn!