Archive | Breakfast RSS feed for this section

Our Favorite Biscuits | Gruyere Biscuits | The Ravenous Pig

9 Sep

Last fall we went to Orlando, Florida for work/fun. While there we tried out the restaurant Cask and Larder. It was delicious and before leaving I purchased the cookbook from their sister restaurant, The Ravenous Pig. I perused the book on the trip home and decided the first thing I had to make were these Gruyère Biscuits. And I have made them at least a dozen times since then.

They are great for any meal. I love them for breakfast with a little butter and homemade peach jam. But they are also good with dinner in the place of your traditional biscuit. I have even cubed the leftovers and made croutons for salad!

This recipe employs some basic pastry making techniques that may or may not be familiar to you. But don’t let that stop you from trying these out. They are definitely worth the effort. You can also make a double batch and freeze the uncooked biscuits to pop in the oven later. Just put the frozen biscuits on your baking sheet and place in the preheated oven. You will need to bake just a few minutes longer.


IMG_2792

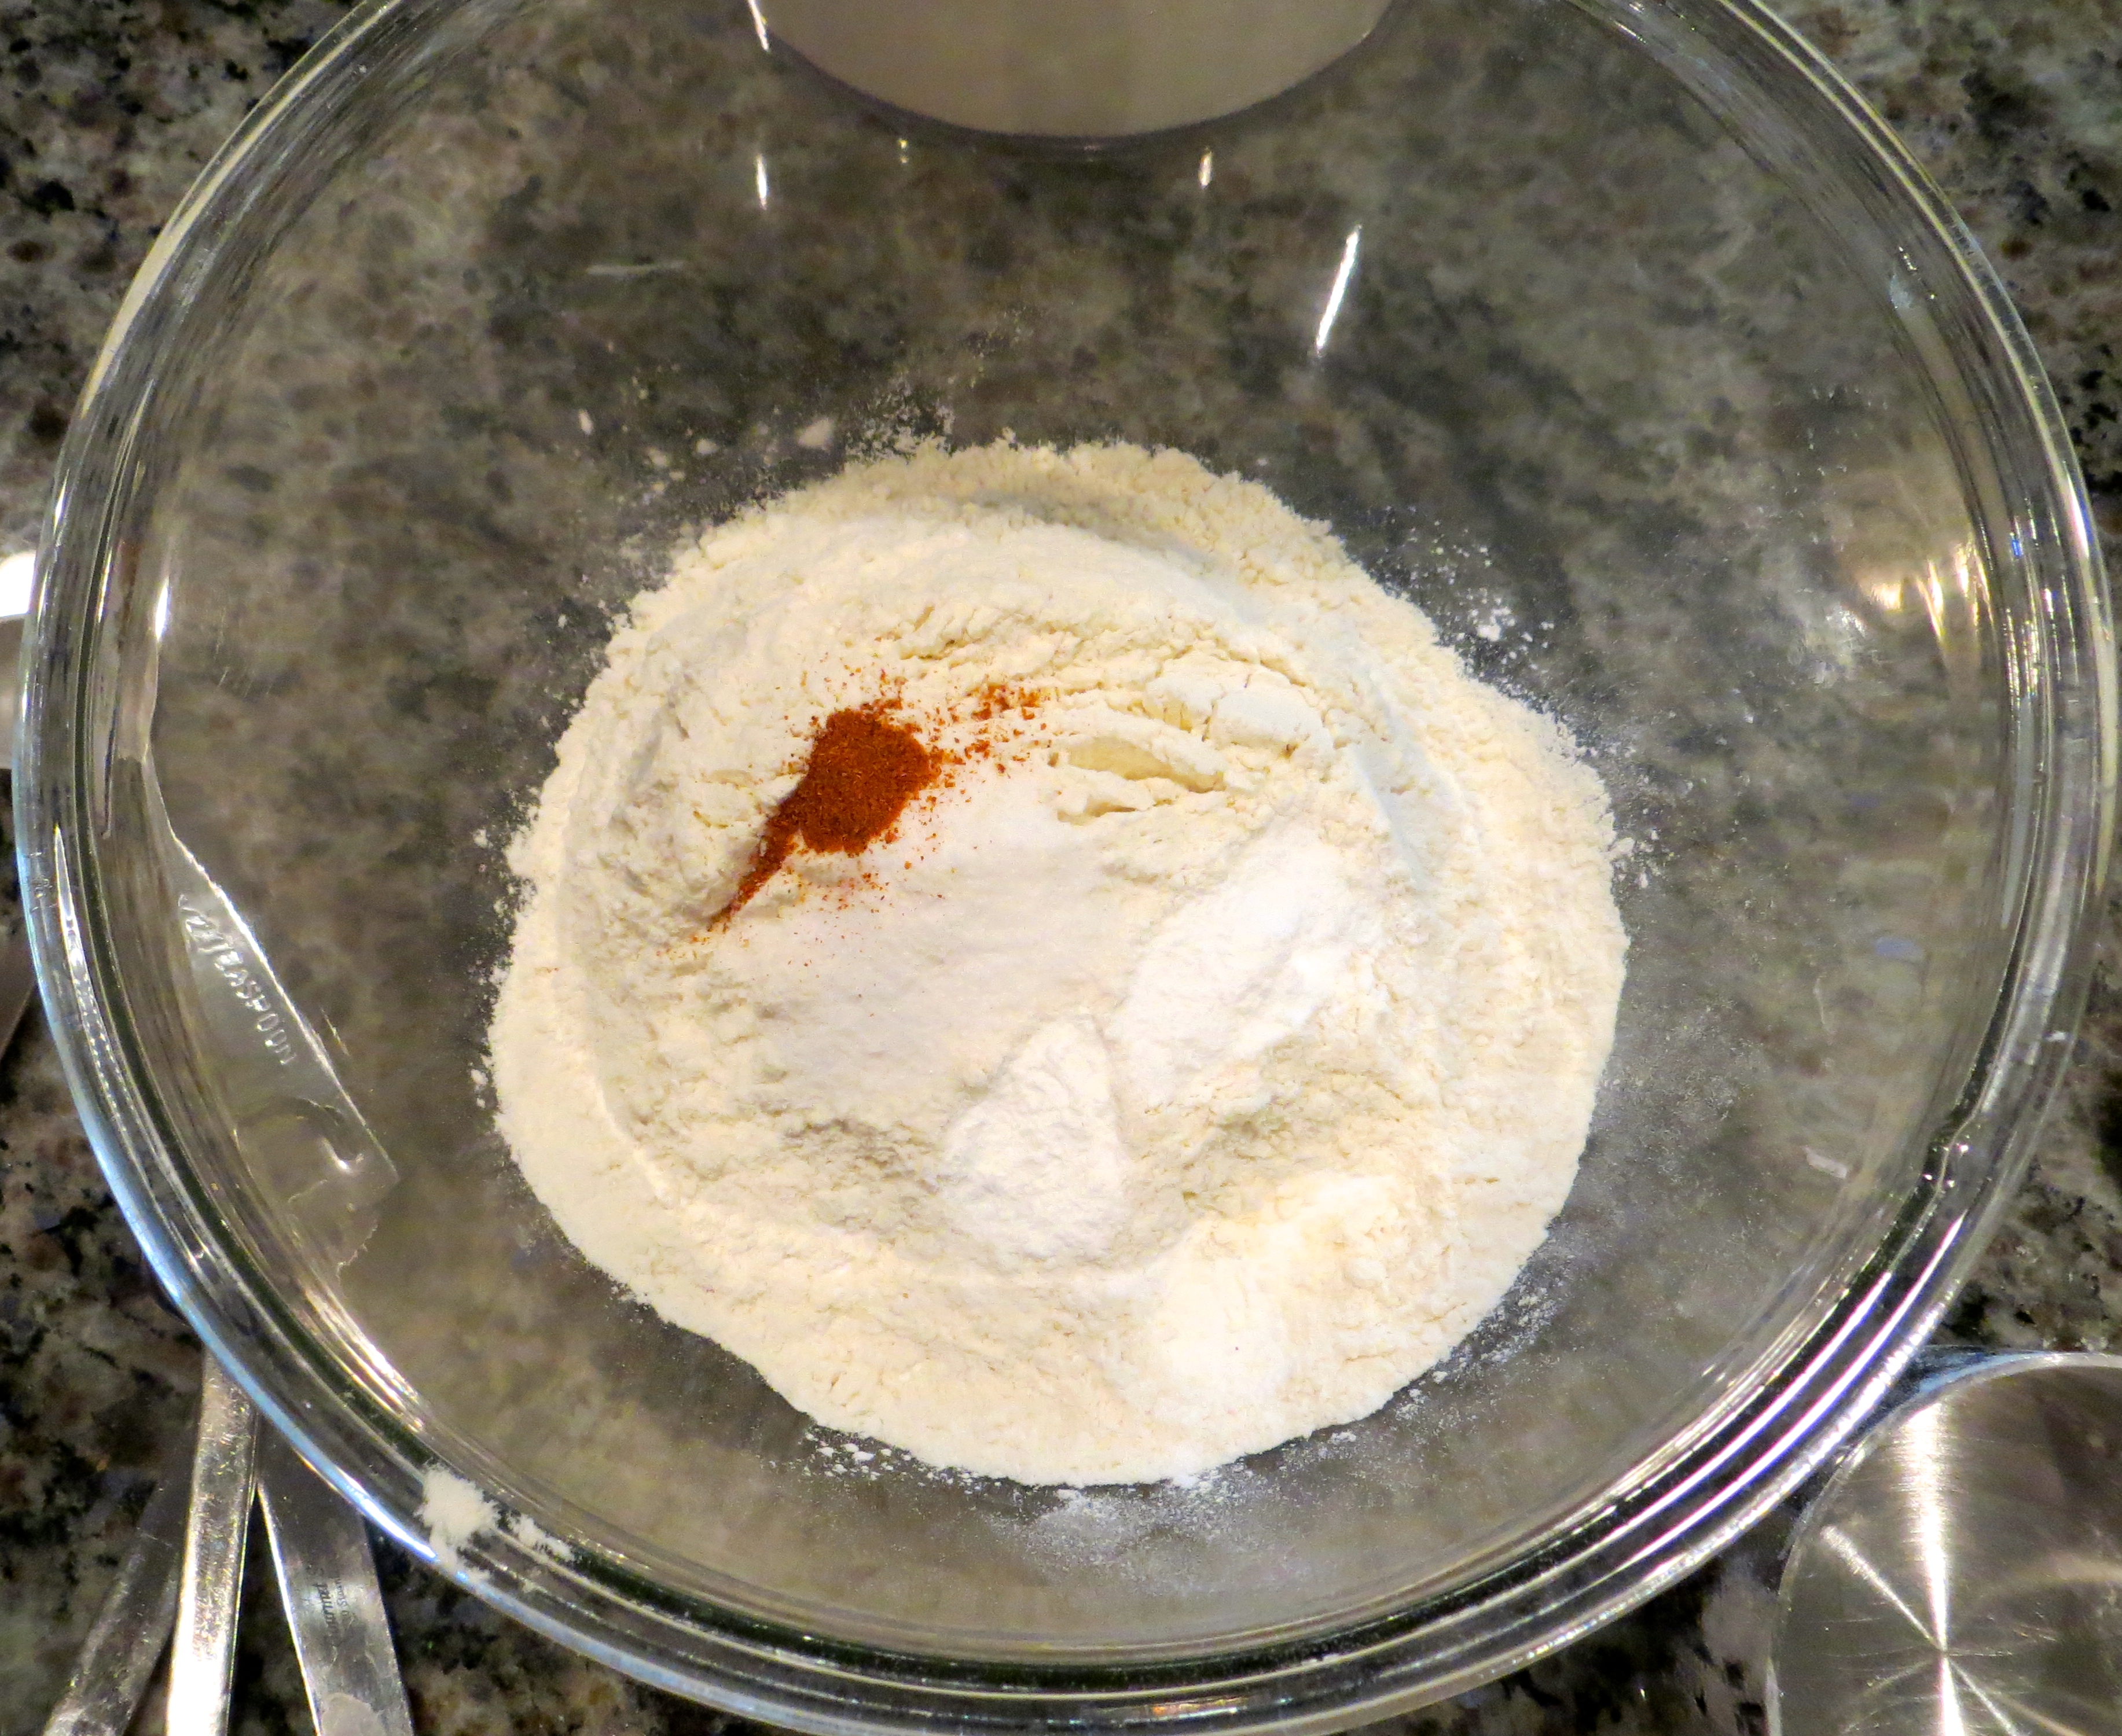
First, combine all your dry ingredients in a bowl.


IMG_2794

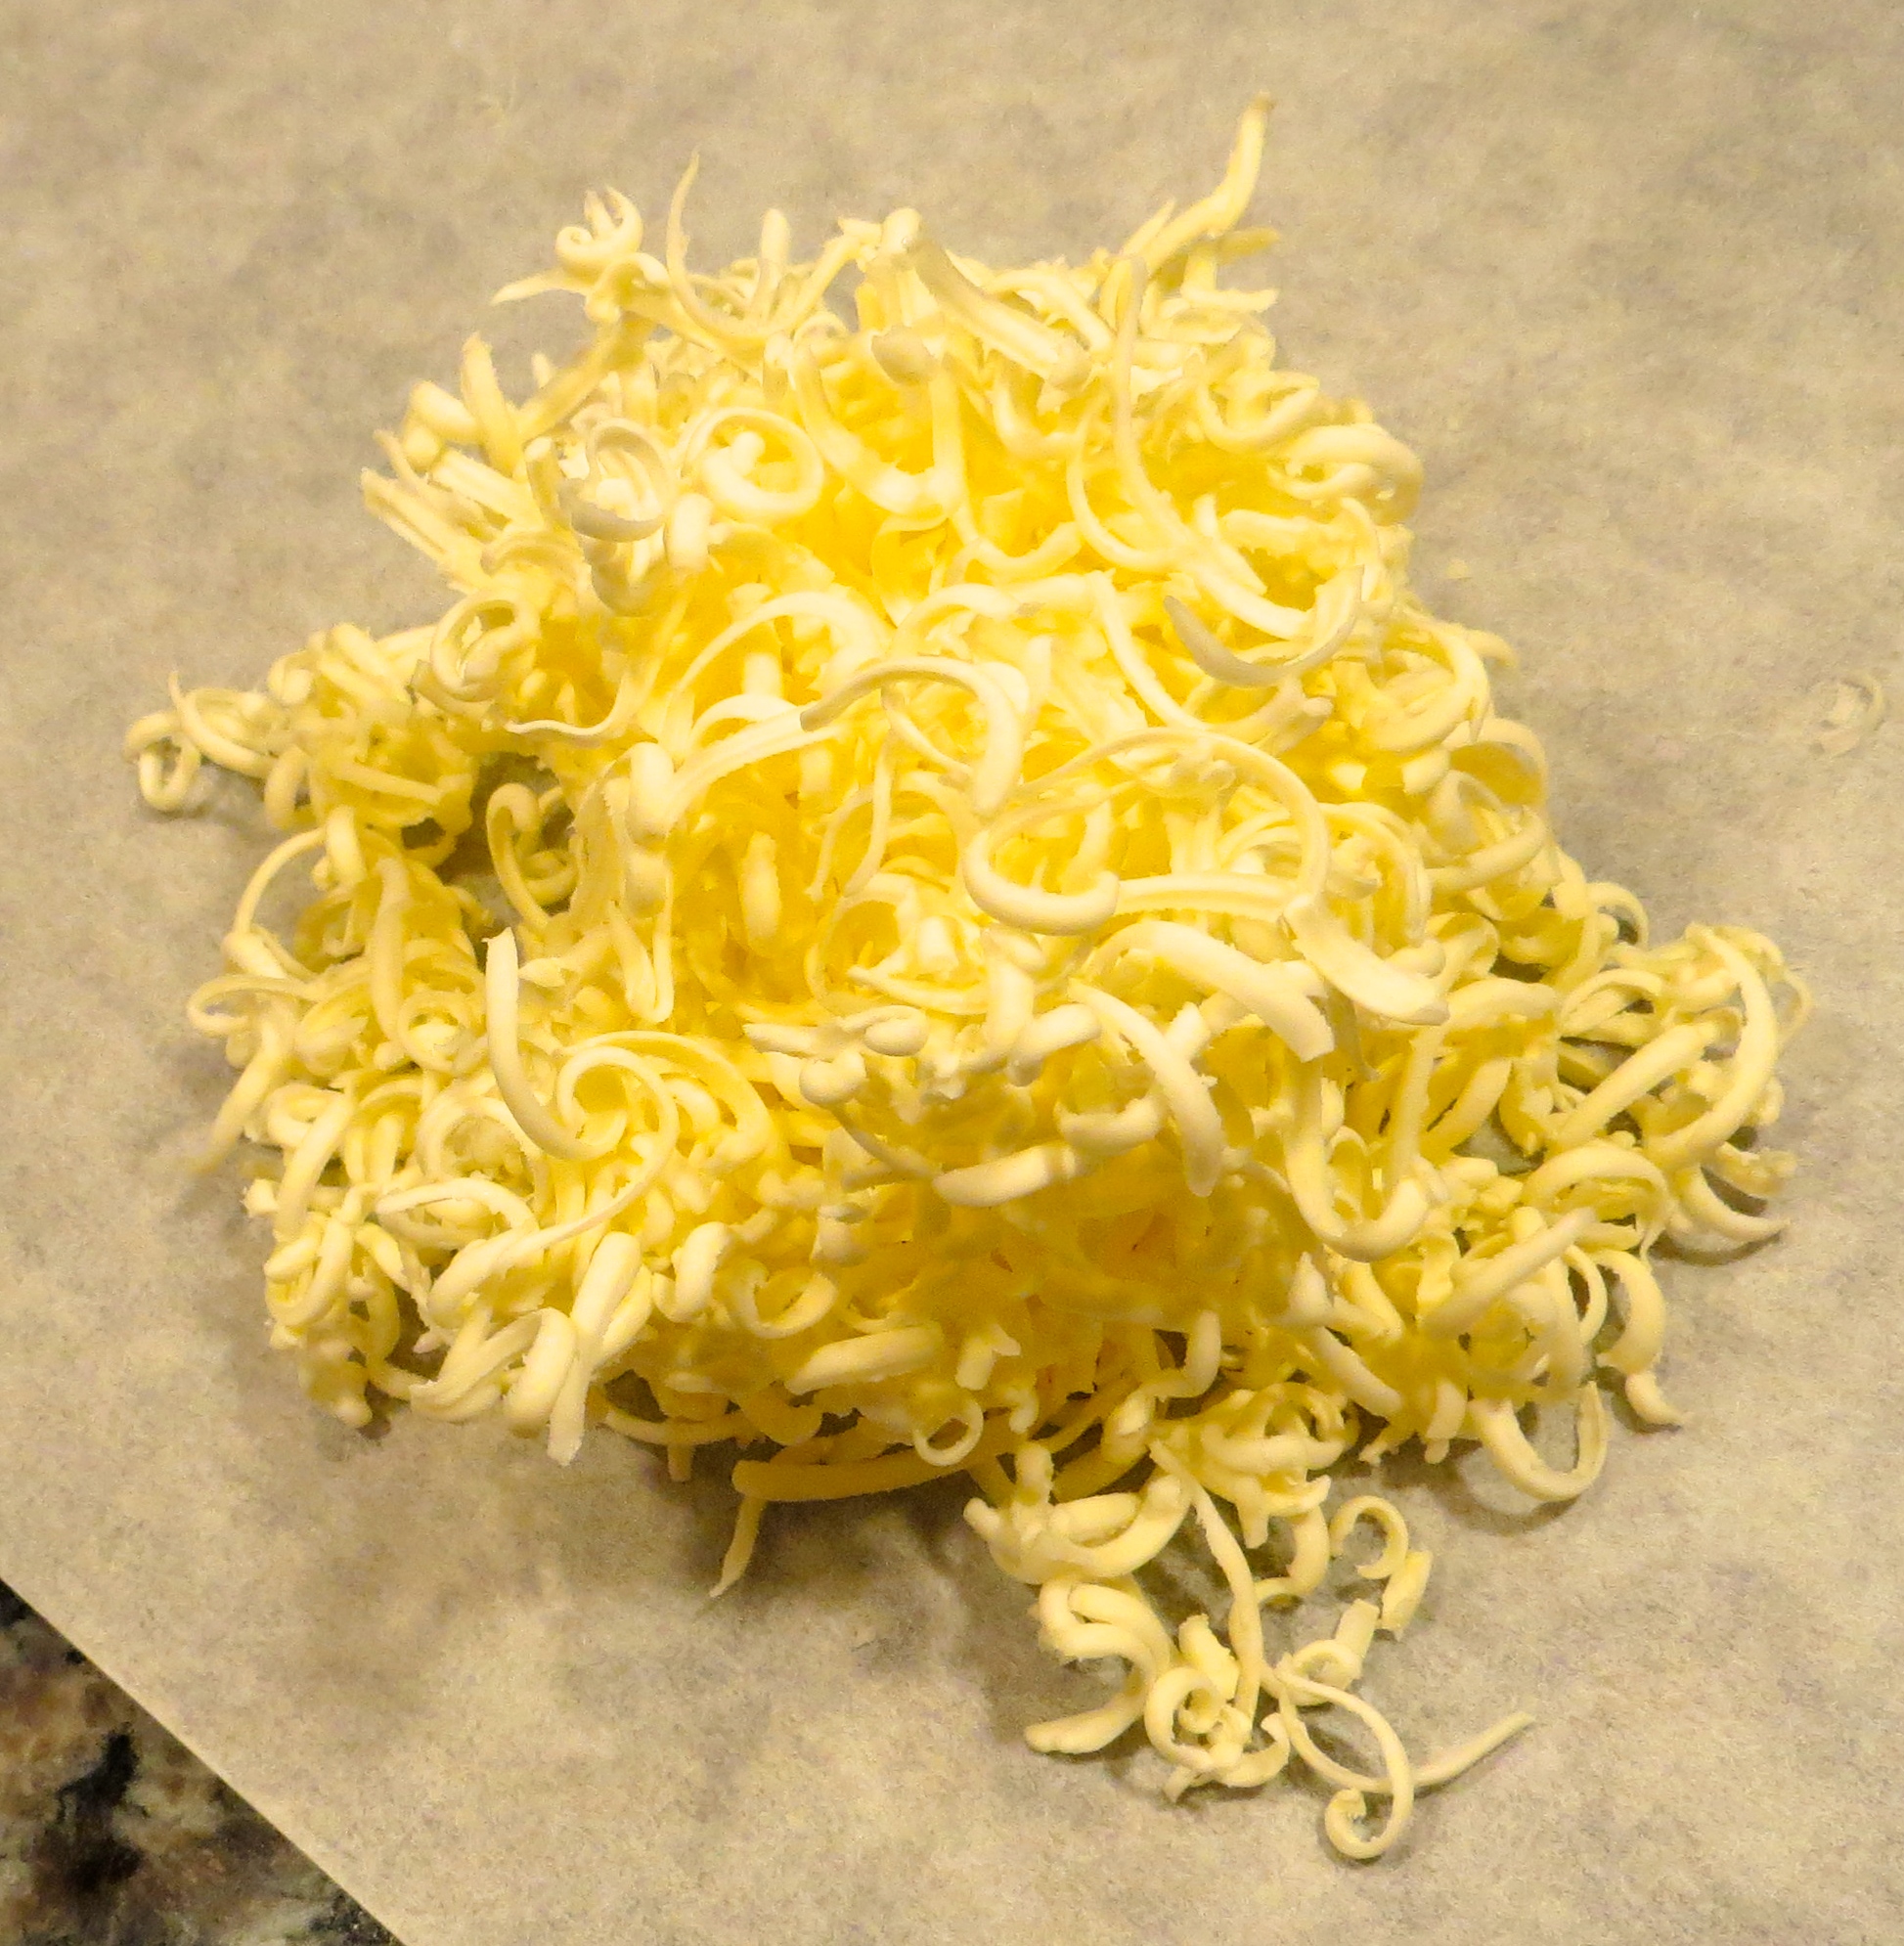
Then, grate your frozen butter using a box grater.


IMG_2796

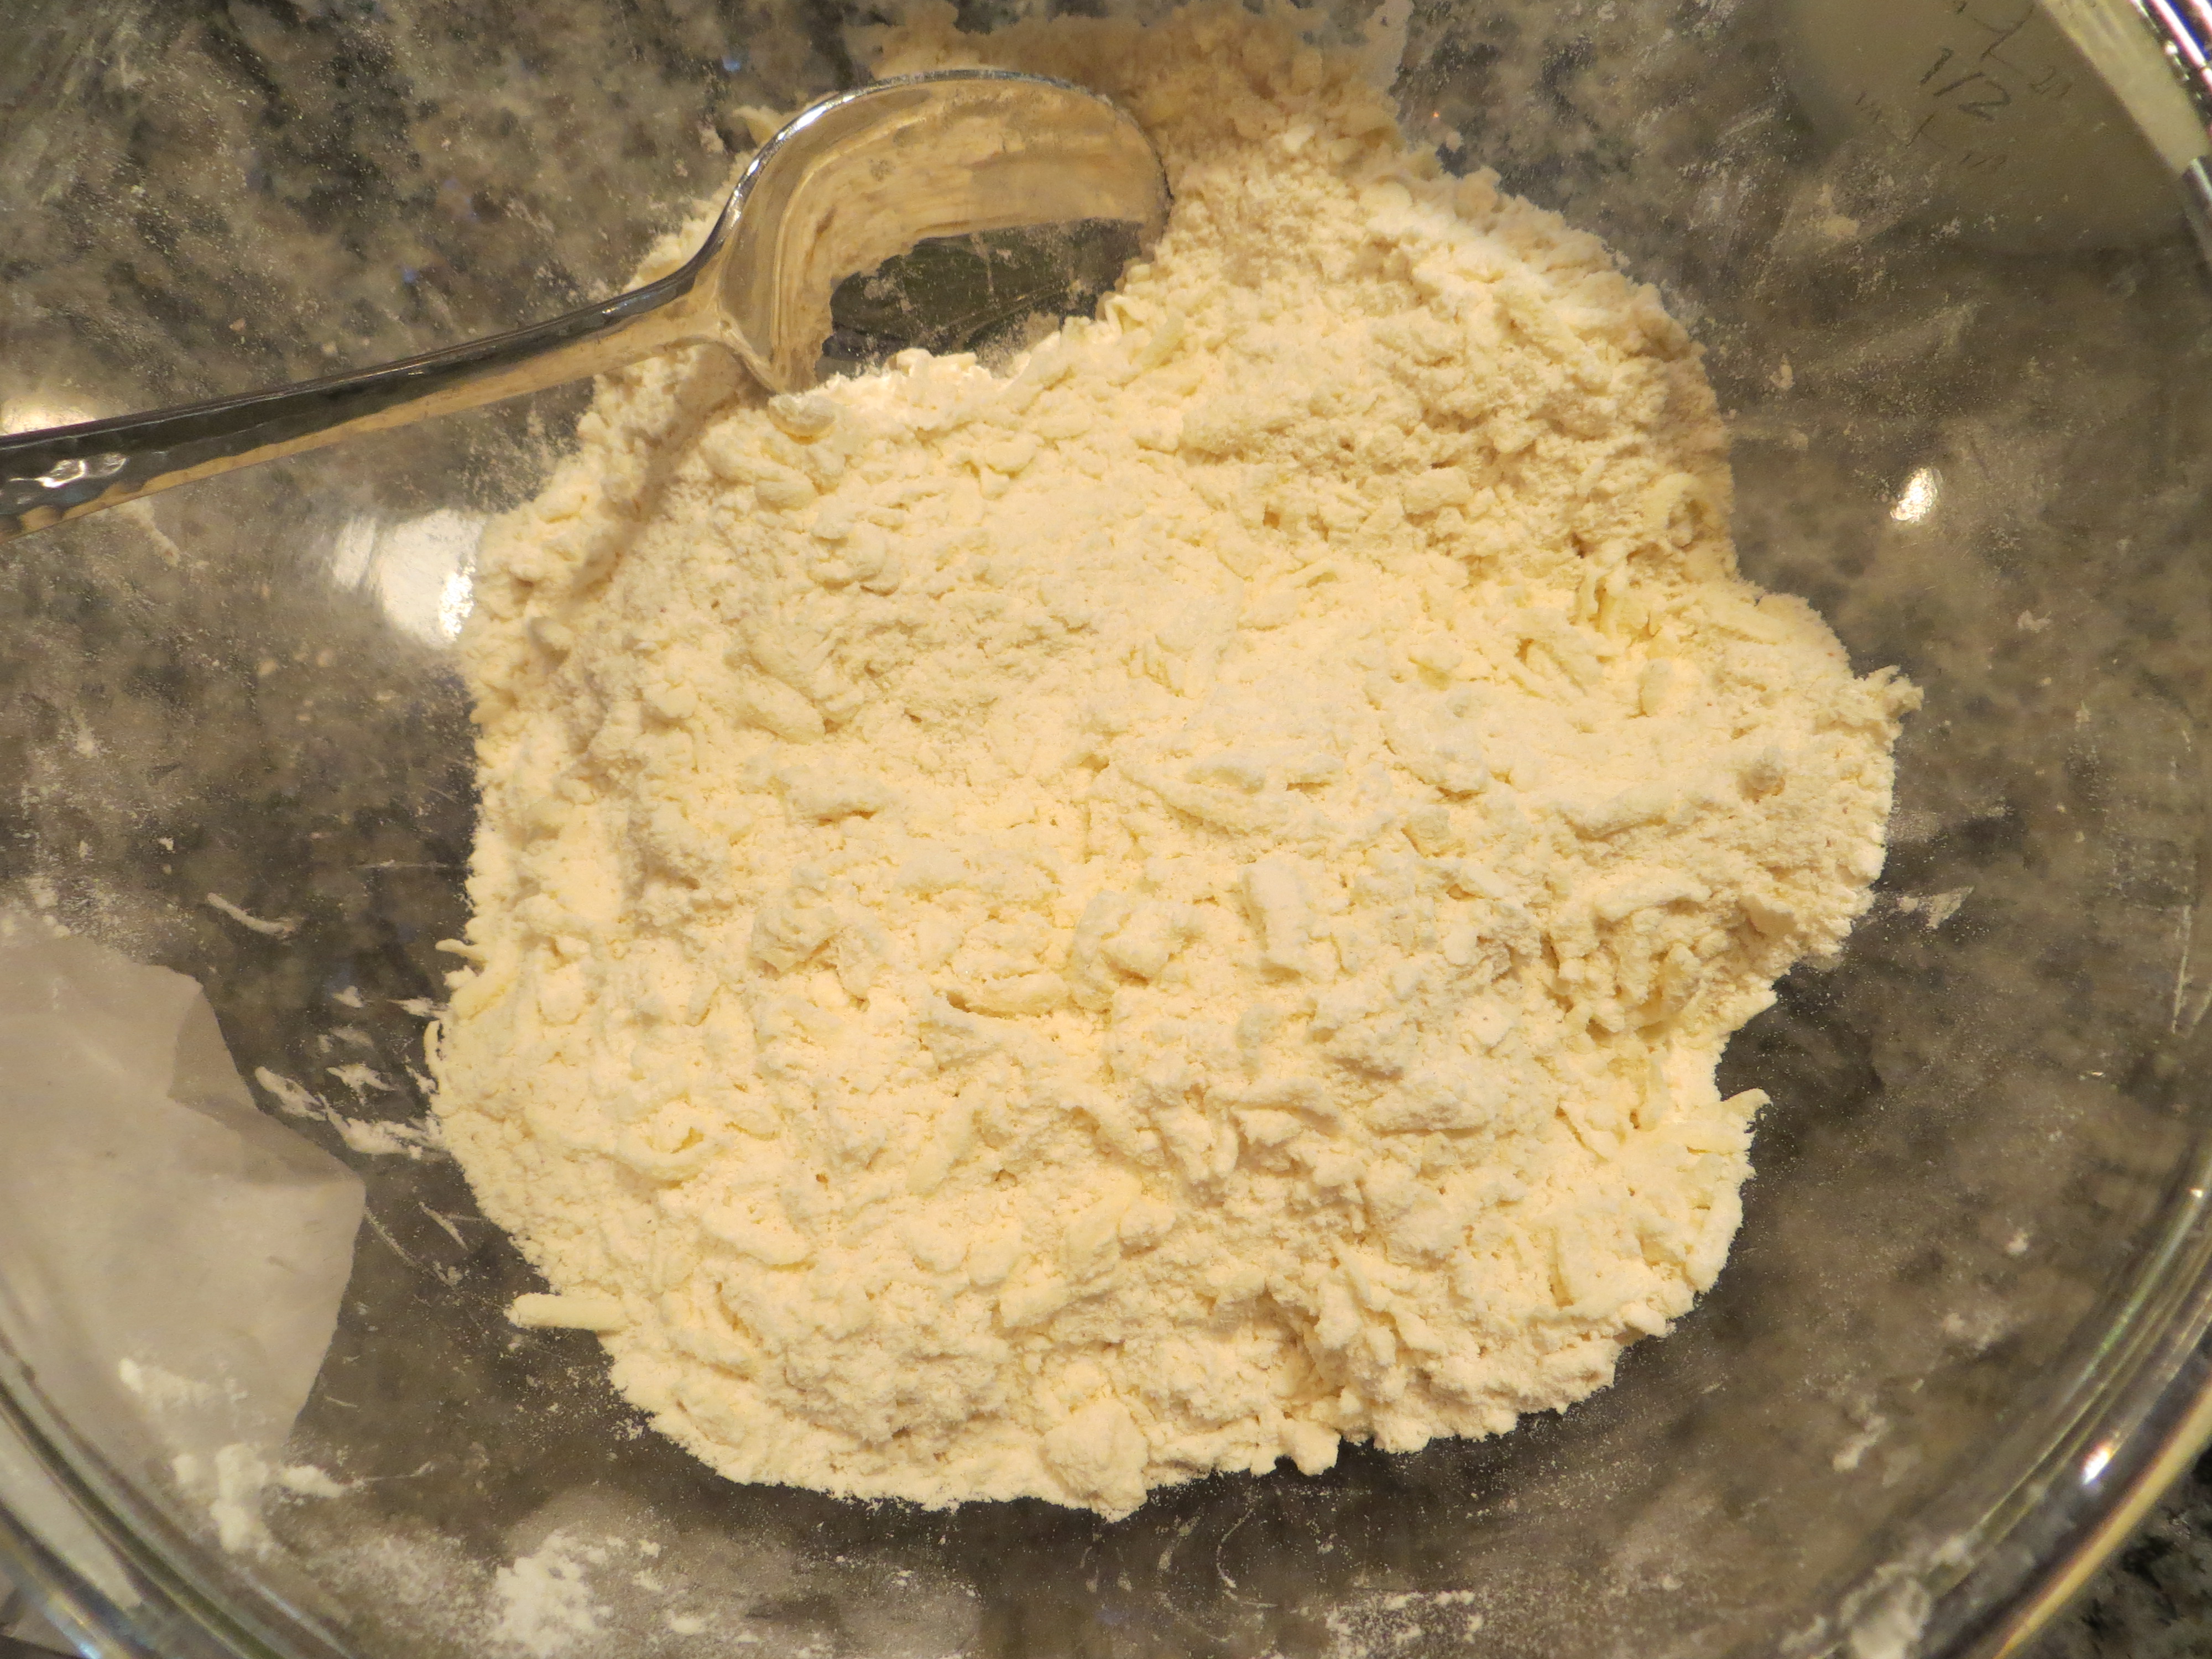
Work the butter into the dry ingredients with your fingers until it resembles coarse meal. This shouldn’t take too long since the butter is already in such small pieces.


IMG_2797

Now stir in the cream and buttermilk just until mixed. The dough will look rough and shaggy but will pull away from the sides of the bowl.


IMG_2799

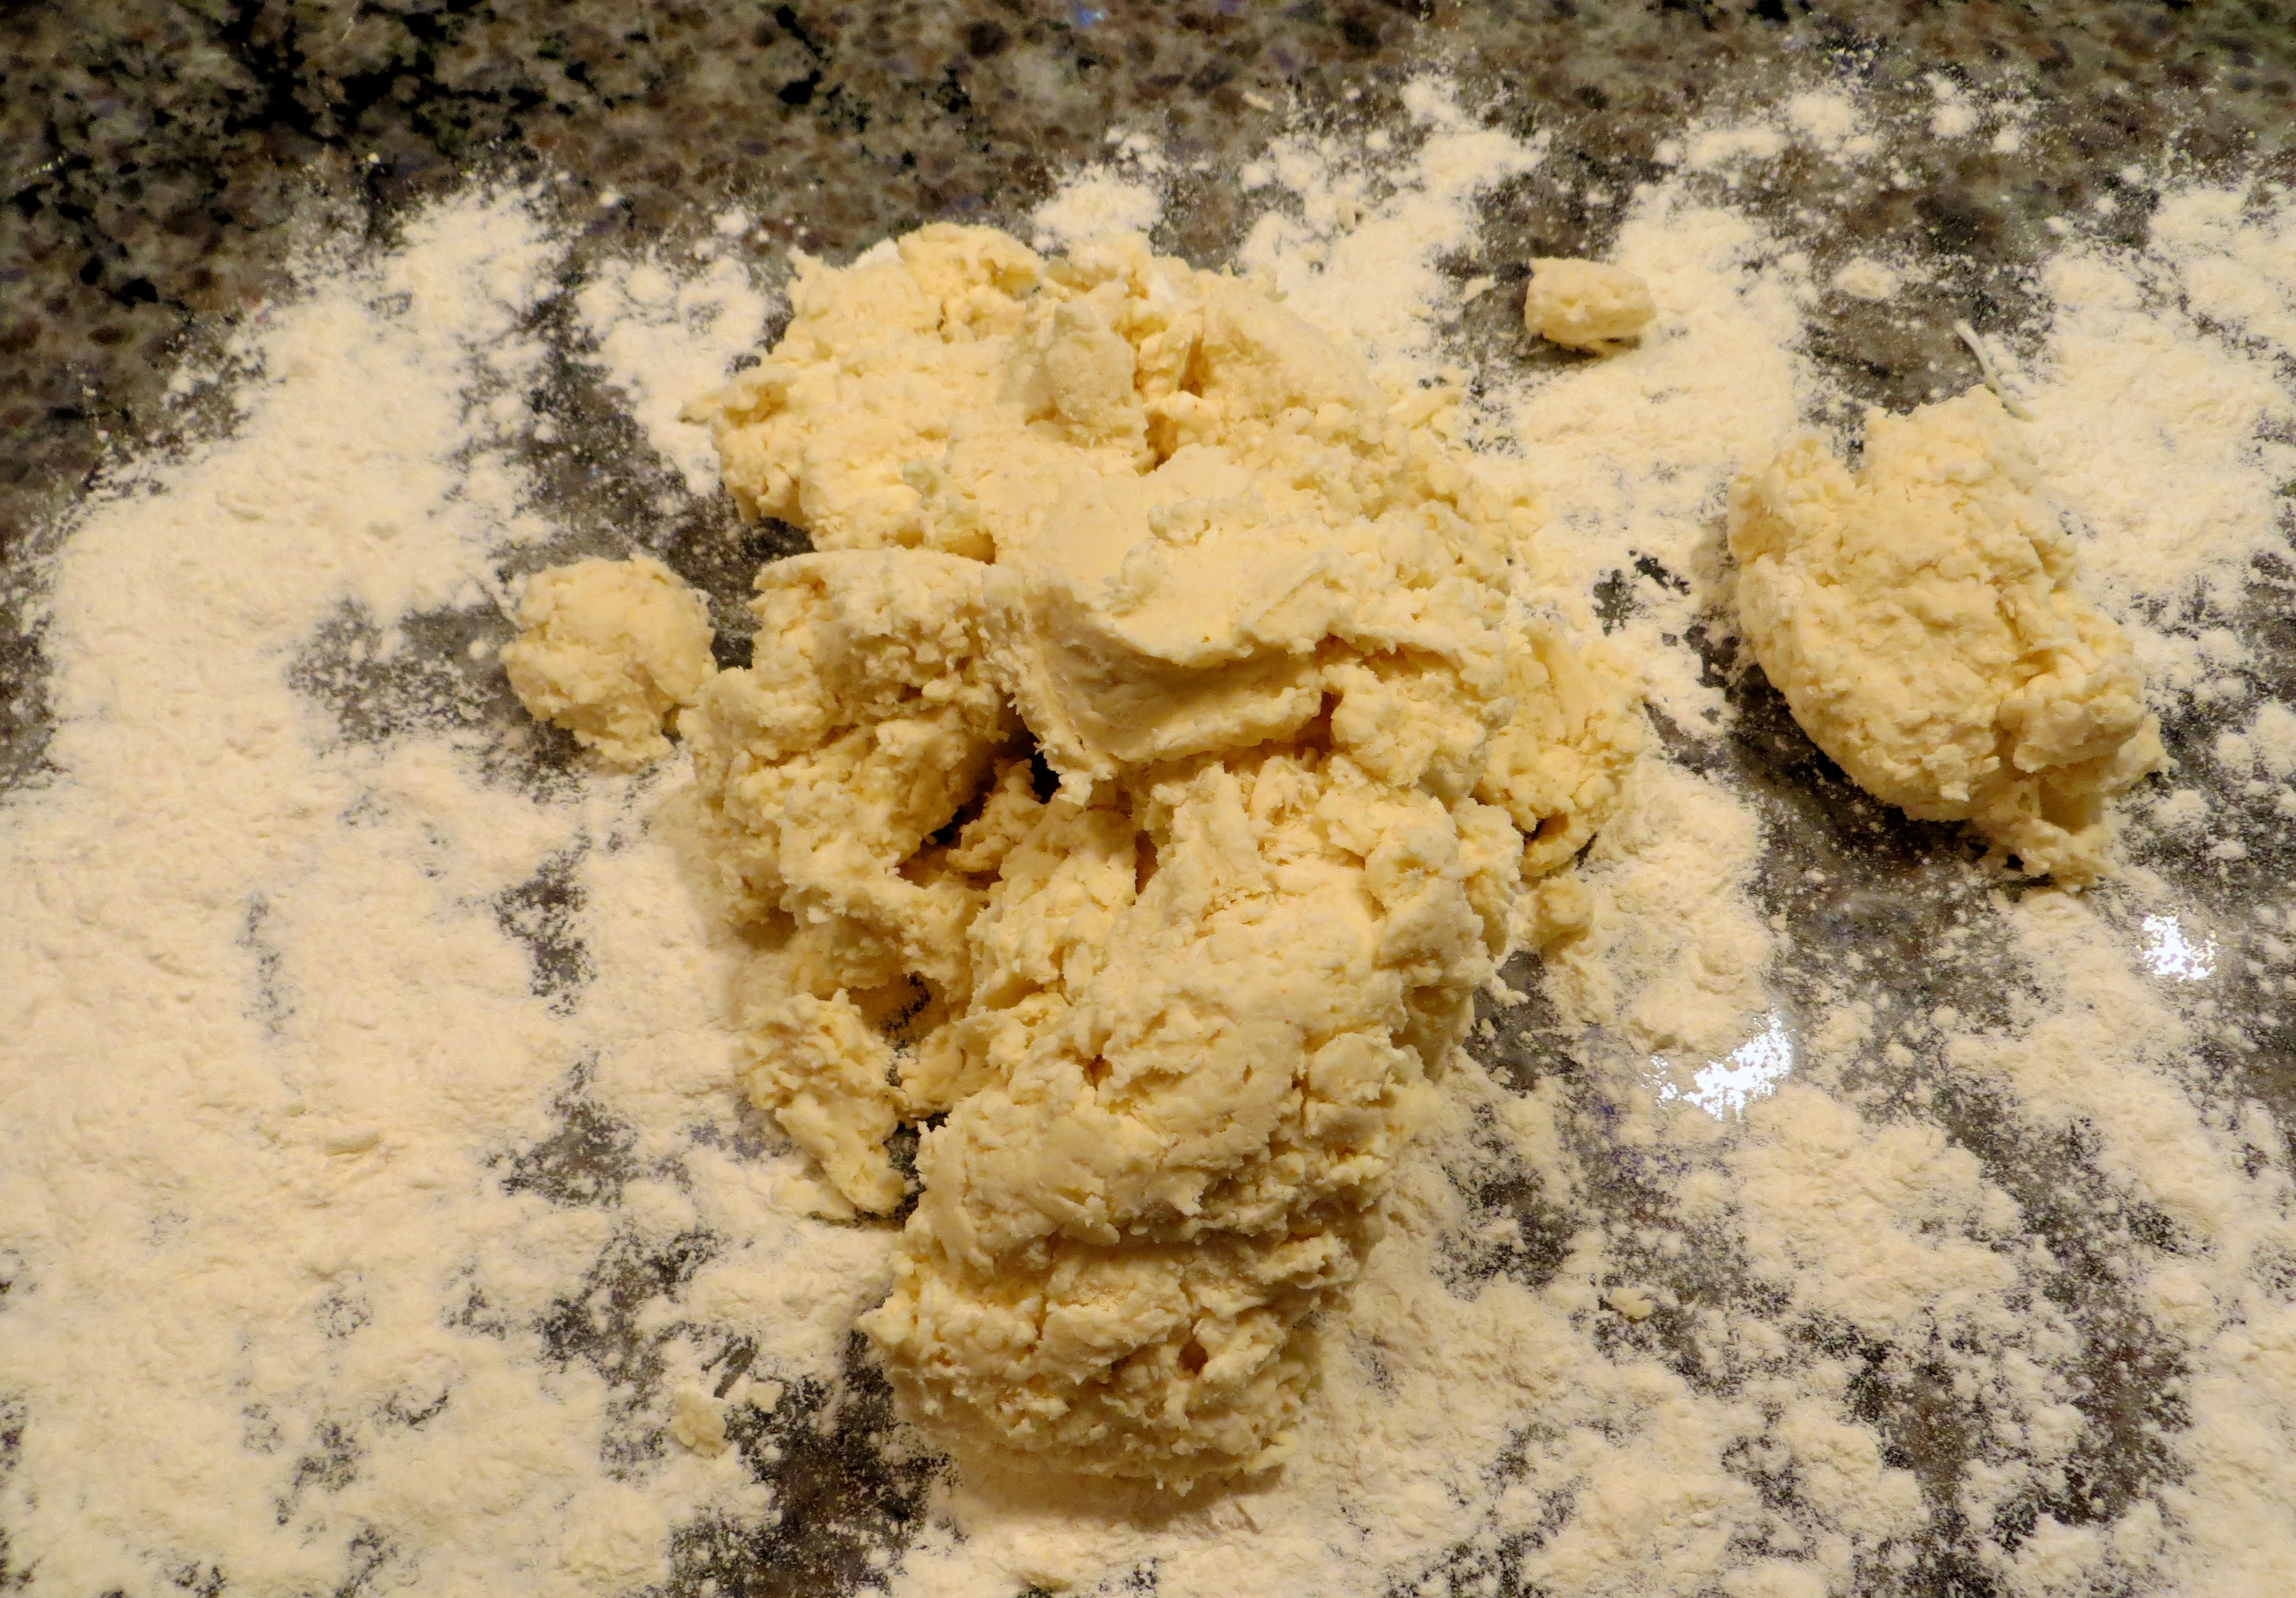
Sprinkle your counter top with a nice dusting of flour and spoon your dough on top.


IMG_2800

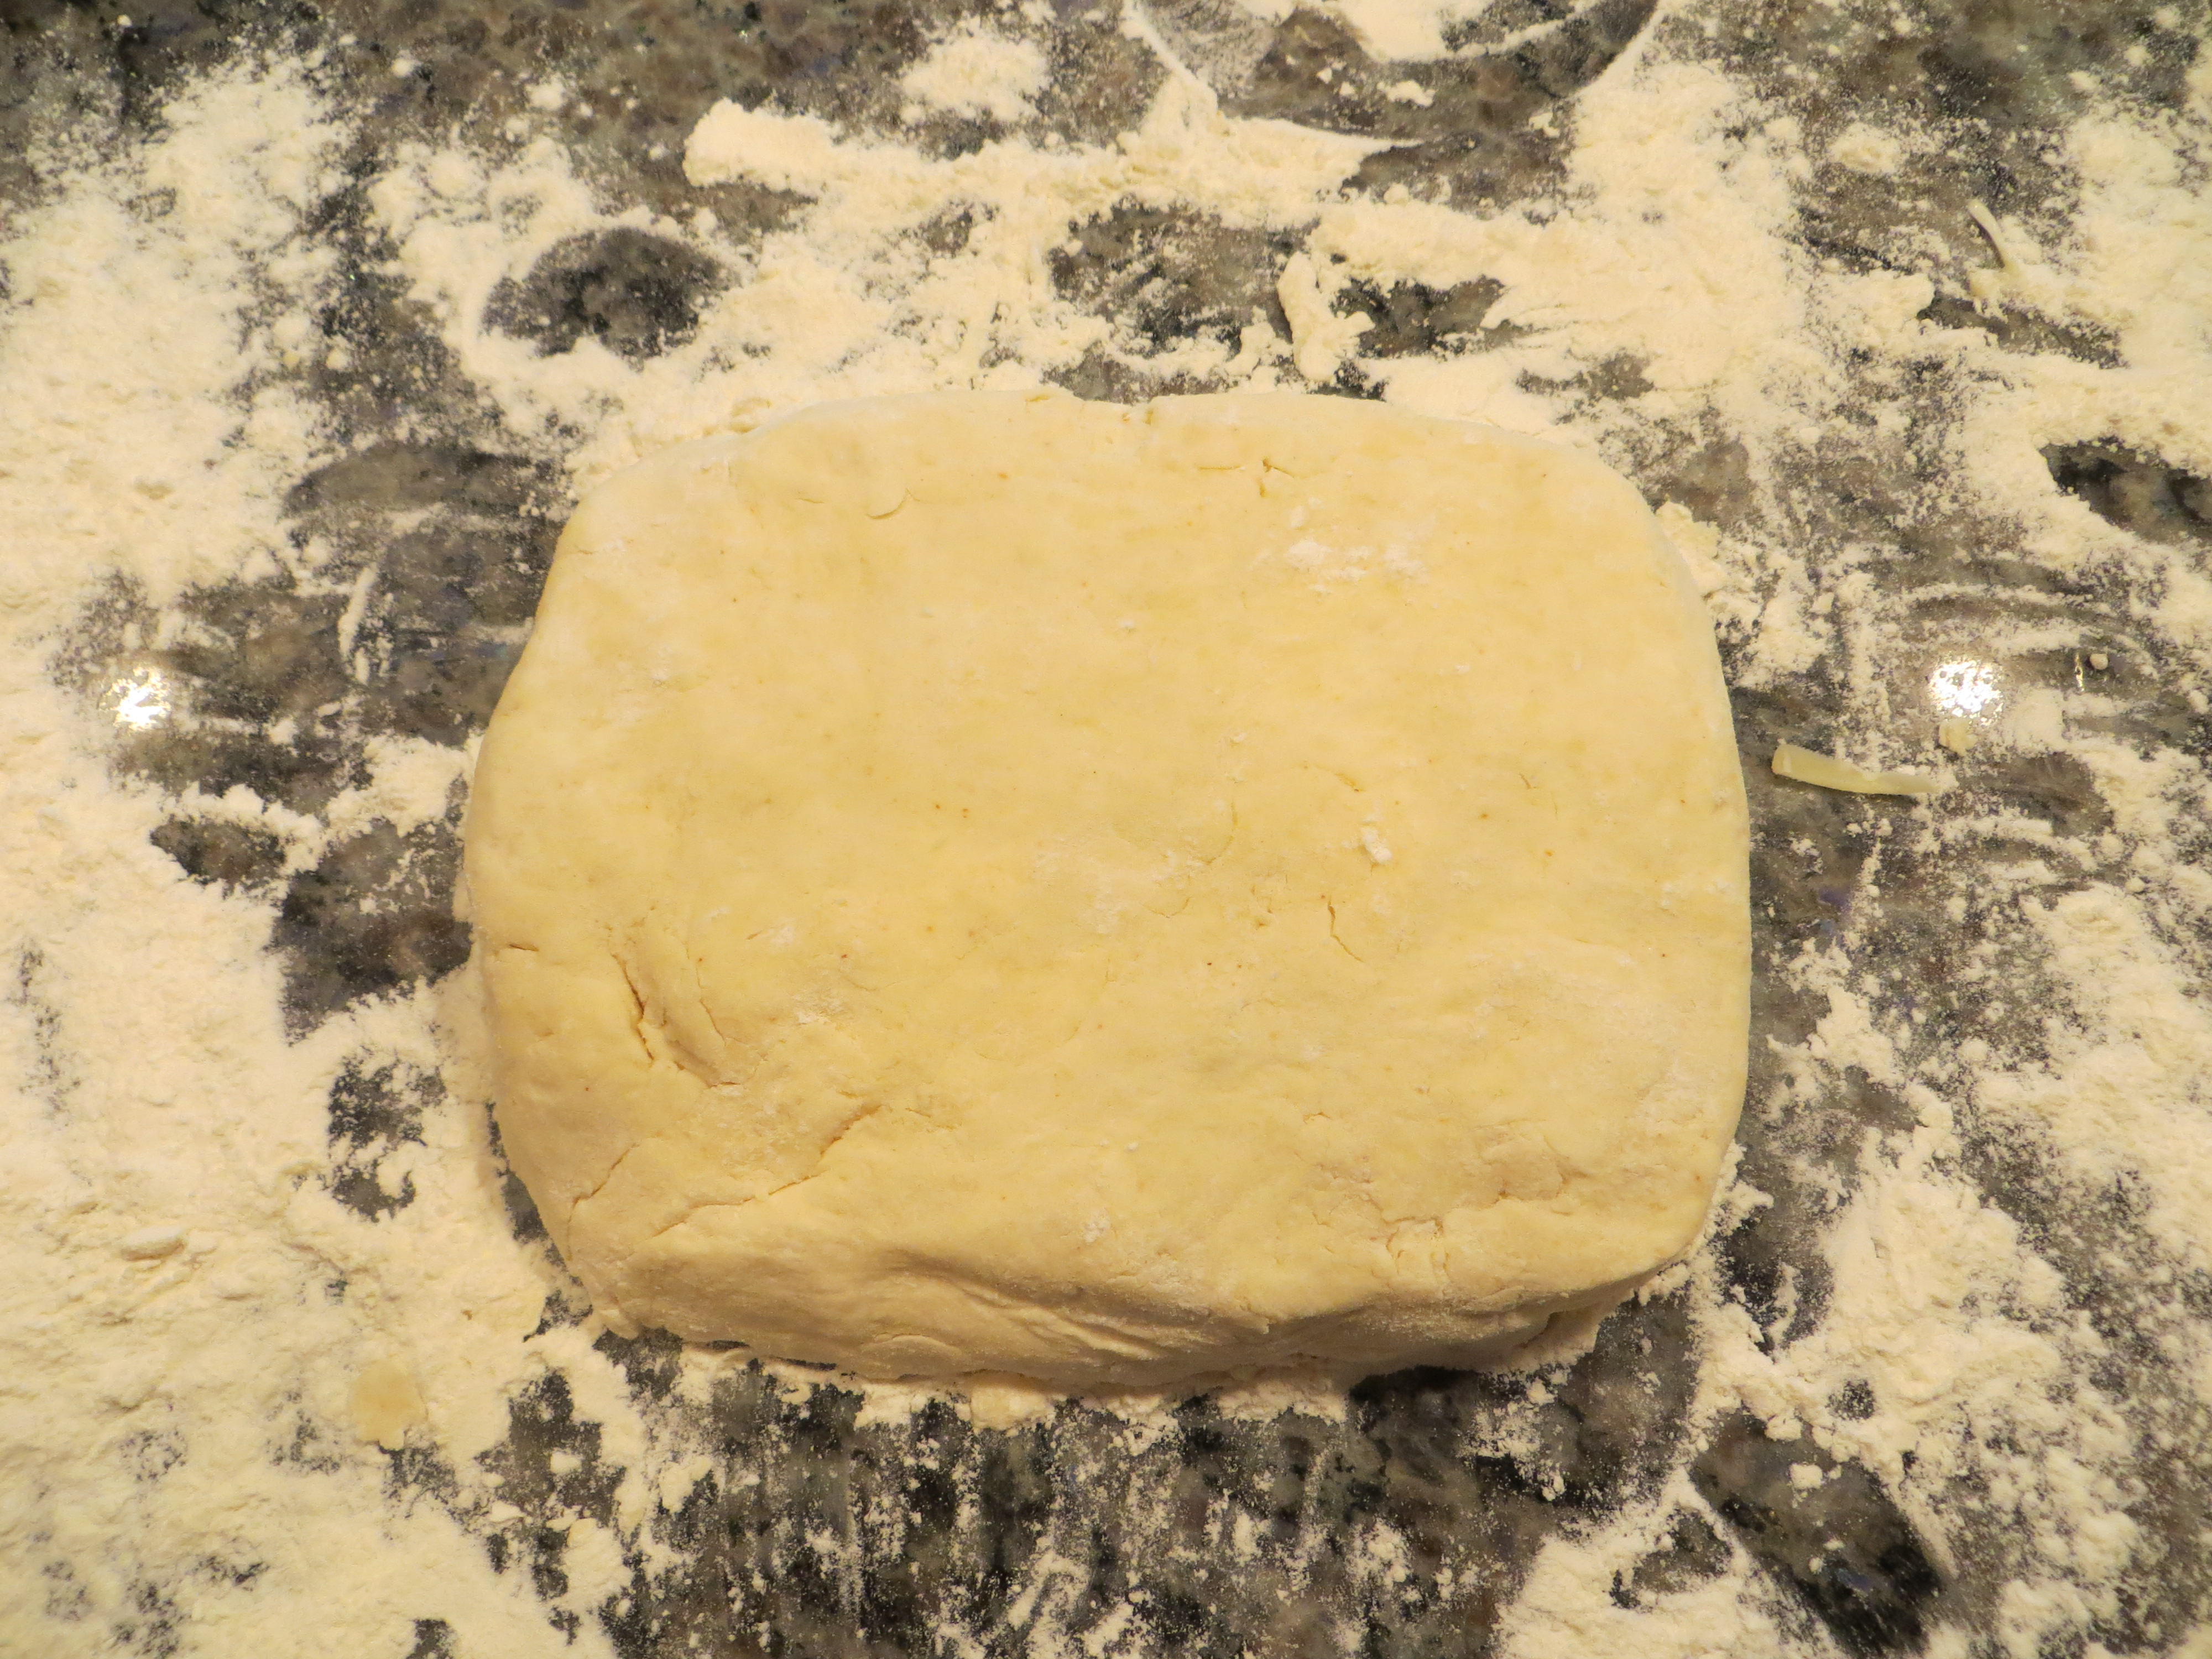
Gently shape the dough into a rectangle and roll it to about 1″ thick.


IMG_2803

Sprinkle the dough with half the cheese mixture.


IMG_2805

Fold the dough up into thirds like you would a letter.


IMG_2806

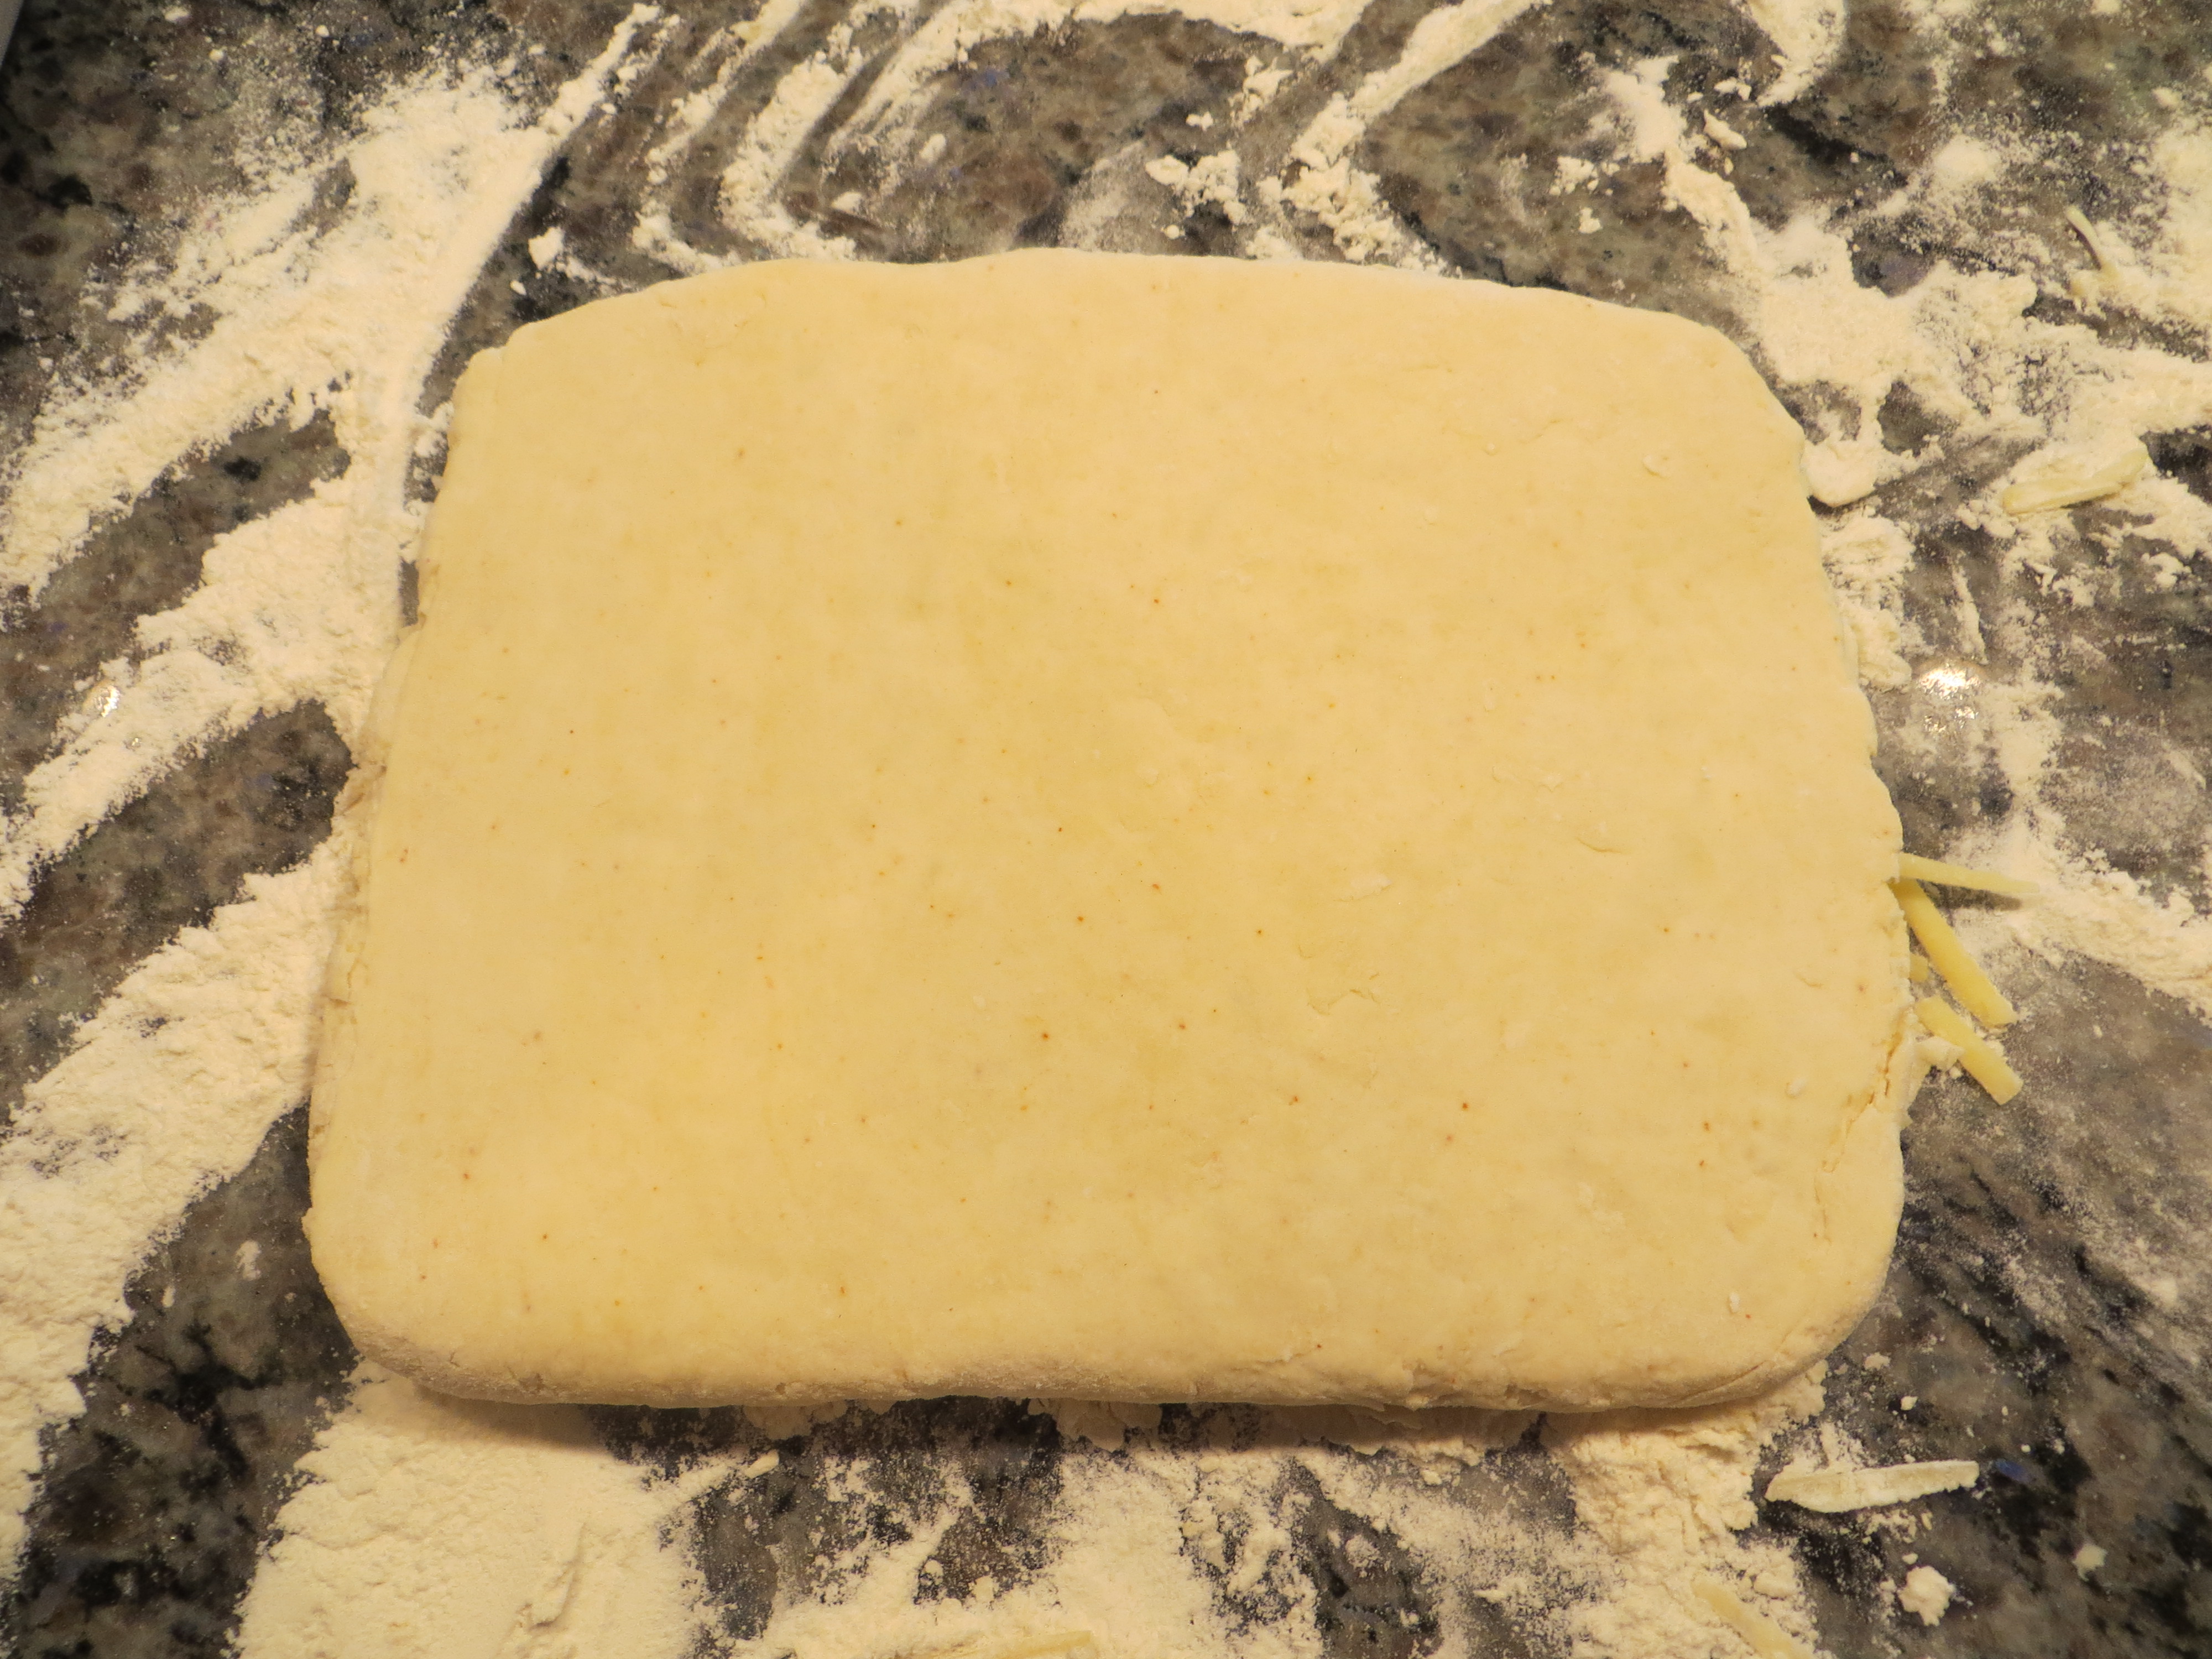
Roll the dough out to about 1″thick. Repeat sprinkling the rest of the cheese, fold and roll to 1 1/2″ thick.


IMG_2810

Using a knife or bench scraper, cut the dough into 12 equal squares. Or get fancy and use your round biscuit cutter.


IMG_2812

Transfer the biscuits to a parchment lined or buttered baking sheet and brush the tops with a little cream.


IMG_2813

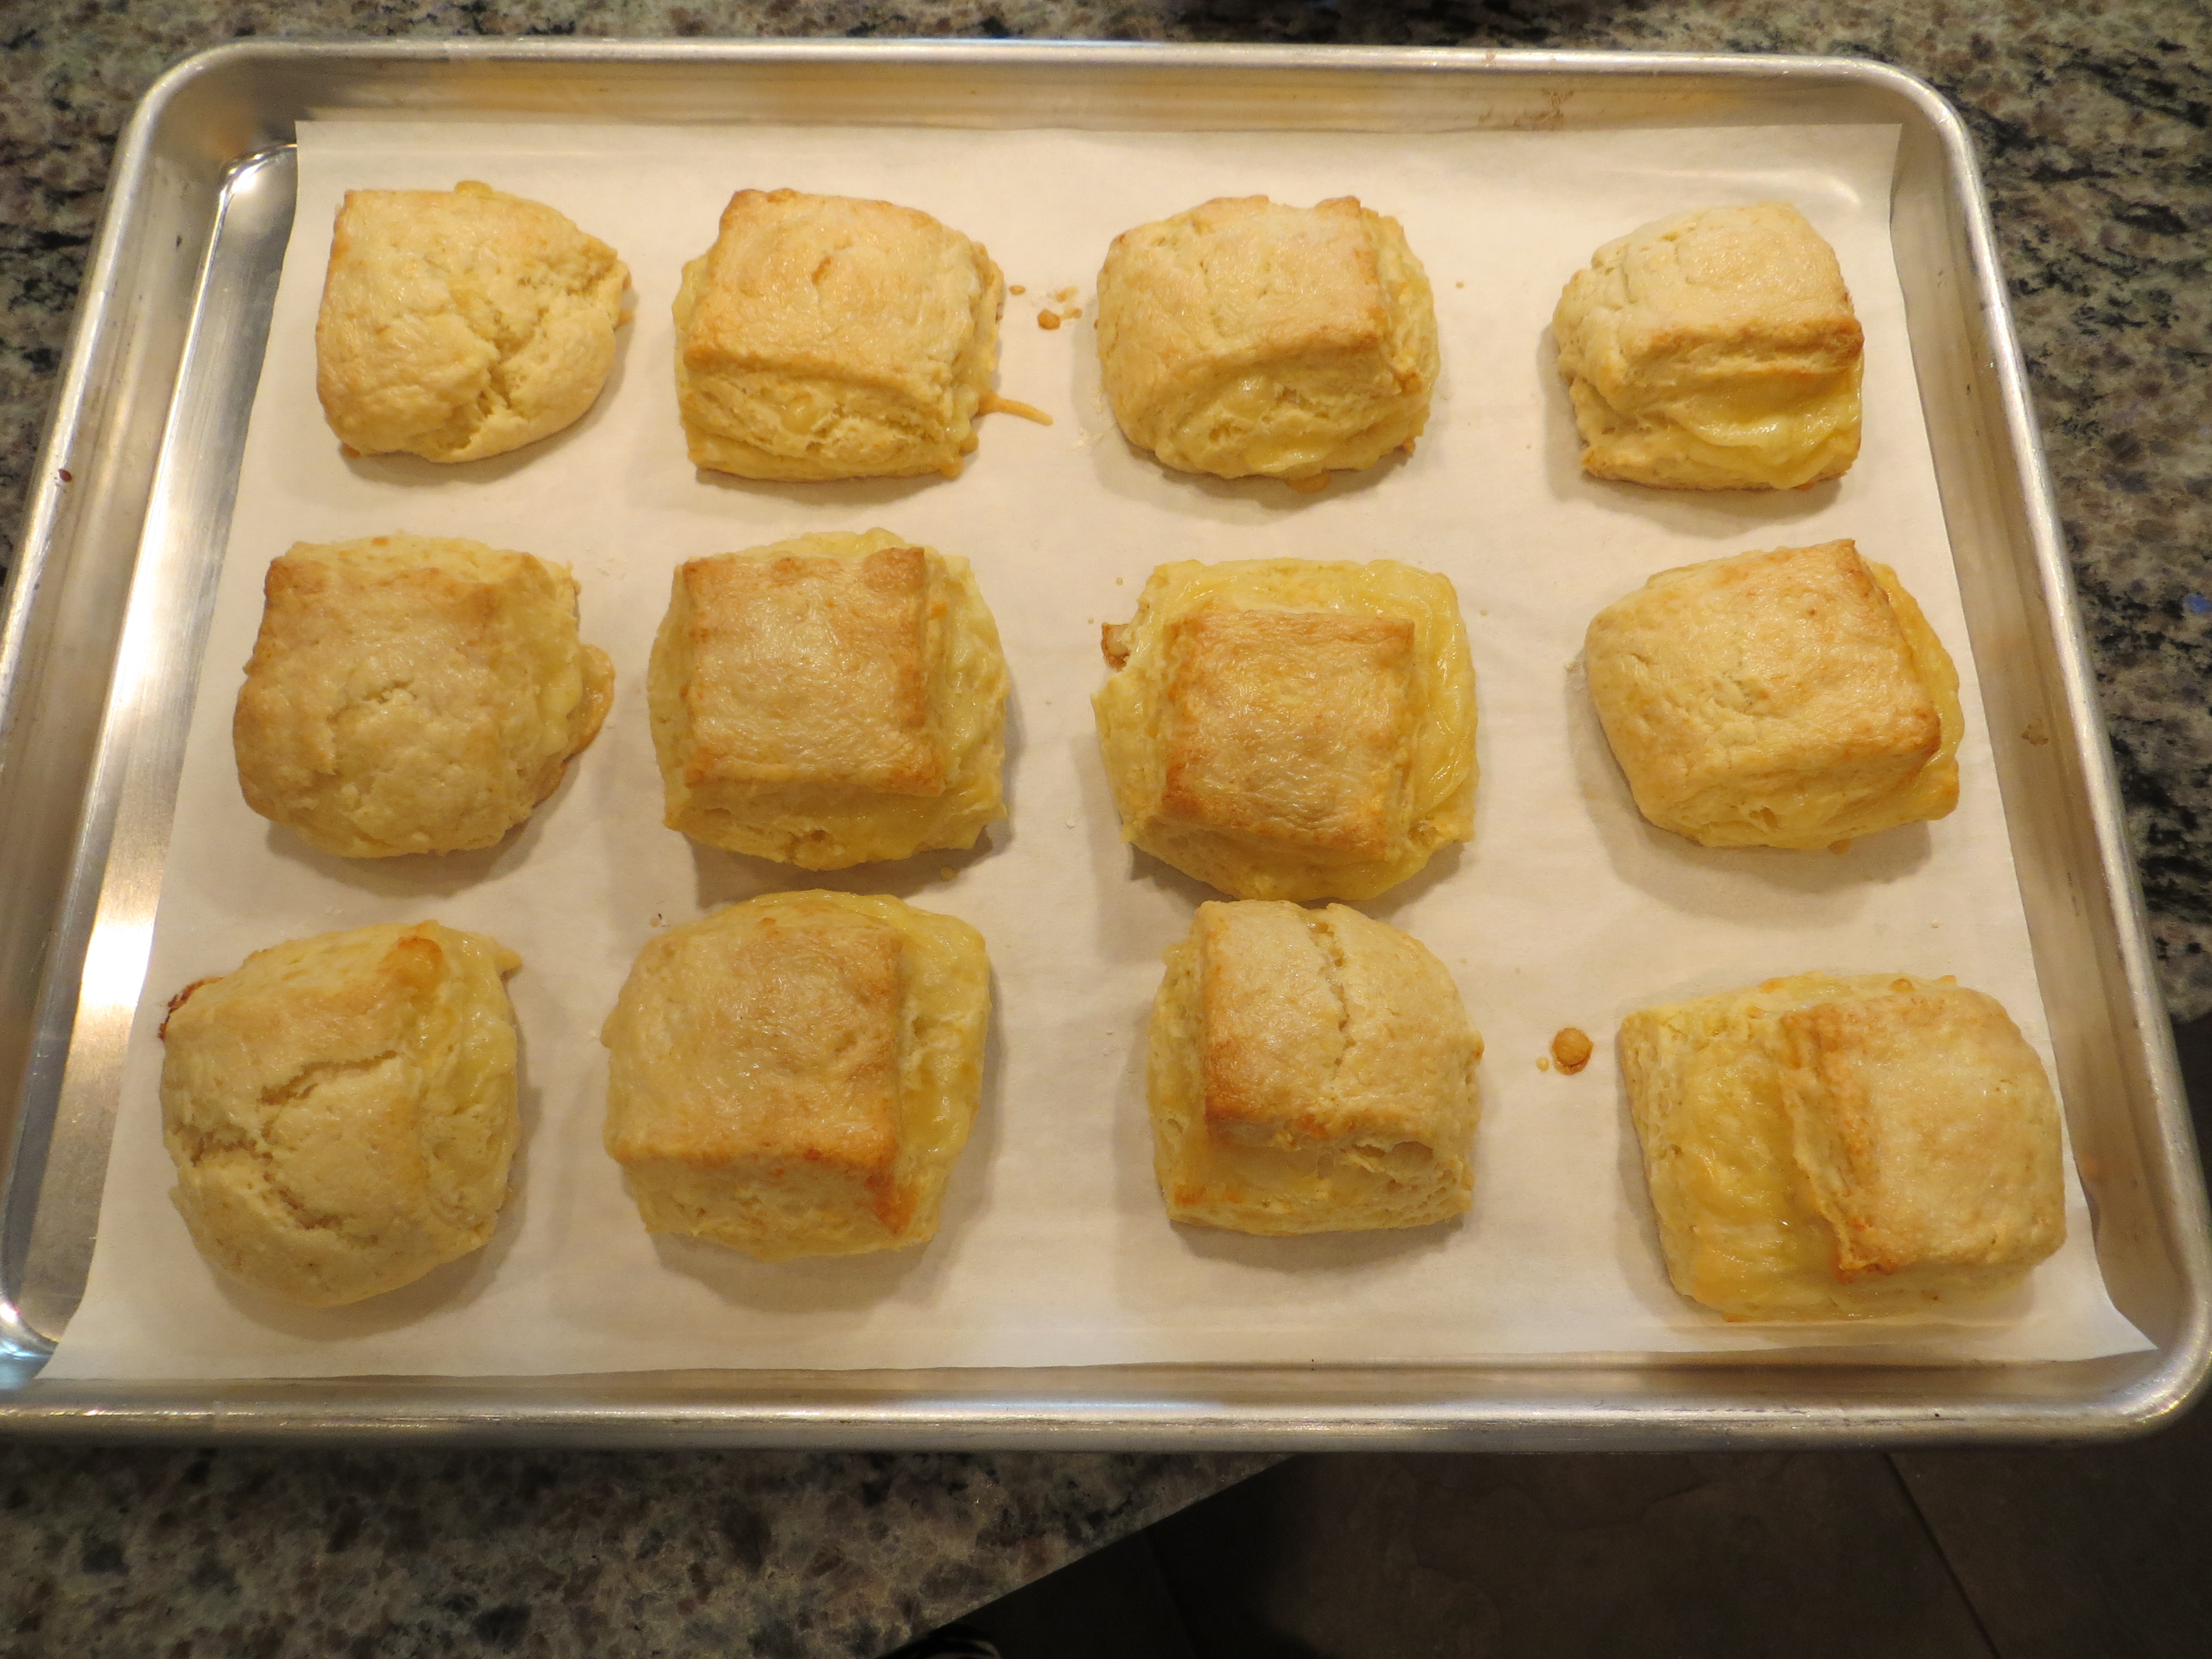
Bake at 375F for 12-14 minutes until golden on the tops.


biscuit collage2

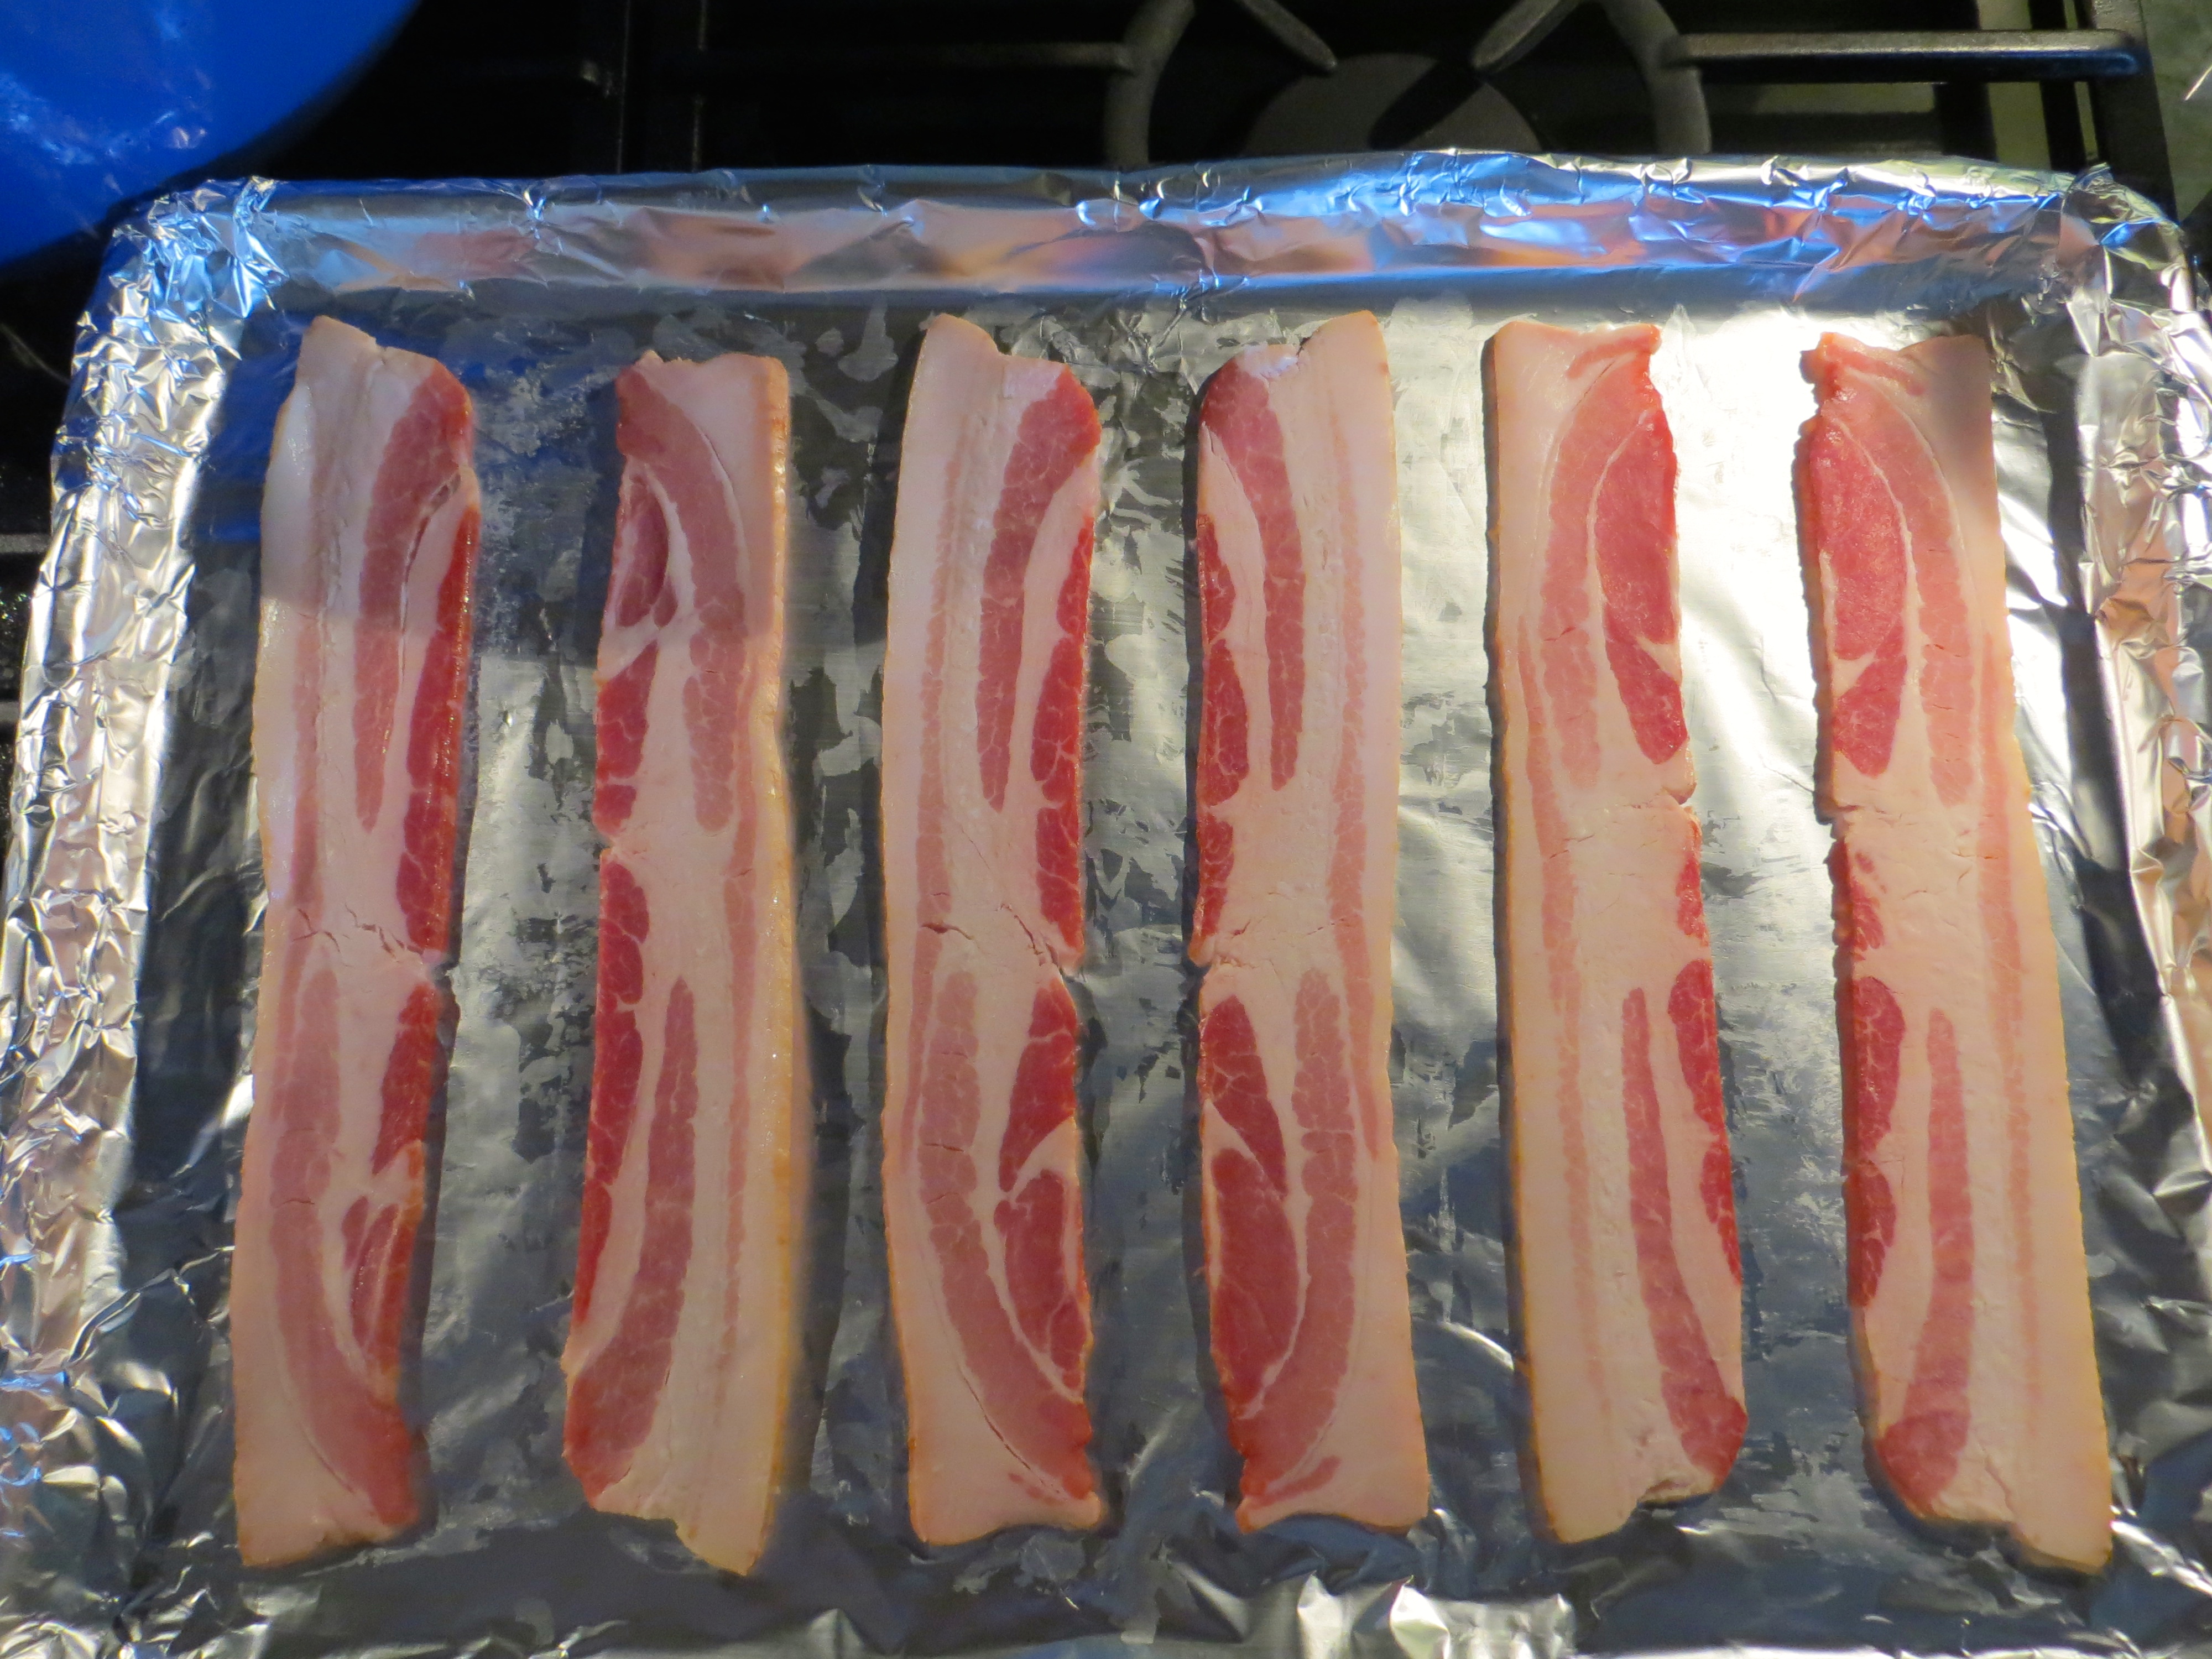
Enjoy in whatever manner you prefer. With homemade peach jam and a side of homemade bacon (recipe from the same cookbook) and Conecuh sausage. Or make a bacon or sausage biscuit sandwich.


How ever you enjoy them, just promise me you will make these biscuits ASAP!


Gruyere Biscuits

  • Servings: 12 biscuits
  • Print

  • 3/4 cup shredded Gruyère cheese*
  • 2 Tablespoons finely grated Parmesan cheese
  • 2 cups all-purpose flour
  • 2 1/2 teaspoons baking powder
  • 1/4 teaspoon baking soda
  • 1/2 teaspoon coarse salt
  • Pinch cayenne pepper
  • 1/2 cup briefly frozen butter
  • 1/2 cup heavy cream, plus more for brushing**
  • 1/2 cup buttermilk

Preheat the oven to 375F. Line a sheet pan with parchment or brush with butter.

Combine the dry ingredients in a medium bowl and whisk together to combine. Using a box grater, grate the butter into the dry ingredients. Blend the butter and dry ingredients with your fingers until the mixture resembles coarse meal.

Pour in the cream and buttermilk and stir just until combined and dough pulls away from the sides of the bowl.

Transfer the dough to a floured work surface. Pat into a rectangle and sprinkle lightly with flour. Roll the dough to 1″ thick.

Sprinkle the dough with half of the cheese mixture. Fold the dough into thirds like a letter.

Lightly flour the surface of the dough and roll again to 1″ thick. Sprinkle with the remaining cheese and fold into thirds and roll to 1 1/2″ thick.

Cut the dough into 12 squares (3×4) and place 2″ apart on the prepared pan. Lightly brush the tops with the remaining heavy cream.

Bake in the preheated oven for 12-14 minutes, turning the pan halfway through baking, or until the tops are golden brown.

Remove the pan from the oven and let stand 5 minutes before serving warm.


*We have used other cheeses in this recipe with success (Cheddar, Swiss, Monterey Jack, etc.).

**I have substituted half-and-half for the entirety of the heavy cream with perfectly tasty results. We couldn’t really tell a difference so consider subbing if you are trying to be healthier ;)-


Adapted from The Ravenous Pig: Seasons of Florida.

Heavenly Dark Chocolate Waffles

6 Mar
I am stealing Bon Appetit's photo because it looks so much more appetizing than mine. But I promise mine were delightfully tasty!

I am stealing Bon Appetit’s photo because it looks so much more appetizing than mine. But I promise mine were delightfully tasty!

Are you prepared to enter breakfast Nirvana? If so, go ahead and make these waffles this weekend, or tomorrow, or maybe even for dinner tonight. They are that good!

Keeping up with my recent habit of finding recipes in magazines, this one came from the February issue of Bon Appetit. Out of the entire section of chocolate recipes, these waffles spoke to me the most. So we had them for breakfast that very Saturday. And Sunday. And the next Saturday. And my stepson heats the leftovers up in the toaster on school mornings…

Suffice it to say, this recipe will become a permanent staple in our weekend breakfast routine. Yes, it is a little fussy, but if you prepare everything before you start mixing, it really doesn’t take that long to throw together. And the effort is SO worth it!

chocolate waffle prep

At first I thought the idea of syrup on a chocolate waffle was abominable but it ends up that it is quite delicious. And with some bacon and a glass of milk on the side, it is perfect.

The original recipe makes about 12 waffles but I reduce it to 1/2 or 1/3 most of the time to serve 2 or 3 people (2 or 3 waffles apiece). But I am including the full-sized version here — waffles for 6! Plus, if you make a full batch but don’t eat them all, they do freeze really well and are easy to pop in the toaster to heat back up (just stick it in frozen).

So what are you waiting for? Add this to your shopping list and you recipe queue immediately!

finished choc waffles

Dark Chocolate Waffles

  • 2 cups all-purpose flour
  • ½ cup unsweetened cocoa powder (I used Dutch-processed)
  • ¼ cup packed brown sugar
  • 2 teaspoons baking powder
  • 1 teaspoon baking soda
  • 1 teaspoon kosher salt
  • 3 large eggs, separated
  • 2 cups buttermilk
  • ½ cup olive oil
  • 1 teaspoon vanilla extract
  • 6 oz. bittersweet chocolate (at least 70% cacao), finely chopped
  • Nonstick vegetable oil spray
  • Unsalted butter and warm pure maple syrup (for serving)

Preheat oven to 250°. Whisk flour, cocoa powder, brown sugar, baking powder, baking soda, and salt in a large bowl. Make a well in the center

and add egg yolks, buttermilk, oil, and vanilla. Blend with a fork, then gradually incorporate dry ingredients, mixing until just combined.

Using an electric mixer on medium-high speed, beat egg whites in a small bowl until soft peaks form. Working in 2 batches, fold egg whites into batter just until combined. Fold in chopped chocolate.

Heat a waffle iron until very hot; lightly coat with nonstick spray. Working in batches, cook waffles until cooked through. Transfer to a wire rack set inside a baking sheet, cover loosely with foil, and keep warm in oven until ready to serve.

Serve waffles with butter and syrup.

DO AHEAD: Batter with egg whites can be made 4 hours ahead. Cover and chill. Cooked waffles can be wrapped in plastic wrap and frozen then reheated with one or two rounds in the toaster.

Adapted from Bon Appetit February 2014.

IMG_2130

Oven-Roasted Bacon

5 Mar

Or, the only bacon I can cook without burning…

Me cooking bacon had become a joke in our house — it always ended up burned no matter the method I employed. Enter the oven-roasting technique. Now my bacon cooking is no longer a laughing  matter. Instead it is a finger-licking, lip-smacking matter. My husband may never fry bacon in the skillet again, either.

The method is great because it yields consistent results, practically no mess, and — the best part — flat bacon slices!

To get started, line a baking sheet with foil, making sure to completely cover the pan. This step ensures clean up takes about two seconds.

IMG_2320

Next, lay your bacon flat and not overlapping on the baking sheet. We like Wright’s Hickory Smoked Bacon, but you can use your favorite.

Put the sheet in the oven on the center rack and shut the door. Turn the oven on and heat to 400 degrees (you do not have to preheat). At the same time, set your timer for 18 minutes.

IMG_2333

When the time is up, check the bacon. It should be sizzling and just starting to brown/curl around the edges. If it’s not, give it a few more minutes but watch it closely.

IMG_2336

If it is, take it out and transfer the bacon slices to a plate lined with paper towels to absorb the excess oil. Cool briefly then chow down.

IMG_2337

To clean up, drain your bacon grease into a small cup or bowl if you want to save it for future recipes; discard it if not. Next, carefully peel the foil off the pan and throw it in the trash.

Now sit down to your delicious breakfast. And stay tuned, I have another breakfast delicacy coming your way soon!

Adapted from this recipe.

King Cake Cupcakes and a Winter Weather Bulletin

29 Jan

Hi, friends! I hope you are warm and toasty wherever you are today. Here in the Deep South/Alabama Gulf Coast, we are freezing our little tushies off! It has been quite an adventure with below freezing temps for the past 2 days and various types of wintry precipitation all around (only sleet and ice at our house, sadly). The weather has been so “extreme” by our standards, that most businesses, including my office, have been closed since yesterday afternoon and will remain closed until at least tomorrow.

After this little experience, I cannot start to imagine how people survive in the far northern states where it regularly drops 20-30 degrees below zero during the winter. We Southerners wouldn’t know how to function! I have to admit, I would take 95 degrees and 100% humidity any day of the week.

IMG_2083

Our little house with its dusting of ice/sleet.

But don’t you worry, all this down time has given me the opportunity to sew and bake like crazy. Over the past two weeks, I have baked 4 loaves of bread, 1 batch of dinner rolls, sewn 5 (!!!) garments (more on those to come), and made these delicious King Cake Cupcakes. What else can you do when it is “Snowmageddon” outside? (As sarcastically dubbed by a local radio station in response to the media frenzy.)

Growing up near Mobile, Alabama (the home of Mardi Gras), I have eaten my fair share of King Cakes. I have had cakes shipped in from “authentic” bakeries in New Orleans, local grocery store King Cakes, and even homemade King Cakes (yes, yours, Catherine). I have always been a fan of the yeasty delight reminiscent of cinnamon rolls with cream cheese filling and sweet icing and tri-colored sugar on top. And being the baker that I am, I have never tried to make my own King Cake until now. Boy, am I glad I did! These little delights are tasty! And not that hard to pull off. I will walk you through it below but first a little more history on the King Cake (and if you want to see my other post about Mardi Gras traditions and a delicious drink recipe, click here).

King Cake, as we coastal Southerners know it, first originated in French Louisiana in the 1700s, where it was introduced by colonists from France and Spain. Many European countries still have their own versions of King Cake but it is different from ours. I am only going to highlight the Southern Coastal variety in this post but you can read more about all types of King Cakes in this Wiki article and on the blog, Joe Pastry.

First of all, you are only supposed to make King Cakes after Epiphany (January 6) and before Mardi Gras (Fat Tuesday). Some people might say it was a sacrilege to make them at other times of the year but many bakeries have started adapting the King Cake idea to other holidays.

The simplest King Cake is cinnamon roll-type dough with sugar glaze icing and purple, green, and yellow sprinkles. Most varieties, though, will have a filling (cream cheese — my favorite, praline, cinnamon, or strawberry). All are topped with some form of glaze and traditionally should have a plastic baby trinket inside. This little baby represents the Baby Jesus and the legend goes that whomever gets the piece of cake with the baby has to buy the next cake. When I was a child, I remember the excitement and anticipation surrounding this little toy that might be hidden in your cake (so you had to eat carefully according to your mom, as not to choke on said baby). Nowadays, though, most places will not put the baby in the cake because of the risk of choking — or should I say the risk of a lawsuit. Instead, the baby will be cradled in some excess icing in the center of the cake.

The recipe I am presenting here is a simple brioche-type dough with a brown sugar studded cream cheese filling. The simple powdered sugar glaze has a hint of citrus to balance the sweetness of the cake. While baking with yeast dough can be intimidating, it really is quite simple if you follow the directions given.

I originally found this recipe on the Garden and Gun blog. I would not recommend following the directions on their website, though, because they are not complete. After a little research, I realized their recipe was just a scaled down version of Emeril’s recipe here, but both are apparently variations of the 1983 Southern Heritage Cakes Cookbook. If you want to reference a source, please use the Food Network recipe, not the one on the Garden and Gun website.

To make the King Cake Cupcakes, you start by mixing up an enriched yeast dough.

IMG_2068

After it has doubled in size, you punch it down then roll it out into a rectangle.


IMG_2070


Next, you spread the dough with the softened cream cheese mixture, then roll it up into a log.

IMG_2073

Slice the log into 15 even pieces and place in paper-lined cupcake pans.

IMG_2076

Let the cakes rise one more time,

IMG_2077

Then bake them at 325 for 15-20 minutes.

IMG_2080

Once they are cooled, drizzle the glaze on top and sprinkle with purple, green, and yellow sanding sugar.


King Cake Cupcakes

Yield: 15 cupcakes

Dough:

  • 2 ¼ teaspoons yeast
  • ¼ cup warm water
  • 1 teaspoon, plus ¼ cup sugar
  • 2 cups flour
  • 1 teaspoon salt
  • ½ teaspoon nutmeg
  • ½ teaspoon lemon zest
  • ¼ cup warm milk
  • 3 egg yolks
  • 3 ounces (or 6 Tablespoons) melted butter

Filling:

  • 8 ounces cream cheese
  • ½ cup brown sugar
  • 1 teaspoon cinnamon

Icing:

  • 1 ½ cups powdered sugar
  • 2 Tablespoons milk
  • 1 Tablespoon lemon juice

Decorations:

  • Green, purple, and yellow sprinkles or sanding sugar
  • Small baby trinket

Whisk together yeast, 1/4 cup warm water, and 1 teaspoon sugar until the dry ingredients are completely dissolved, then let rest until the yeast is foamy, bubbly, and active, about 5 to 10 minutes. Combine flour, salt, 1/4 cup sugar, nutmeg, and lemon zest in the bowl of an electric stand mixer (or you can also mix by hand). Fit mixer with dough hook attachment, turn on low speed, and add milk, egg yolks, and melted butter, a little at a time, until all ingredients are combined; continue mixing on low about 10 minutes (or knead by hand).

At this time, if the dough has not formed a sticky ball in the bowl, add 1 tablespoon of flour at a time, no more than ½ cup total.  Scrape down the sides and bottom of the mixer and let mix again for another 10 minutes. Turn onto an oiled surface and knead by hand into a tidy little ball, 5 minutes or so.  Place dough in an oiled bowl, cover, and let rise until it doubles in size, about 1 to 2 hours. Stretch and roll your dough into a long rectangle, approximately 12″ x 18″.

Combine the filling ingredients and the spread mixture onto the surface of the rectangle. Roll the dough up starting on a short end, and slice into 15 equal medallions.  Place medallions flat side down in lined cupcake tins. Cover, set aside, and let rise again until double, about 30-40 minutes. Bake at 325 for 15 to 20 minutes, or until deep golden brown. Cool completely.

Combine icing ingredients in a mixing bowl and mix until it achieves the desired consistency (adjust with more liquid or more powdered sugar if necessary). You can do this easily with a whisk.

Drizzle the glaze over the cooled cupcakes, hiding a baby trinket or charm inside one of the cupcakes before icing, if desired.  Decorate with Mardi Gras beads or yellow, purple, and green sprinkles.

Weekend Round Up

18 Feb
 

Don’t you hate it when you finally have a day off and you still wake up at 6:30 AM?  Today is my first day off after 12 days straight of nursery rounds, office hours, and after-hours calls and I was looking forward to snoozing until at least 8!  Oh well.  I got up and ate my usual Nutella toast and decided to let y’all know the things I’ve been working on over the past few weeks.  I have to run out for a new pair of fabric shears today but hopefully after that I will get some of these unfinished projects wrapped up!

From the Sewing Room

Here are some of my current fabrics under construction:

 
This was my first time scanning fabric. I promise there isn’t a stain in the middle.
  This Marc Jacobs stretch cotton will involve this cute peplum — that’s all I’m telling you for now!  It’s ready to be finished now that my wonderful alterations expert, Lisa, helped me finish fitting it.


This stretch Tahari suiting has shades of fuschia, coral, and green on a peachy background.  I am practicing lining and seam finishes with this one.  I hope to wear it to work one day this week so I will show you pics when it is done.  Please notice my lovely fuschia serging thread.  I finally got brave enough to change the thread on my serger all by myself! 🙂


These dots have been underway the longest.  They are the skirt for my Bombshell Dress from the Sew Retro class on Craftsy.  I am having fitting issues with the bodice so I may go ahead and finish the skirt to wear until I can get some professional help with the bodice.

From the Kitchen 

On the cooking front, I made three really good recipes from the interwebs this week but didn’t have a chance to snap a pic of any of them.  The first one is a regular in my rotation.

 I like Tiny Urban Kitchen‘s method of steak preparation because it eliminates all the guess work.  While my husband is usually in charge of cooking the steaks in our house (he is the steak whisperer, after all), occasions arise where I may be called on to complete the task.  Enter steak prep method for the immensely OCD :O

 To accompany our steaks, I tried Ina Garten’s roasted asparagus.  It was perfect for a weeknight meal (and would also be a great low maintenance side for a big dinner party).  This is super easy and involves tossing trimmed asparagus with olive oil, seasoning with salt and pepper, and roasting on a pan at 400 degrees for 25 minutes.  There.  Now you don’t even need to click the link.

Photo look too good to be taken by me? You're right -- it's from Bo's Bowl.

Finally, I made Bo’s Bowl’s Strawberry Cream Cheese Muffins to use up some waning strawberries from the farmer’s market — delish!  I took the leftovers to the nurses at the hospital and they were gone within minutes.  Be sure to check out Bo’s blog — he also hails from the Heart of Dixie.

So that’s it for this week.  Stay tuned for a fully-loaded Mardi Gras recipe just for you in the next few days, as well as some fun Mardi Gras trivia.  Have a good Saturday!

Chocolate Workshop Part One — Cappuccino Chip Crumble Muffins

6 Feb

This past Friday evening I attended a chocolate workshop at a local culinary school.  I should tell y’all that I’m a cooking nerd — I love studying the science of what happens in the kitchen — so this class was a blast.  Who doesn’t love cooking and having someone else clean up the mess?!?  I got to hang out with some cool folks, and I came home with 7 new recipes, 6 of which we tasted during the class–score!

Each person was assigned a different recipe to prepare and mine was the Cappuccino Chip Crumble Muffins from Chocolatier October 1996.  I will be posting each of the six recipes (with permission of the instructor) in the upcoming weeks as well as a bonus recipe.

These muffins are easy to assemble, delicious with your morning coffee, and received the husband stamp of approval.  While the original recipe yields 11 jumbo muffins, it will also make about 20 regular-sized muffins if you don’t have a jumbo muffin tin.

Enjoy!

 
Cappuccino Chip Crumble Muffins
Yield: 11 jumbo or 20 regular muffins

Crumble:
3/4 cup all-purpose flour
2 teaspoons ground cinnamon
3/4 teaspoon nutmeg*
1/2 cup firmly packed light brown sugar
3 tablespoons granulated sugar
1 cup walnuts, chopped
6 tablespoons butter, cut into 1/2″ cubes

Batter:
1 1/2 cups milk, divided
2 tablespoons instant espresso powder
3 1/2 cups all-purpose flour
4 teaspoons baking powder
1 teaspoon salt
1 tablespoon cinnamon
1/2 teaspoon nutmeg*
1 cup granulated sugar
9 ounces semisweet chocolate chips
9 tablespoons unsalted butter, melted and cooled
1/4 cup firmly packed dark brown sugar
4 large eggs
1 tablespoon vanilla extract

Position rack in center of oven and preheat to 375F. Spray 11 jumbo or 20 regular muffin tins with nonstick cooking spray or line with paper liners.

Combine all crumble ingredients and blend with a fork (or your fingers) until crumbly. Set aside.

Scald 1/2 cup milk in small sauce pan. Remove from heat and stir in espresso powder. Pour into a medium mixing bowl, add remaining 1 cup milk, and set aside to cool completely.

Whisk flour, baking powder, salt, cinnamon, nutmeg*, and granulated sugar together in a large mixing bowl. Toss in the chocolate chips.

Whisk the melted butter, dark brown sugar, eggs, and vanilla extract into the cooled milk mixture. Pour over the dry ingredients and stir until just combined.

Divide batter between muffin cups, filling each cup a generous ¾ of the way full. Lightly press about ¼ cup of the crumb mixture onto the top of each muffin (each cup will now be filled to the brim but don’t worry—you will have beautiful muffin tops!).

Bake for 25 minutes, or until a toothpick inserted into the center comes out with a few moist crumbs clinging to it. Cool in the pan on a wire rack for 10 minutes then remove from the pan and cool completely.

Source: Chocolatier October 1996

*Nutmeg is one of the most disgusting flavors to me so I omitted it from the recipe with good results 😉