Archive | Completed Sewing Projects RSS feed for this section

Sewaholic Lonsdale

31 Mar

I’m still here!  Don’t worry I haven’t fallen off the planet!!  I have been traveling, sewing, and mostly working since we spoke last.  I have a cute sundress to show you today.  We are definitely getting into sundress-wearing weather here in the Deep South and the Sewaholic Lonsdale is the perfect pairing.  I stalked this pattern for a while before I actually convinced myself to buy it, but once I got it, I sewed it up almost immediately.  I love the cute knot at the front and the way the straps loop through the back and then tie.  I also like the breezy half (?) circle skirt.  Although I don’t think this halter style is the most flattering on my body, that’s not going to stop me from wearing my new cute dress or making this pattern up again 🙂

IMG_1399

For this version, I used a new rayon challis I picked up at Hart’s Fabric when I was in California last month.  I know I still have to show you all my fabrics and I promise I haven’t forgotten.  The fabric was easy to work with and it is wonderful to wear.  It does wrinkle a bit as you can see in the photos but it is not that bad.
IMG_1394

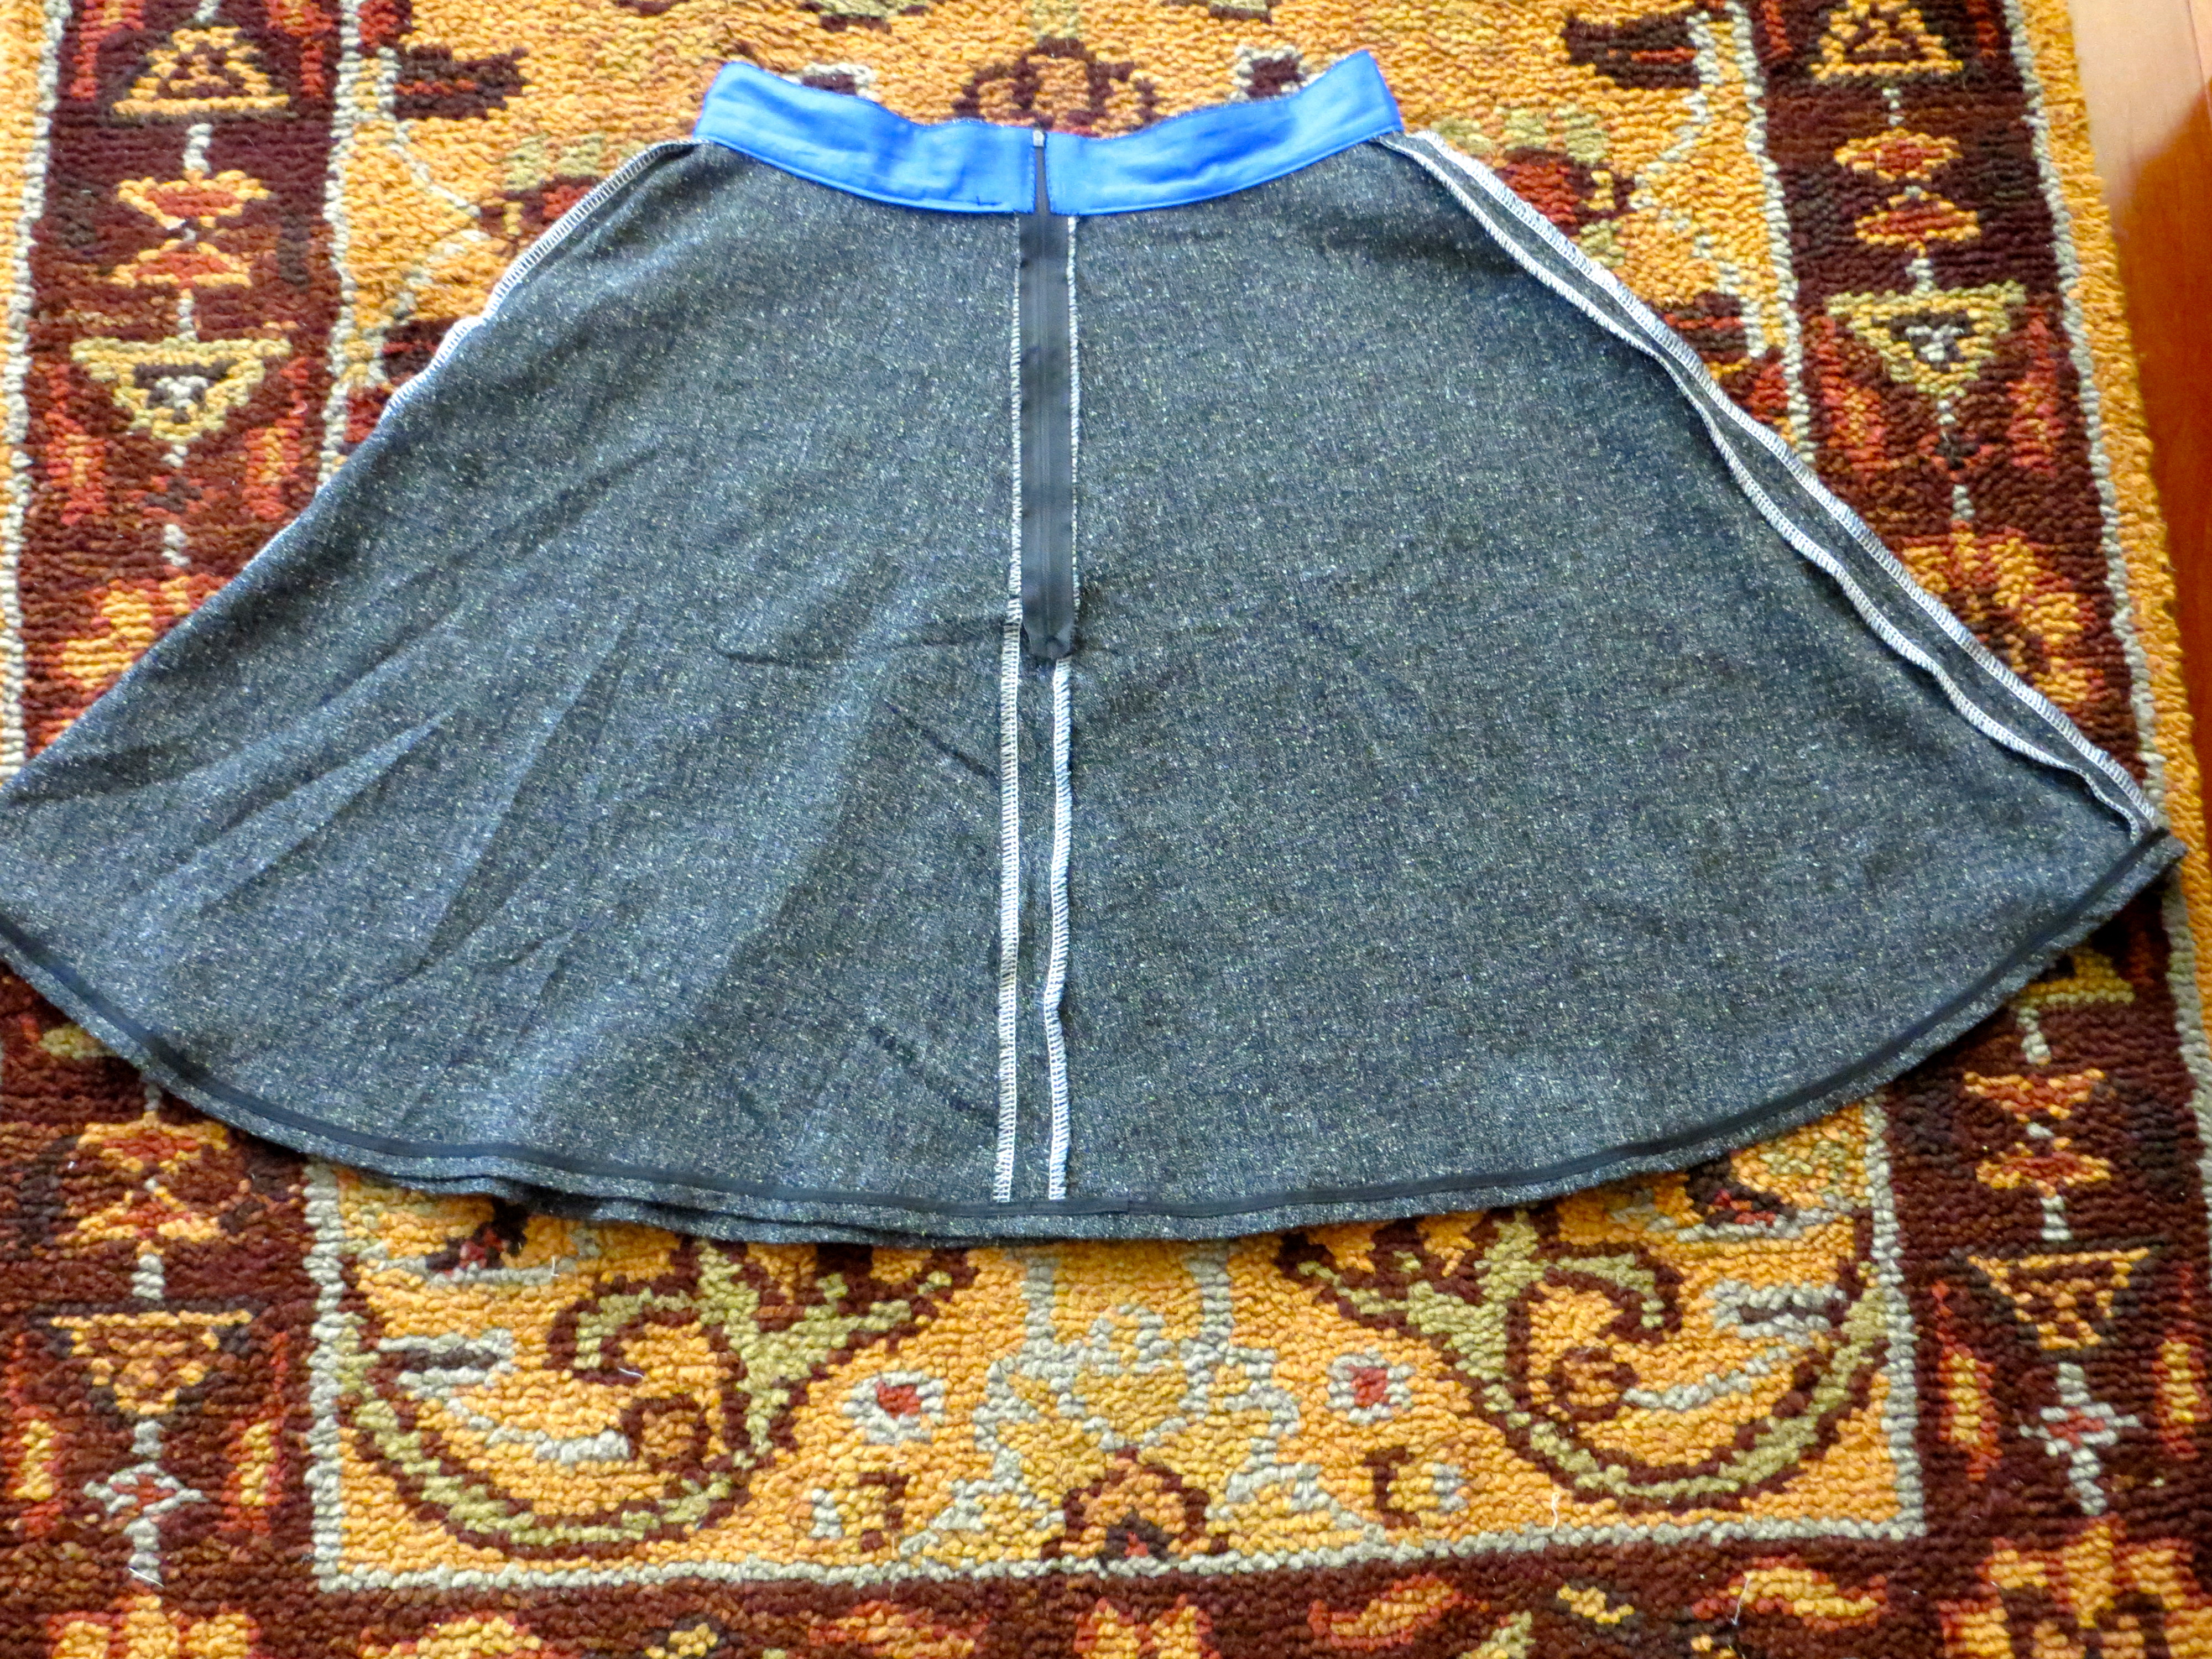
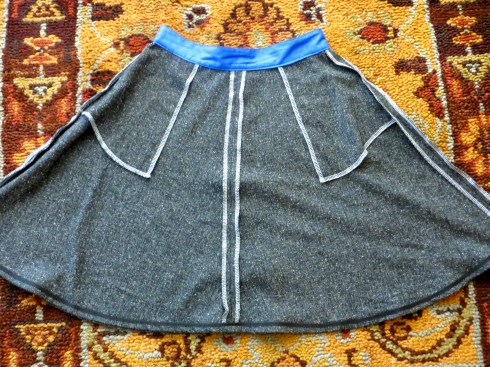
If you are not familiar with this pattern, the bodice is self-lined but the skirt is unlined.  I strayed from the pattern and decided to line the skirt as well.  I used a yellow batiste.  Because I sewed the batiste to the rayon all the way down the center back seam when inserting the zipper, I could not separate the two layers for hemming without doing some unpicking.  Since that is one of my least favorite tasks, I left it as it was and just hemmed the two layers together and the skirt lining became more of an underlining.  The downside is that my flowy rayon is now a bit more structured but the plus side is that I had a hidden layer to anchor my handstitched blind hem to.  This minor blooper is not going to prevent me from wearing this dress at all and I have already enjoyed wearing it on vacation, to church, and all day to our local arts and crafts fair (where the photos were taken).

IMG_1396

I love the consistent sizing of Sewaholic patterns.  I sewed my usual size 8 and did my usual 1″ full bust adjustment.  This FBA was a bit different since I didn’t want a waist or bust dart in the final dress.  I rotated the bust dart up to the knot gathers and the waist dart fullness was rotated to the center front seam.  You can see details of how this is done on the Sewaholic website’s tutorial.

IMG_1400

The only other alteration I made was to hem the skirt just above knee-length as I feel this is more flattering on me.

IMG_1401

If you are looking for an easy-to-sew and very wearable summer dress pattern, you should definitely consider the Lonsdale.  I am thinking about making the maxi version for the next go-around.  What do you think?

Vogue 8603, Washington DC, and G Street Fabrics

4 Mar

IMG_1358

So I have to apologize to my email and RSS feed readers who may have noticed that my last post went up a few days prematurely. I guess I will just blame it on the lack of time awareness that goes along with being on a cruise. I actually scheduled the post for Thursday but the WordPress app on my iPad had different ideas. Regardless, now you definitely know that I am spending the week bobbing around the Caribbean aboard the beautiful Celebrity Reflection.

IMG_1359

I’m sorry for not posting this skirt sooner — I initially stitched it up about a year ago but a series of events have kept it from making an introduction before now. Initially, the skirt was complete save for the hemming. Then, I lost a little weight and it got a bit big in the waist. I ended up taking it to my local alteration shop for the modifications because I decided if it was up to me, it would never get done. She also helped me mark the hem. By then it was summertime and I just didn’t feel like working on the skirt any more so it has sat in my UFO pile until now. I decided to finally finish the hem and wear the skirt on a recent work trip to Washington DC a few weeks ago.

IMG_1360

While I was in DC, I made a trip out to G Street Fabrics that all of the DC area sewing bloggers talk about. I had to take the Metro out of the city into Maryland and then walk 5-10 minutes to get there. They have a decent selection of fabric but some of it is hard to peruse because of the way all the bolts are piled on top of one another and their prices are ridiculous! Their silk charmeuses were $60-$70 per yard! I also saw an exact cotton that I purchased in NYC for $6 per yard selling in G Street for $25 per yard. They did have a nice selection of trims and buttons and I did manage to find a few things to bring home. I will show them in an upcoming post along with the Hart’s Fabrics buys that I mentioned not long ago.

IMG_1352

I love the ruching on the hips of this skirt. It reminds me of a skirt I have by one of my favorite designers, Nanette Lepore.

IMG_1365

Unfortunately, I have forgotten many of the details of the construction of this skirt because I made it so long ago. I do know that I cut the lining from the pieces that did not include ruching — no sense in having double the bulk in that area.

IMG_1366

My fabric is a lovely stretch suiting from Emma One Sock with a peachy nude background and green, magenta, and coral tweed-like flecks in it. It is hard to see the details of the fabric from these photos. I will try to update when I get home.

IMG_1368

I lined the skirt with a silky and slightly stretchy pale green satin. I used hot pink for all of my serger threads.

IMG_1367

My mother and grandmother joined me on my trip to Washington. While we were there, we had the opportunity to visit my cousin at work at the Pentagon!

IMG_1348

Sewaholic Hollyburn Skirt

27 Jan

Don’t forget to enter my One Year Blogiversary Giveaway!  The giveaway will end Thursday, January 31 at midnight CST.  Click here to leave a comment on the giveaway post and be entered to win a free Craftsy class of your choice!!!

IMG_1261

This Hollyburn skirt is my most recently finished sewing project and I have to tell you what a joy it was to stitch up.  I was in the middle of muslining the shirtwaist dress from Gertie’s New Book for Better Sewing because I’m going to a workshop in California with Gertie (!!!) next weekend.  I needed something quick and easy with no fitting issues to cleanse my sewing palate and this skirt was just the thing.  Simply make sure you pick the right waist measurement, confirm with the finished garment measurement and start cutting and sewing.  I chose a poly blend suiting from my stash (from Joann’s) and used a silky royal blue cotton sateen for the pocket and waistband lining (from the NYC trip).  The interesting thing about the fabric from Joann’s is that I have a pair of pants from The Limited in the exact same fabric!

IMG_1259

I was originally going to participate in the Hollyburn Sewalong being hosted by Rachel at My Messings but once I got started on this pattern I couldn’t wait to finish it up.  I have come to the conclusion that Tasia of Sewaholic Patterns is a very gifted pattern designer/drafter.  I have now made 3 of her patterns (Renfrew x 2, Cambie, and this skirt),and they are all very well-drafted and the instructions, while succinct, are very well-written.

1206_Sewaholic_Hollyburn_Envelope_Front.jpg

This skirt is a simple half circle with slash pockets, center back zipper, and three length variations.  I chose to make the shortest version as I recently read that my ideal skirt length is a little above my knee — never knew I had short shins!  I made a size 8 but I did cut the length at the size 16 line.  I sewed a 5/8″ hem.

IMG_1263

While this pattern is suitable for beginning sewers, I decided to make a few small modifications to fancy it up a bit.  I split the pocket piece into two to create a separate pocket lining piece.  I also sewed the skirt/pocket lining seam at 1/2″ so that the apparel fabric would roll to the inside a little bit and the blue wouldn’t be visible from the outside of the garment.

IMG_1264

Until the Date Night Dress, I have only ever done invisible zippers.  This skirt was my first time doing a centered zipper.  I probably ripped and basted this thing a half-dozen times before I was satisfied.  I finally got it close and steamed the life out of it to make it look decent.  I have to say I am quite satisfied with it now.  I departed from the directions as written a bit and sewed the back seam up to the notches and backstitched.  Then, I basted the rest of the seam closed to make pressing the seam allowances back easier.  I took the basting out after pressing and before pinning the zipper but I think if I had left the basting in while pinning, I wouldn’t have had to rip the zipper out so many times.  Any more experienced zipper-installers have a say about this?

IMG_1258

You can do anything but lay off of my blue suede shoes — Elvis Presley

Here’s how I wore it to work.  Same old Talbots cardigan (I love this thing!), and my Via Spiga pointy-toe, low-heel pumps.  You can’t really see it in the photos but they are blue suede that matches the lining fabric.

IMG_1285

I also modified the waistband piece to be able to line it with my blue fabric.  I split the waistband piece in half lengthwise, then added a 5/8″ seam allowance.  I then cut one piece each from fashion and lining fabric.  I interfaced the fashion fabric only with a lightweight woven interfacing from Emma One Sock.  I sewed the pieces together along one long edge, trimmed and edgestitched, then treated the pieces as one per the instructions for the remainder of the construction process.

IMG_1289

I finished all my raw edges with my serger.  I guess I could’ve changed to black thread but I kind of like the white contrast since the fabric has little white flecks in it.

IMG_1292

To finish the waistband, I stitched in the ditch all the way around and this worked out perfectly.

IMG_1288

For my hem, I bound it in double fold bias tape.  This served two purposes.  First it provided a clean finish.  Second it added a little structure to the hem so it has a bit of flare.  I normally handstitch or machine blind hem all my hems but I decided to just machine straight stitch this one since the stitches blend into the fabric so well.  It was so much easier that way!  🙂

IMG_1257

Top: Ann Taylor
Cardigan: Talbots
Skirt: Made by Me!
Shoes: Via Spiga
Necklace: Tessyla from Etsy

Belle Bow Blouse — In House Patterns

26 Jan

Don’t forget to enter my One Year Blogiversary Giveaway!  The giveaway will end Thursday, January 31 at midnight CST.  Click here to enter a comment on the giveaway post and be entered to win a free Craftsy class of your choice!!!

IMG_1245

In my office at work.

This is a finished object that has been hanging in my closet for quite a few months now (since the summer).  Sorry it has taken me so long to get some decent pictures of it.  This blouse is the Belle Bow Blouse by In House Patterns, an indie pattern company that was new to me until I came across their downloadable offerings on Pattern Review.  The blouse features a neck tie, button front, waist tucks in front and back for shaping, and gathers at the shoulder yoke with sleeveless dropped shoulders.

IMG_1248

I must say I am very impressed with In House Patterns so far.  This pattern was very well-drafted, the instructions are excellent and create a very clean, professional finish, and the seam allowances are already reduced to keep you from having to trim everything.  To top it all off, these patterns are drafted for a D-cup so I didn’t have to spend time doing a full bust adjustment (FBA).

IMG_1246

I can tell you from personal experience that the top fits very true to the size chart without excess ease.  I was one size bigger in the hips than the waist and bust but I thought it wouldn’t be a big deal so I didn’t grade up.  Mistake — I ended up having to let my tucks out a little bit to accommodate my hips.  Next time I will know to go ahead and grade out at the side seams.

IMG_1249

I made the shirt from a cheap polyester that I picked up at the Vogue Fabrics booth at the Sewing Expo in Atlanta last year.  It took right at 1.5 yards.  It gets staticky like crazy.  I used tricot fusible for the button placket.  I used the buttons I picked up in England for the closures.

IMG_1243

Shirt: Made by Me!
Cardigan: Talbots
Jeans: AG
Shoes: Via Spiga
Necklace: Kluster on Etsy

When I wore it to work this week, I layered my favorite ivory cardigan over it.  This shirt also looks great tucked into a pencil skirt.  The pattern includes a collared version without the tie and I am thinking about making that one up next…

IMG_1250

I love how it just skims the hips.  The tucks are so easy to sew and are also great for alterations when you ignore the size chart 🙂

IMG_1252

A view of the inside.

As far as the finishes called for, the facing edges are serged.  The front bodice/yoke seam is clean finished so no exposed edges show.  The back yoke seam is finished with the serger.  The side seam edges call for a serged finish.  The sleeves and bottom have a narrow machine hem.

IMG_1256

Front yoke seam — inside view.

All in all, I can’t recommend this pattern enough.  If you haven’t seen In House Patterns before, go check them out.  And if you’re concerned because you aren’t a D bust cup, Alexandra has a lot of great information on her website about how to alter her patterns for larger and smaller sizes.  I am looking forward to new patterns from this great designer!

IMG_1247

1 Year Blogiversary Giveaway!

24 Jan

As I mentioned yesterday, I am celebrating one year of blogging about my cooking and sewing adventures.  I am amazed that I have accomplished all that I have — I have baked fancy cakes, perfected roasted chicken, whipped up some tasty cocktails, made some cute tops, conquered a princess seam sloper, and sewed a boutique-worthy dress.  I have also enjoyed “meeting” other bloggers, helping me broaden my sewing skills and exposing me to things I may not have otherwise come across.

In the coming weeks/months, I hope to share with you all the finished projects that have been hanging in my closet for a while now as well as the ones that are just getting finished up.  My life is pretty hectic, so finding time to sew is hard enough, but finding time to get good photos and blog about them is even harder.  I hope with longer days ahead, this will not be as much of an issue.  Right now I have about 6 unblogged garments to show you.  Perhaps I will aim to present 1 every two weeks?


IMG_1241


In the kitchen, Mr. Homemaker and I have recently subscribed to an organic produce delivery service and receive a box every other week.  So far we have been very pleased and find ourselves eating at home a lot more often.  I will try to share more recipes with you that involve fresh produce from our box as well as go through some of my entertaining essentials.


craftsy-logo


Well, enough of that.  Now for the giveaway I mentioned yesterday.  I am giving away, compliments of me, a gift certificate for a free Craftsy class to one lucky reader.  All you have to do is comment on this post and tell me which of my posts in the past year has been your favorite and what you would like to see me post in the upcoming year.  This giveaway is open to readers anywhere in the world (the prize will be provided via e-mail).  If you aren’t familiar with Craftsy, it is an online learning platform that provides video courses for many different crafts (baking, cake decorating, sewing, knitting, jewelry making, gardening, etc.).  You can watch the classes at your convenience and on your own time and they never expire.  Even if you don’t win, they offer several free mini classes, so it’s worth checking out.

Please note, this giveaway is not being sponsored by Craftsy.  I am purchasing this prize myself to celebrate my one year Blogiversary.  Yay!!!

The giveaway will close next Thursday, January 31, and I will announce the winner shortly thereafter.  Good luck and thanks for reading!

The Date Night Dress

9 Jan

So here it is — my big sewing accomplishment from the New Year’s holiday.  I am so pleased with how this make turned out.  I didn’t copy a particular RTW design but I do think it looks a lot like some Kate Spade dresses I have seen.  What do you think?

IMG_1166

Necklace: Nine and Co.
Clutch: Cruise ship duty free shop
Shoes: Donald J Pliner

This dress is made from New Look 6457 and I used one of my NYC fabrics — a luscious silk Dupioni/Shantung with a white background, large grey and black paisleys, and scattered black and dark cobalt/navy sequins.

IMG_1188

It is trimmed with black satin (self-made) piping at the princess seams, neckline, armholes, waistline, and hem.  I finished it with a handpicked lapped center back zipper and handstitched invisible hem (with grey lace hem tape).

IMG_1179

My first lapped and handpicked zipper!

As far as alterations go, I used the bodice front pieces from Simplicity 2648 (see Peplum Top from last week) because I knew they already fit.  I lowered the front neckline 1.5″ and the back neckline 3″.  I took 0.5″ off the bodice length.

IMG_1171

I added piping to the princess seams because I like the look, although this wasn’t called for in the pattern.  The pattern called for a gathered, Dirndl skirt, but I wanted something with a cleaner look, so I cut the pattern skirt pieces but converted the gathers to box pleats in the front and regular pleats in the back and lined them up with the princess seams.

I learned several new techniques while making this dress — how to make piping from scratch, how to insert a lapped zipper, how to handpick a zipper, how to insert a zipper guard, how to apply hem tape, how to insert a hook and eye, and how to insert a dress lining without any hand stitching (yay!).

IMG_1169

I fully lined the dress, the bodice with a stretch satin because it feels so good slipping on and off, and the skirt with Bemberg rayon.  I hemmed the skirt lining by machine and frilled it up with grey lace hem tape to match the dress skirt.

IMG_1189

I applied a zipper guard to keep the zipper from eating up the lining or dress fabric.

IMG_1194

On the dress’ first outing, my husband and I went to one of our favorite “fancy” restaurants in town.  Toward the end of the meal my husband said a casual hello to another man as he was walking out and told me “that’s Larry the Cable Guy.”  I was like “Oh, okay, huh?”  After a moment of my husband explaining things to me and after we had paid our tab, we met “Larry,” who is really Dan, outside the restaurant, chatted for a few moments, then snapped a pic so I could show y’all that this dress also attracts celebrities 🙂


IMG_1421

Here is a view of how I wore the dress for its second outing (to church and brunch), plus an action shot of me ironing some invisible fabric.  I topped it with a chunkier necklace (The Limited), RTW black ponte jacket with leather trim (Elie Tahari), and black suede tall boots (Stuart Weitzman).  And fresh hair and make-up.

IMG_1175

So while there are a few things that are not perfect about my dress, I will not be pointing those things out to you and I dare you to spot them (well, I don’t really dare you, but you know what I mean).  I am so glad I have finally made something substantial I am proud of and will wear over and over again.

IMG_1173

And because I promised a glimpse of what’s on my sewing table, Gertie’s shirtwaist dress, as a shirt with a peplum (are you tired of those yet?).  This is a wearable muslin and if it turns out, I will be making the dress next.  What’s on your sewing table?

IMG_1417

Knit Peplum Top

2 Jan

Happy New Year everyone!  I hope you had an excellent holiday season and your mind is full of exciting resolutions 🙂

I have taken the last few days off of work and have spent it doing little other than sewing.  I have to tell you it has been wonderful!  I had gotten a little disgruntled with my sewing because I had been having some trouble with sorting out my fitting issues but I made two garments over the break that I think fit perfectly.  This accomplishment was just what I needed to get my “sewjo” back and I am ready to tackle more projects now.


IMG_1157


On a side note, I participated in the Christmas sewing swap hosted by Vicki Kate and I was paired up with Rebecca from Sew Tiger Sew all the way over in San Francisco.  She sent me this gorgeous grey and white sheer cotton from Britex Fabrics.  I may be making an Alma blouse with it if I buy the pattern or I may use a pattern from my stash — we’ll see.  You’ll have to wait to see what I sent Rebecca when she reveals it on her blog.


IMG_1139


A few days ago, I was checking out a new local high-end women’s boutique.  I saw several cute knit peplum tops on the racks, all in the $250 and up price range.  Aside from remarking to my husband on the outrageous price tag for something that was fabricated in China, I also noted the simple construction techniques that had been used to make the tops and exclaimed that I could make one myself — and for a lot less than $250!  So I set out to do just that.


IMG_1137


For this top, I used Simplicity 2648, an Amazing Fit dress pattern.  I had made it once before in the preblog days before I knew how much ease the Big 4 pattern companies add to their patterns.  I recut the pattern in a smaller size and bust cup and the fit was much better.  I still did a little bit of tweaking, I think mostly because I used a knit (albeit very stable and sturdy Eileen Fisher white ponte knit), and took the seams in a tad under the bust and at the sides, but overall the 12C pattern fit me well.  I also shortened the bodice by 1″ for my short waist.  I drafted my own 1/2 circle peplum to fit once I had perfected the fit of the bodice.


IMG_1143


For construction, I serged all the seams with a 4-thread overlock.  I then topstitched the princess seams and back darts as well as the waist seam.


IMG_1160


I fully lined the top with a silky tricot I picked up at a local fabric salvage shop for a song.  I edge stitched the neck and armhole openings to echo the topstitching and to help keep the lining in place.


IMG_1162


Overall, I LOVE my top and plan to wear it a ton.  I think I will also be making more knit tops like this but don’t know that I will be lining all of them, especially if they are not in a see-through color.


IMG_1140


As an added bonus, I  now have a princess bodice block that fits me and I will be showing you the second project of my mini holiday break that I created using the pattern soon but in the meantime here is a sneak peek!


IMG_1156


Styling Notes

Top:  Me Made!

Skirt:  CAbi

Tights:  Spanx

Shoes:  Donald J Pliner

Necklace:  Kenneth Cole

Holiday Dirndl Skirt à la Gertie

24 Dec

IMG_1327

I bet you were thinking I had given up sewing.  I have actually been doing a fair amount of sewing I just haven’t had time to get things photographed and blogged.  I did have a chance to snap a few pics of this skirt, though, the other Sunday when we went out for brunch and a wonderful Christmas jazz concert.

IMG_1324

I made this skirt last year using Gertie’s Dirndl skirt tutorial and it is such a quick and easy project, especially if you are a new seamstress or don’t have a lot of time to dedicate to a project.  My fabric is a beautiful green silk dupioni with large tonal polka dots (which are hard to see in the photos).

I did stray from Gertie’s tutorial a little bit in two ways.  One, I made the waistband from one piece of fabric.  If you are going to sew two pieces together, why not just cut one and fold it in half?  Two, I don’t really think a pattern is necessary for this skirt.  I just tear my fabric on grain to get my skirt panels in the desired length, then I fold them in half and cut any excess width off after making sure the edge is straight.  Other than that, I followed the directions she outlines.

If you are looking for a quick and satisfying make or a beginning sewing project, I definitely recommend this skirt.

IMG_1326


Styling Notes:

Top and black bead necklace: The Limited

Cardigan:  Talbots

Shoes:  Cole Haan

Belt:  Target

Crinoline slip:  Trashy Diva

Lipstick:  MAC Russian Red

Shorts! Simplicity 1808

12 Oct

Because the genetic code passed on to me by my parents included sequencing for excessive junk in my trunk, I have always had a hard time finding bottoms to fit — things that fit in the waist are too tight in the hips and if something fits in the hips it gapes in the waist. Shorts seem to be exceptionally tricky for some reason, so when I started sewing, shorts were high on my list of must-makes. I recently saw these cute shorts on the Nordstrom blog and thought I would try to recreate them.

20120908-124456.jpgsource

They have cute pleats in the front which I think are more flattering for my fuller front thigh, and the back waistband (couldn’t find a pic), is elasticized. Then I came across this pattern:

20120908-130016.jpg

and decided that it could be easily adapted to suit my goals. I did make a few alterations. First, I omitted the tie belt. Second, I stopped the elastic at the side seam instead of carrying it around as depicted in the pattern. Third, I separated the pocket piece into two so I could have my pocket lined in a different fabric.

In terms of fit, I made a muslin first in a slightly stretchy cotton woven. The shorts ended up being really big (I could have taken an inch out of each side seam), so for this pair I cut a size smaller.

20120908-122954.jpg

Unfortunately, when I made my fashion fabric pair, I couldn’t pull them up over my hips. Luckily, letting out all the waist seams to the max and tapering it down gave me just enough room to shimmy into these if I do it just right. I can’t explain this.

20120908-123033.jpg

Here’s a pic of the front pleat and pocket detail.  Dark clothes are hard to photograph so I tried to lighten it up a bit to show the details — still not a great photo.

20120908-123047.jpg

A view from the side showing how the elastic portion of the waistband stops at the side seam.

20120908-123100.jpg

Now the back view — ugh!  Will not be wearing these with my shirt tucked in!!  I would like to add welt pockets and belt loops but I don’t know if that would fix the crumpled paper bag appearance of my back side.  After I finished my shorts, I saw Lauren’s version where she used a single wide elastic and stitched over it with a 3 part zigzag.  I think her back waistband looks much better so if I make these again I will employ that technique.

20120908-123015.jpg

A view of my cute silk charmeuse pockets.

Overall, I am pleased with my shorts and feel like I have made some progress in my sewing and pattern alteration skills.  I would like to try the Thurlow pattern by Sewaholic next to see if I can get a finished product that works with a shirt tucked in 🙂

20120908-122937.jpg

Pattern:  Simplicity 1808

Fabric:  Carolina Herrera cotton sateen (shorts), print silk charmeuse (pocket and waistband lining)

Notions:  1/4″ elastic

Finishes used:  Serged seam allowances, machine blind hemmed, stitched in the ditch to secure waistband facing

Top:  Oldie from Target

Shoes:  Seychelles from earlier this year

Necklace:  Premier

Bracelets:  Kenneth Cole from Dillard’s

Sewaholic Cambie — As a Blouse

11 Aug

Me at Nanette Lepore showroom, standing in front of the upcoming season. Of course I’m blocking the whole section of NL clothes that match the shirt I’m wearing.

This is my second attempt at Sewaholic Cambie.

My first attempt is the complete dress pattern with the gathered skirt and it is lacking only the lining to be finished.  The problem?  I’m not loving the fabric now that it’s all sewn up.  The fit is perfect and it is my first time to do a real full bust adjustment on a flat pattern but I just can’t see myself ever wearing the dress so it is sitting in the UFO pile.  But that didn’t stop me from moving forward with my great-fitting post-FBA bodice pattern and turning out a second version.  I decided I wanted a cute peplum blouse when I found this green Swiss dot fabric at Hancock and I am so pleased with the results.  I lined it in a soft, light aqua cotton that I picked up for a steal at a local fabric salvage store.  The pattern is well drafted and goes together smoothly.  I only have a few issues/suggestions/comments, so I will list those here:

1.  The sweetheart neckline doesn’t hug the body very well.  I understitched the lining to the seam allowance and this helped a little but on my next version (currently in the works), I am going to ease in a slightly shorter piece of twill tape to the seam allowance to get the neckline to hug my body better.

2.  Along the same lines, the instructions tell you to trim the seam allowances of the neckline before you insert the sleeves.  This makes it a little trickier to know exactly how far to pull the sleeves through before sewing.  Next time I will just wait to trim everything after I have pulled the sleeves through and sewn them in place.

Please pardon the I-just-pulled-it-out-of-the-dirty-laundry-to-take-photos wrinkles 🙂

3.  For my FBA, I used the Palmer/Plescht method and created a new dart in the side seam.  I chose my starting size based on some crazy theory that I came up with — basically I calculate what my bust measurement would be if I was a B-cup based on my band measurement.  So if my under bust measurement is 28.5″ and US bra sizing adds 4″ for the band size then a B cup is 2″ above the band size, my theoretical bust measurement would be 34.5″ which corresponds exactly to the pattern size 8.  I do these crazy measurements because my high bust measurement never seems to correspond well for me and the fit is always off if I go by that method.  Maybe most people don’t have that problem and you can ignore my psycho idea but it works for me 🙂

So I started with a pattern size 8 and made the slashes up and across according to the Fit for Real People book.  Since the pattern doesn’t have a side seam dart, I created one for better shaping.  According to my DD cup size (I can’t believe I just said that!), I needed to add 1″ between the vertical lines of the slash I made, opening up the waistline dart wider.   I trued up the length of the bottom of the bodice piece, made sure my bust point was still accurate, drew in my dart legs (kept the waist dart curved with my French curve ruler), and I was done.  I have to say, this is the best fitting bodice I have ever sewn!  Yay!!!

4.  Since I modified the dress in to a blouse and swapped out the two pattern skirt options for a peplum, I had to draft this myself.  No worries, though, because drafting a small full-circle peplum is pretty simple.  Just google “drafting a full circle skirt” and you will find plenty of great tutorials on how to do it.

5.  I moved the zipper from the center back to the left side seam.  

Tasia gives great instructions on her blog about how to sew the lining to the invisible zipper.  I will be using this technique from now on.  It is so professional and clean and I didn’t even need to sew in a hook at the top of the zip!

All in all, this is a stellar pattern and you should start working on your Cambie dress (or blouse) ASAP.  Stay tuned because I have another version coming up that is a good deal fancier than the one you see here… 🙂