Perfectly Easy Pavlova and a Blogiversary!

23 Jan

IMG_1222


How many of you sewers out there were thinking I had gotten my hands on a copy of Cake Pattern’s newest release, the Pavlova wrap top and skirt, before it officially hits the market?  Sorry, no such luck.  But I did make you this tasty edible version of the Australian dessert that starts with a light meringue shell, gets filled with airy, sweetened whipped cream, and then topped with your choice of seasonal fresh fruits.

It’s also a celebratory dessert to commemorate my 1 year blogging anniversary!  In one year’s time, I have written 45 posts, gathered 98 (wordpress + google reader) followers, received 176 comments, and gotten 8458 hits.  That’s not too bad!  I’ll be announcing a giveaway tomorrow in honor of the special event, so stay tuned!  But until then, feast your eyes on this lovely and refreshing dessert 🙂


IMG_1232


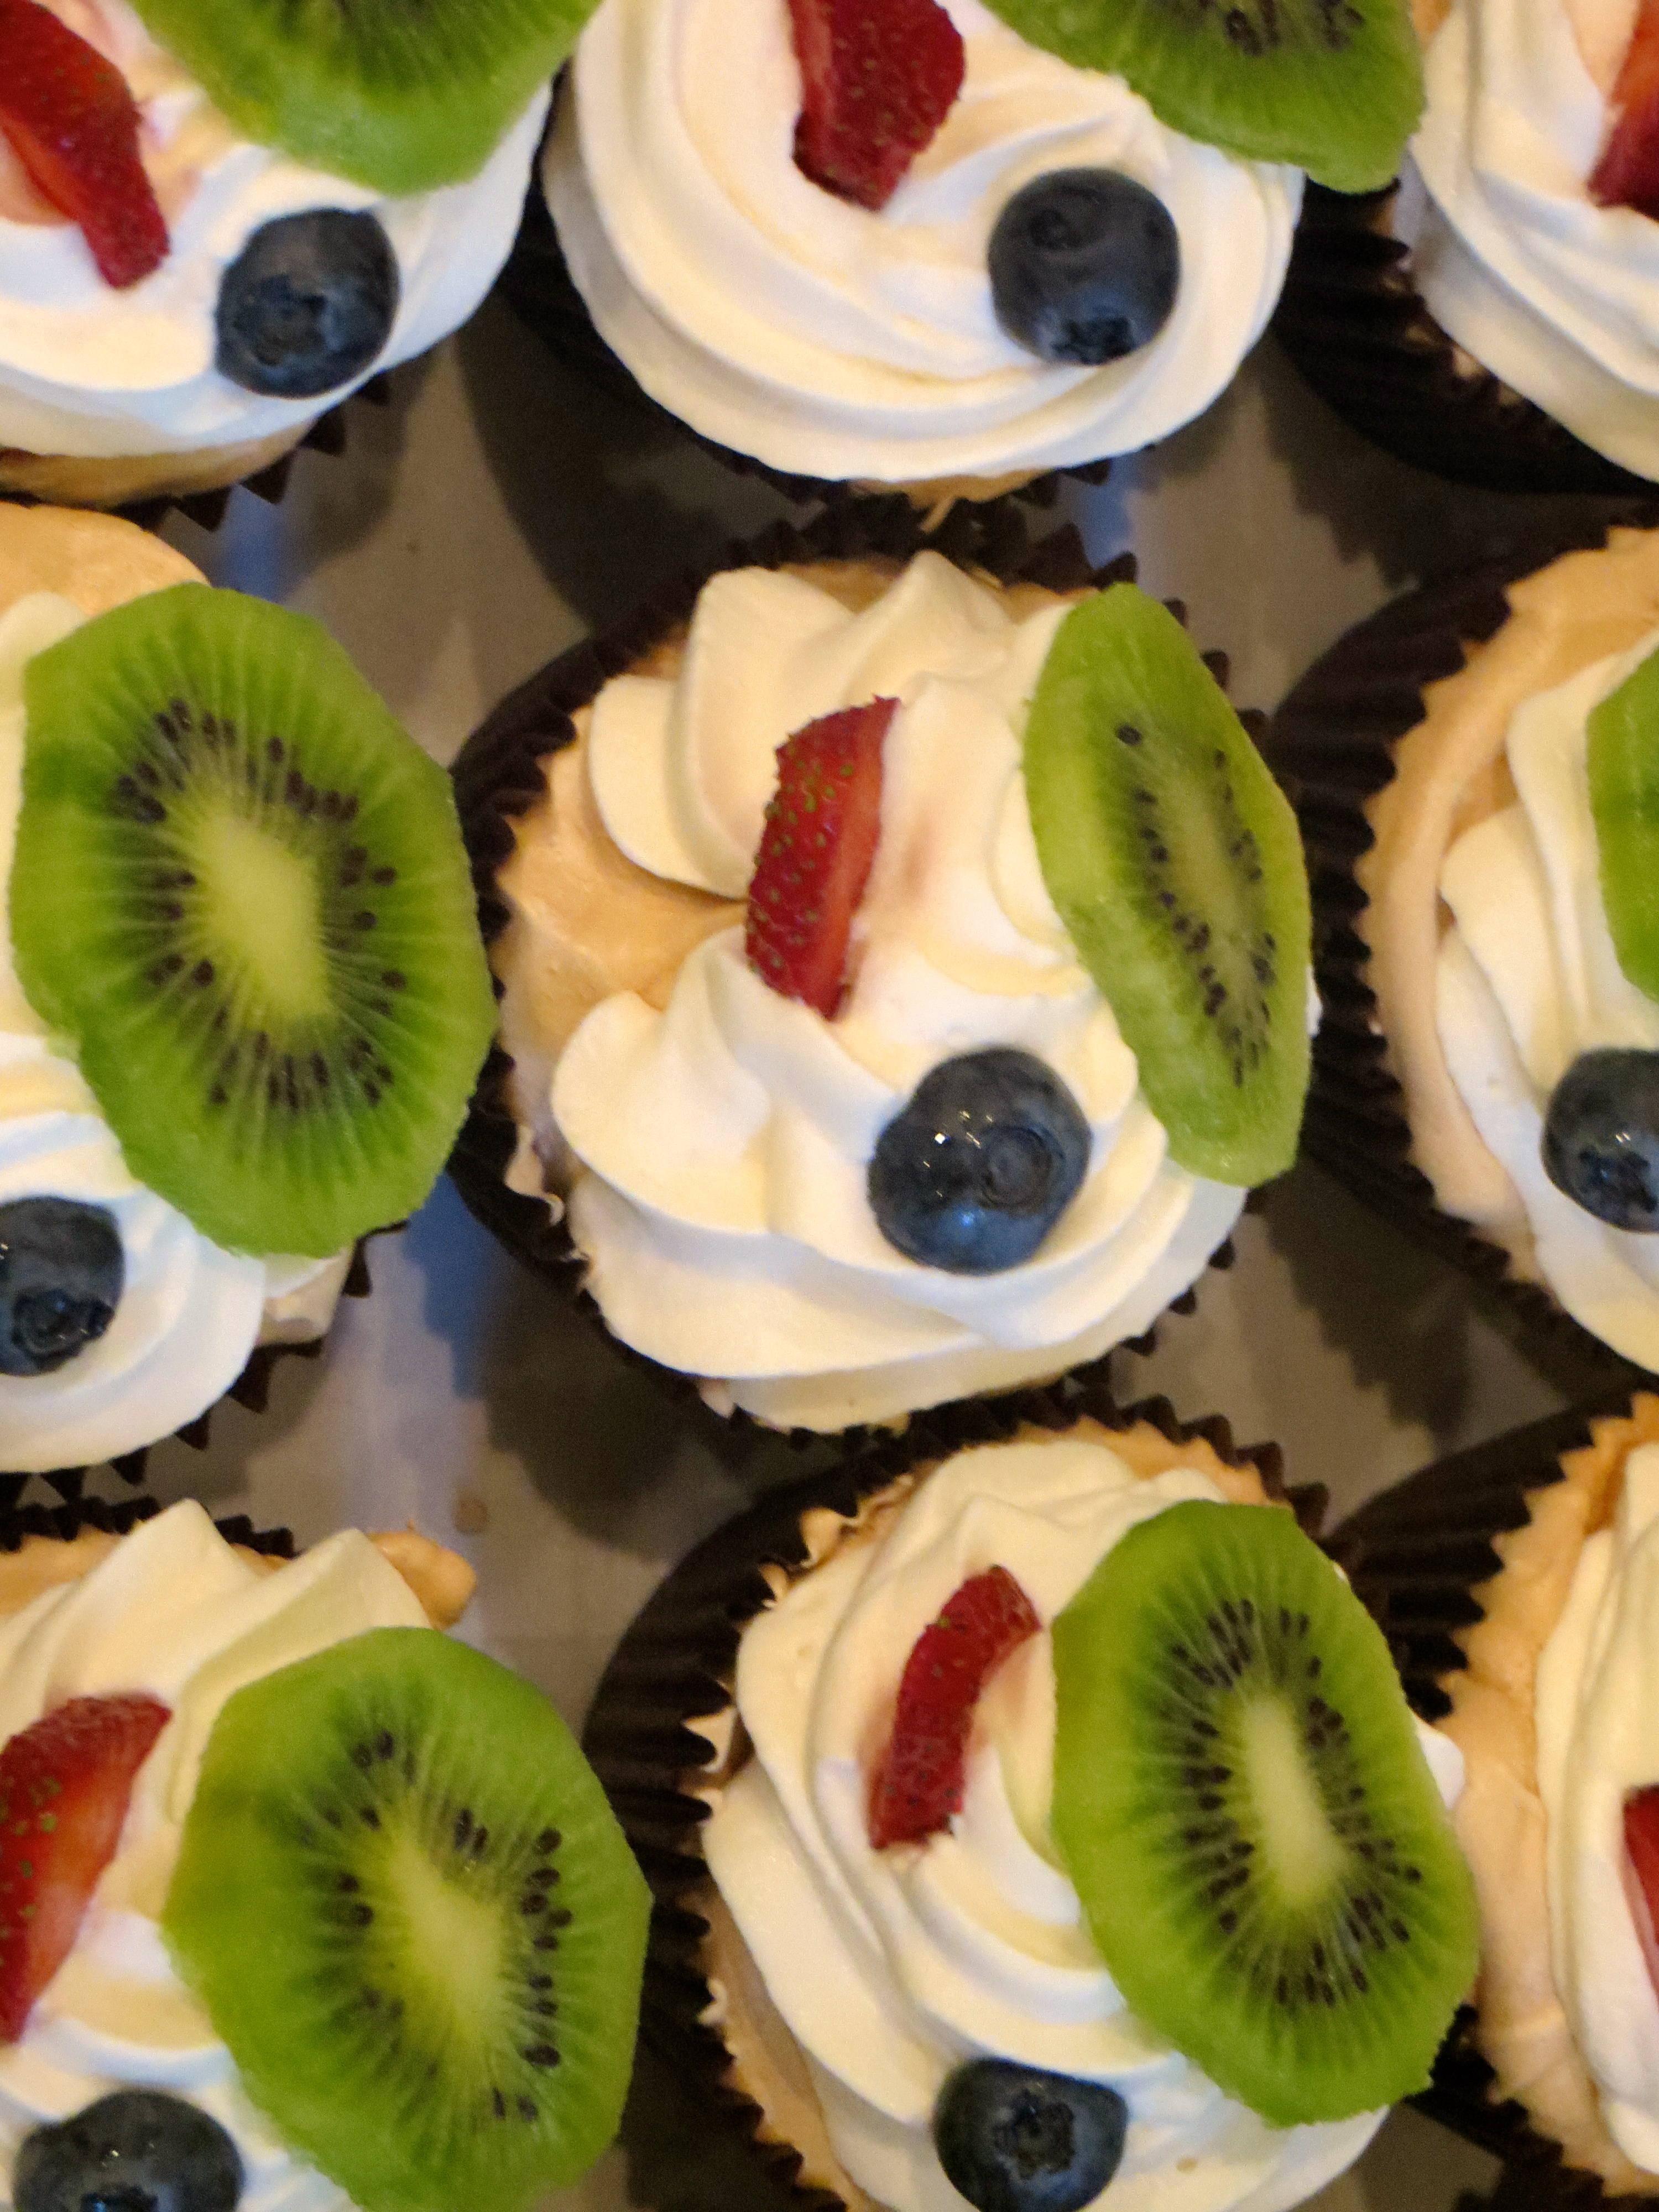
I even made some mini ones to share.  Do you think they look like funny little faces?  This recipe looks complicated but it is as simple as can be.  My sister first introduced me to it several years ago and we have been making it regularly since.  If you have a few basic ingredients and an electric mixer, you can wow your friends and loved ones with this sure-to-please confection.

I have used strawberries, kiwi, and blueberries here because they happened to come in my produce box for the week, but you can use your favorite complimenting fruits — peaches, nectarines, raspberries, blackberries, etc.


IMG_1204


So, first you are going to beat your room temperature egg whites until they are stiff and glossy like so.  Can you see my reflection in these?


IMG_1208

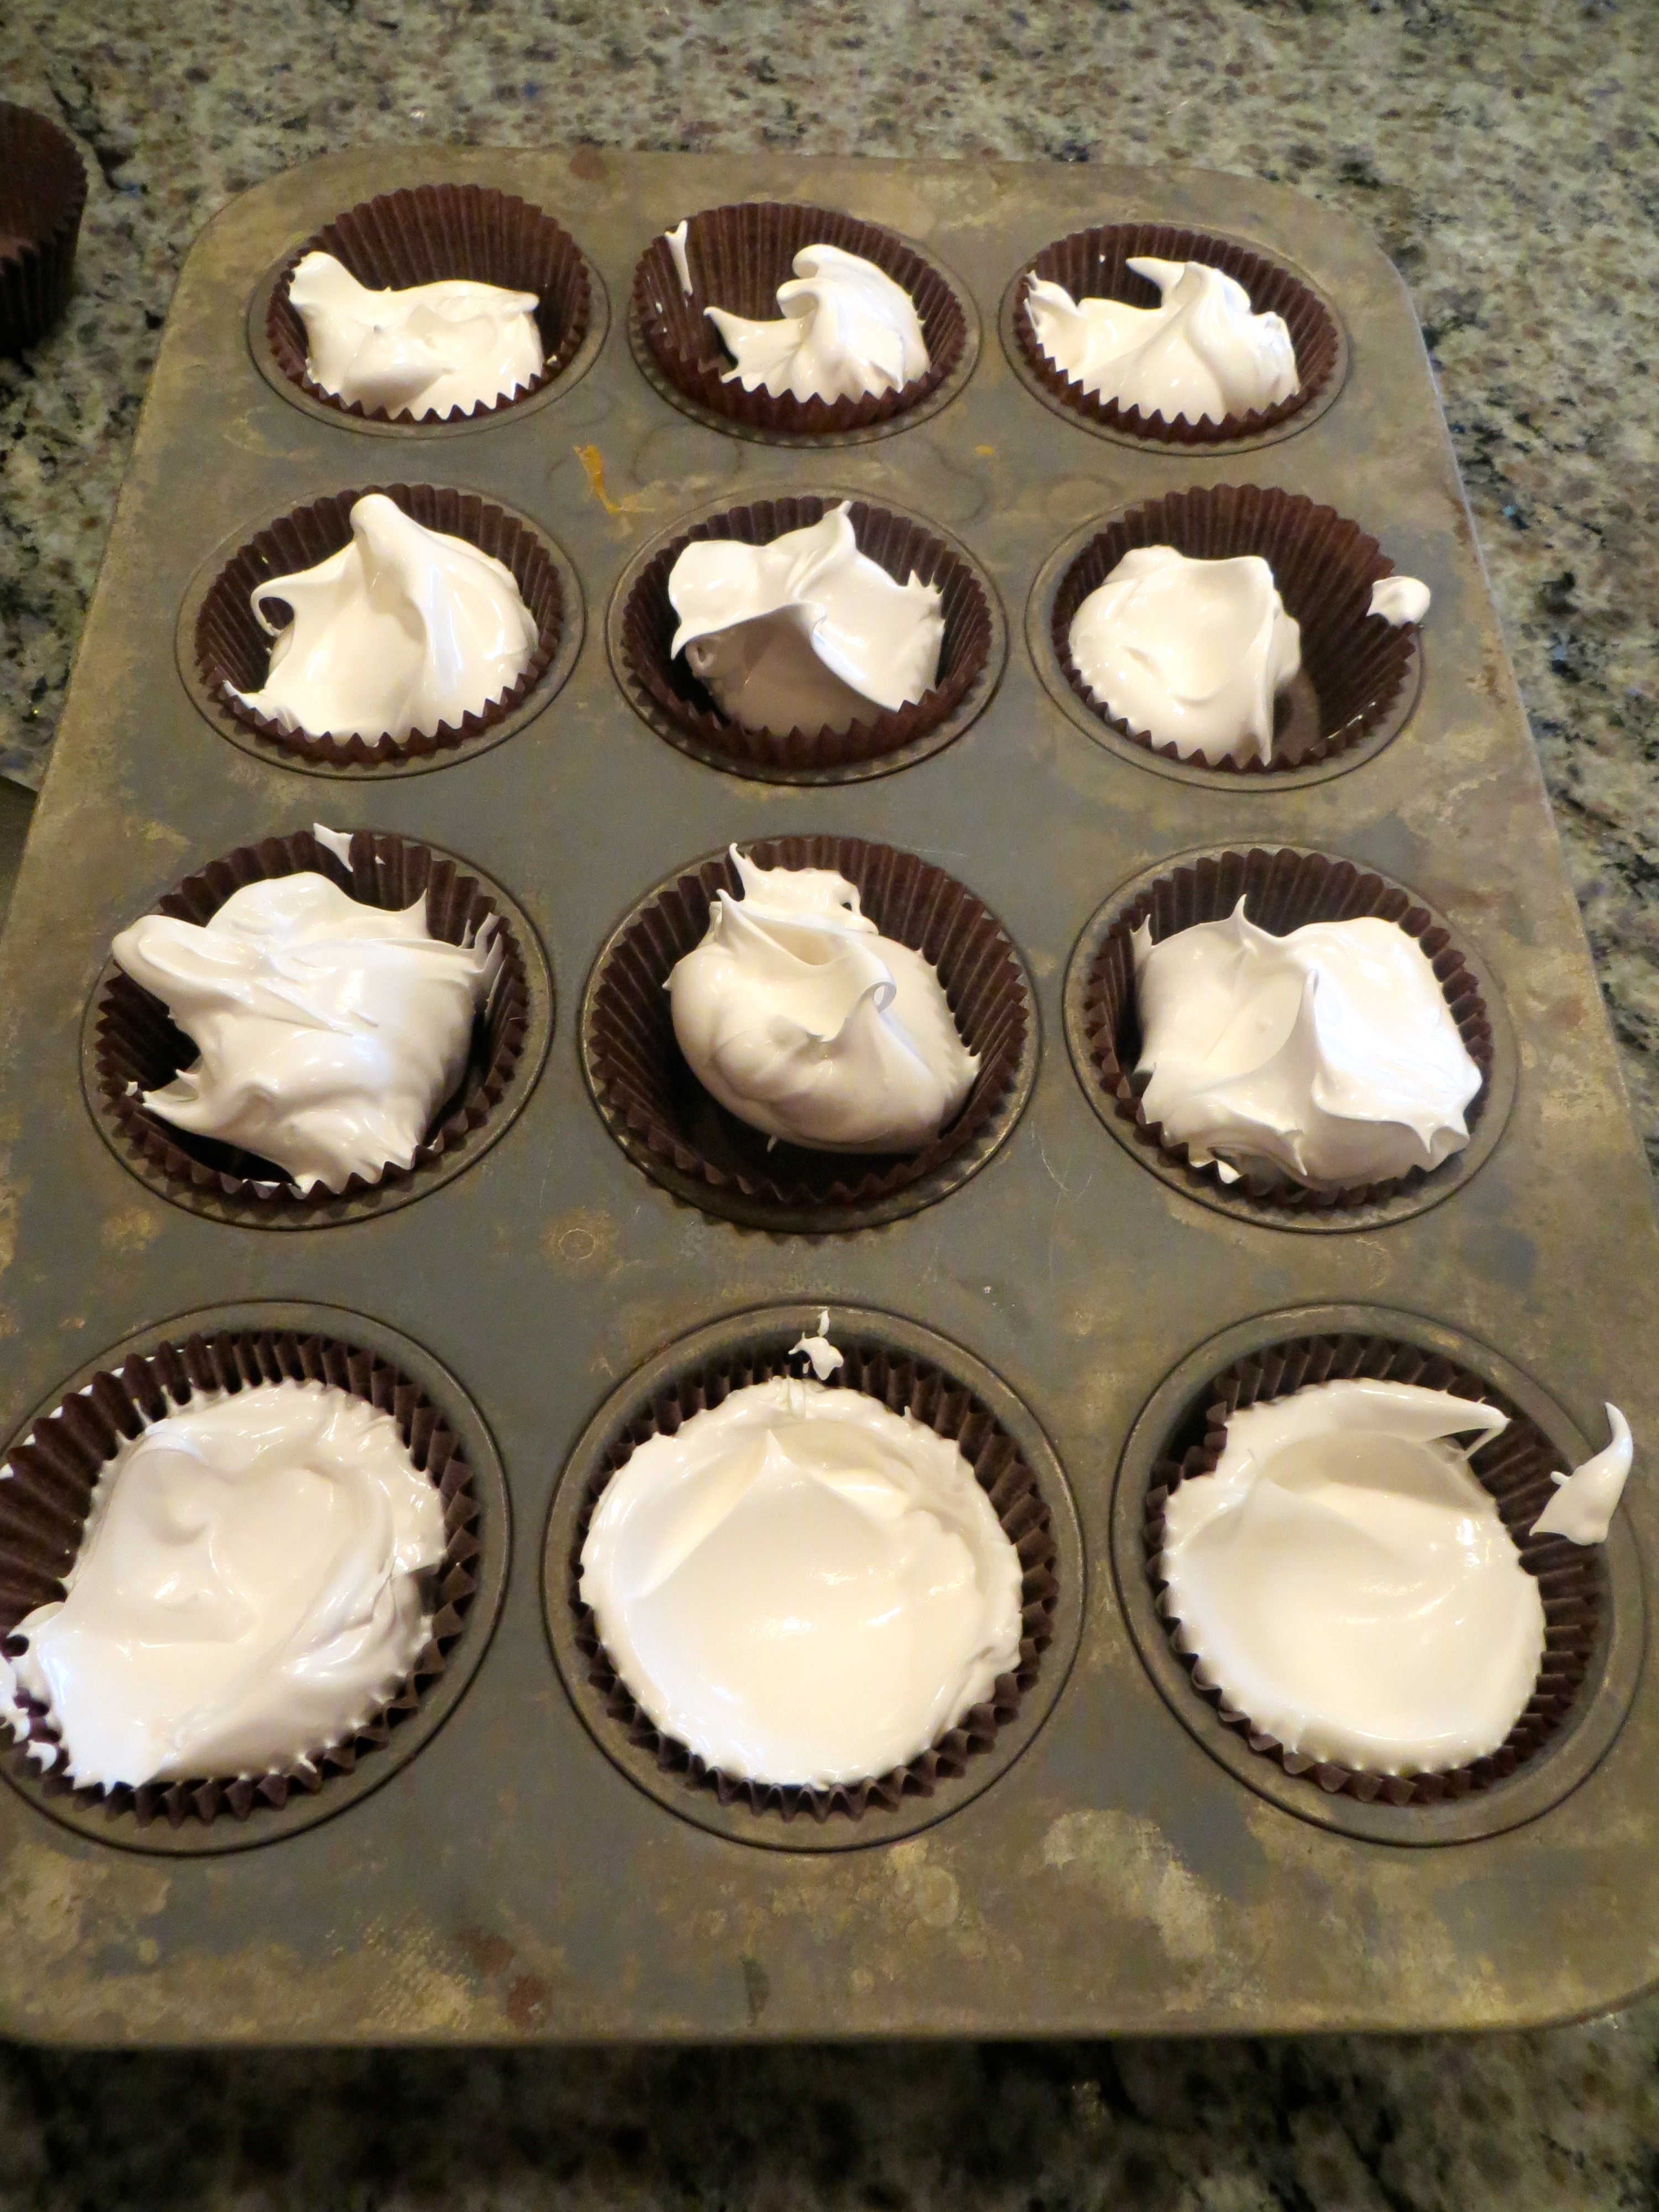
The bottom row has been smoothed.


If you choose to make the cupcakes, one batch makes about 2 dozen regular size cupcakes.  This time around I just used a spoon to fill the paper cups then smoothed the tops with a wet metal tablespoon (this is a great kitchen trick for meringue).  If I am being fancy, I will use my piping tools to make mini meringue nests on parchment and forego the cupcake papers and tin.


IMG_1206


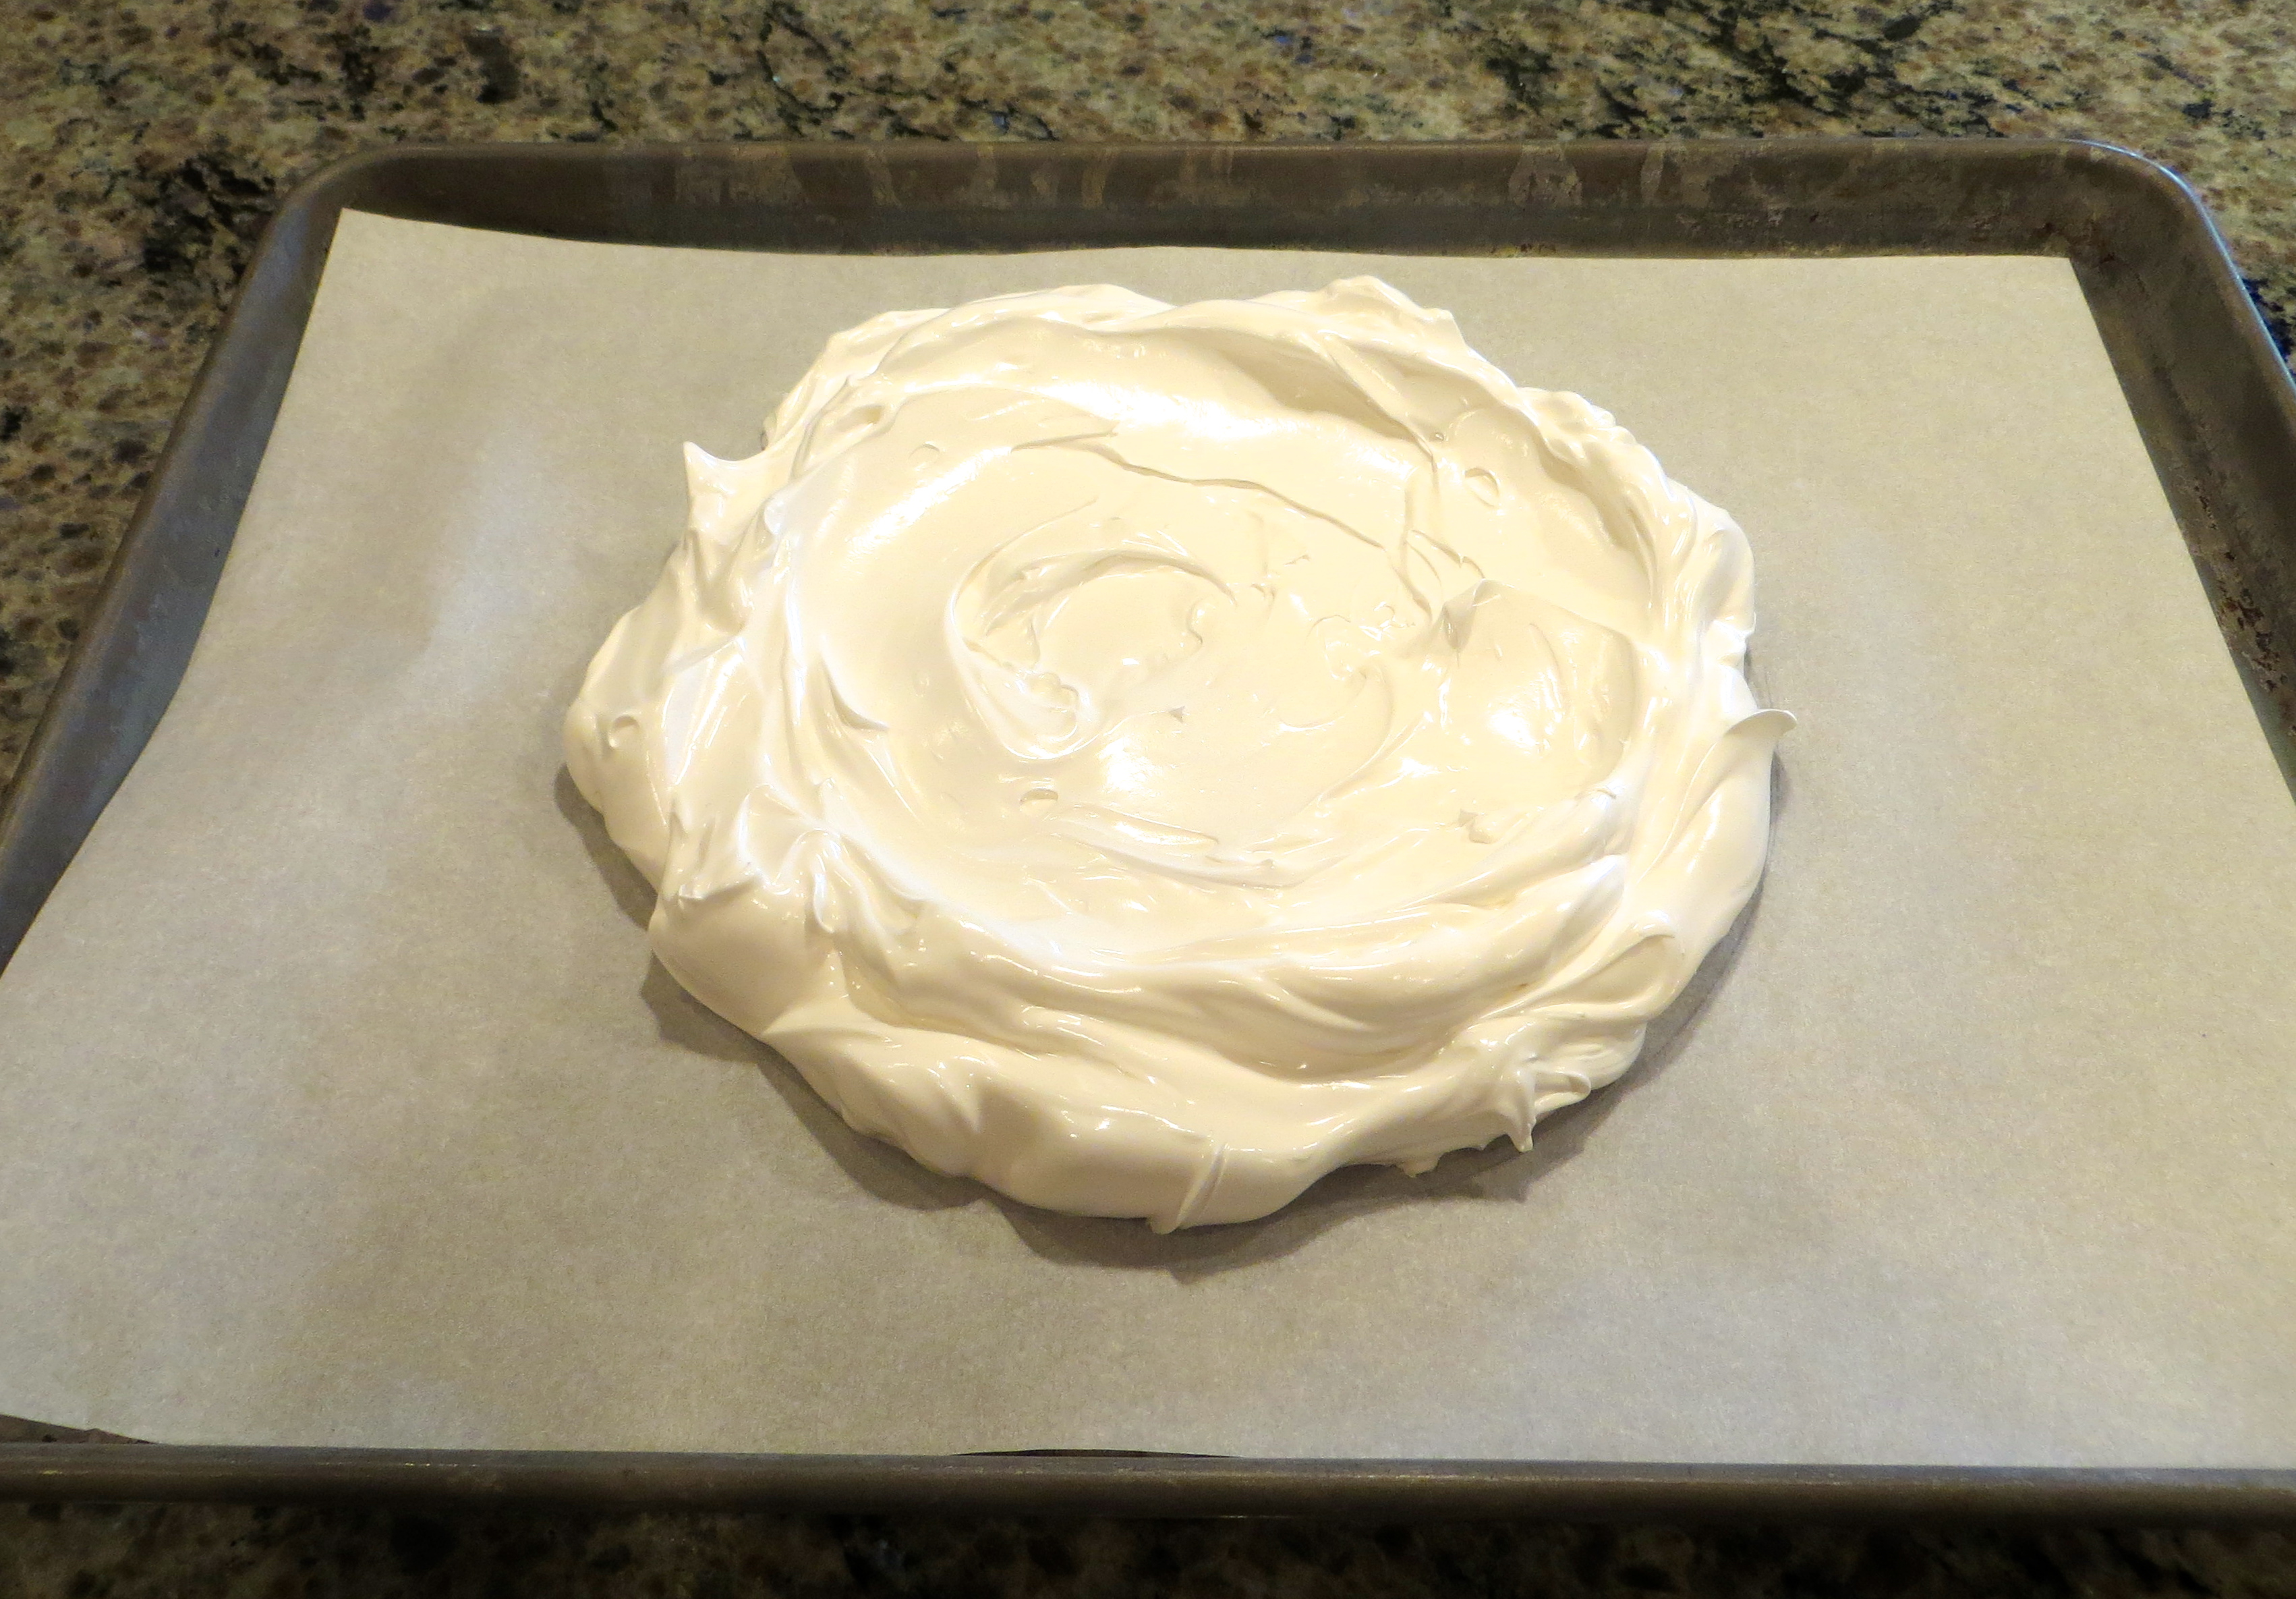
For the large pie, trace a 9″ circle onto parchment paper, flip the paper over and place it on a baking tray, then spread the meringue on top.  Use the spoon to spread it into the circle and smooth the top with the wet spoon.


IMG_1237


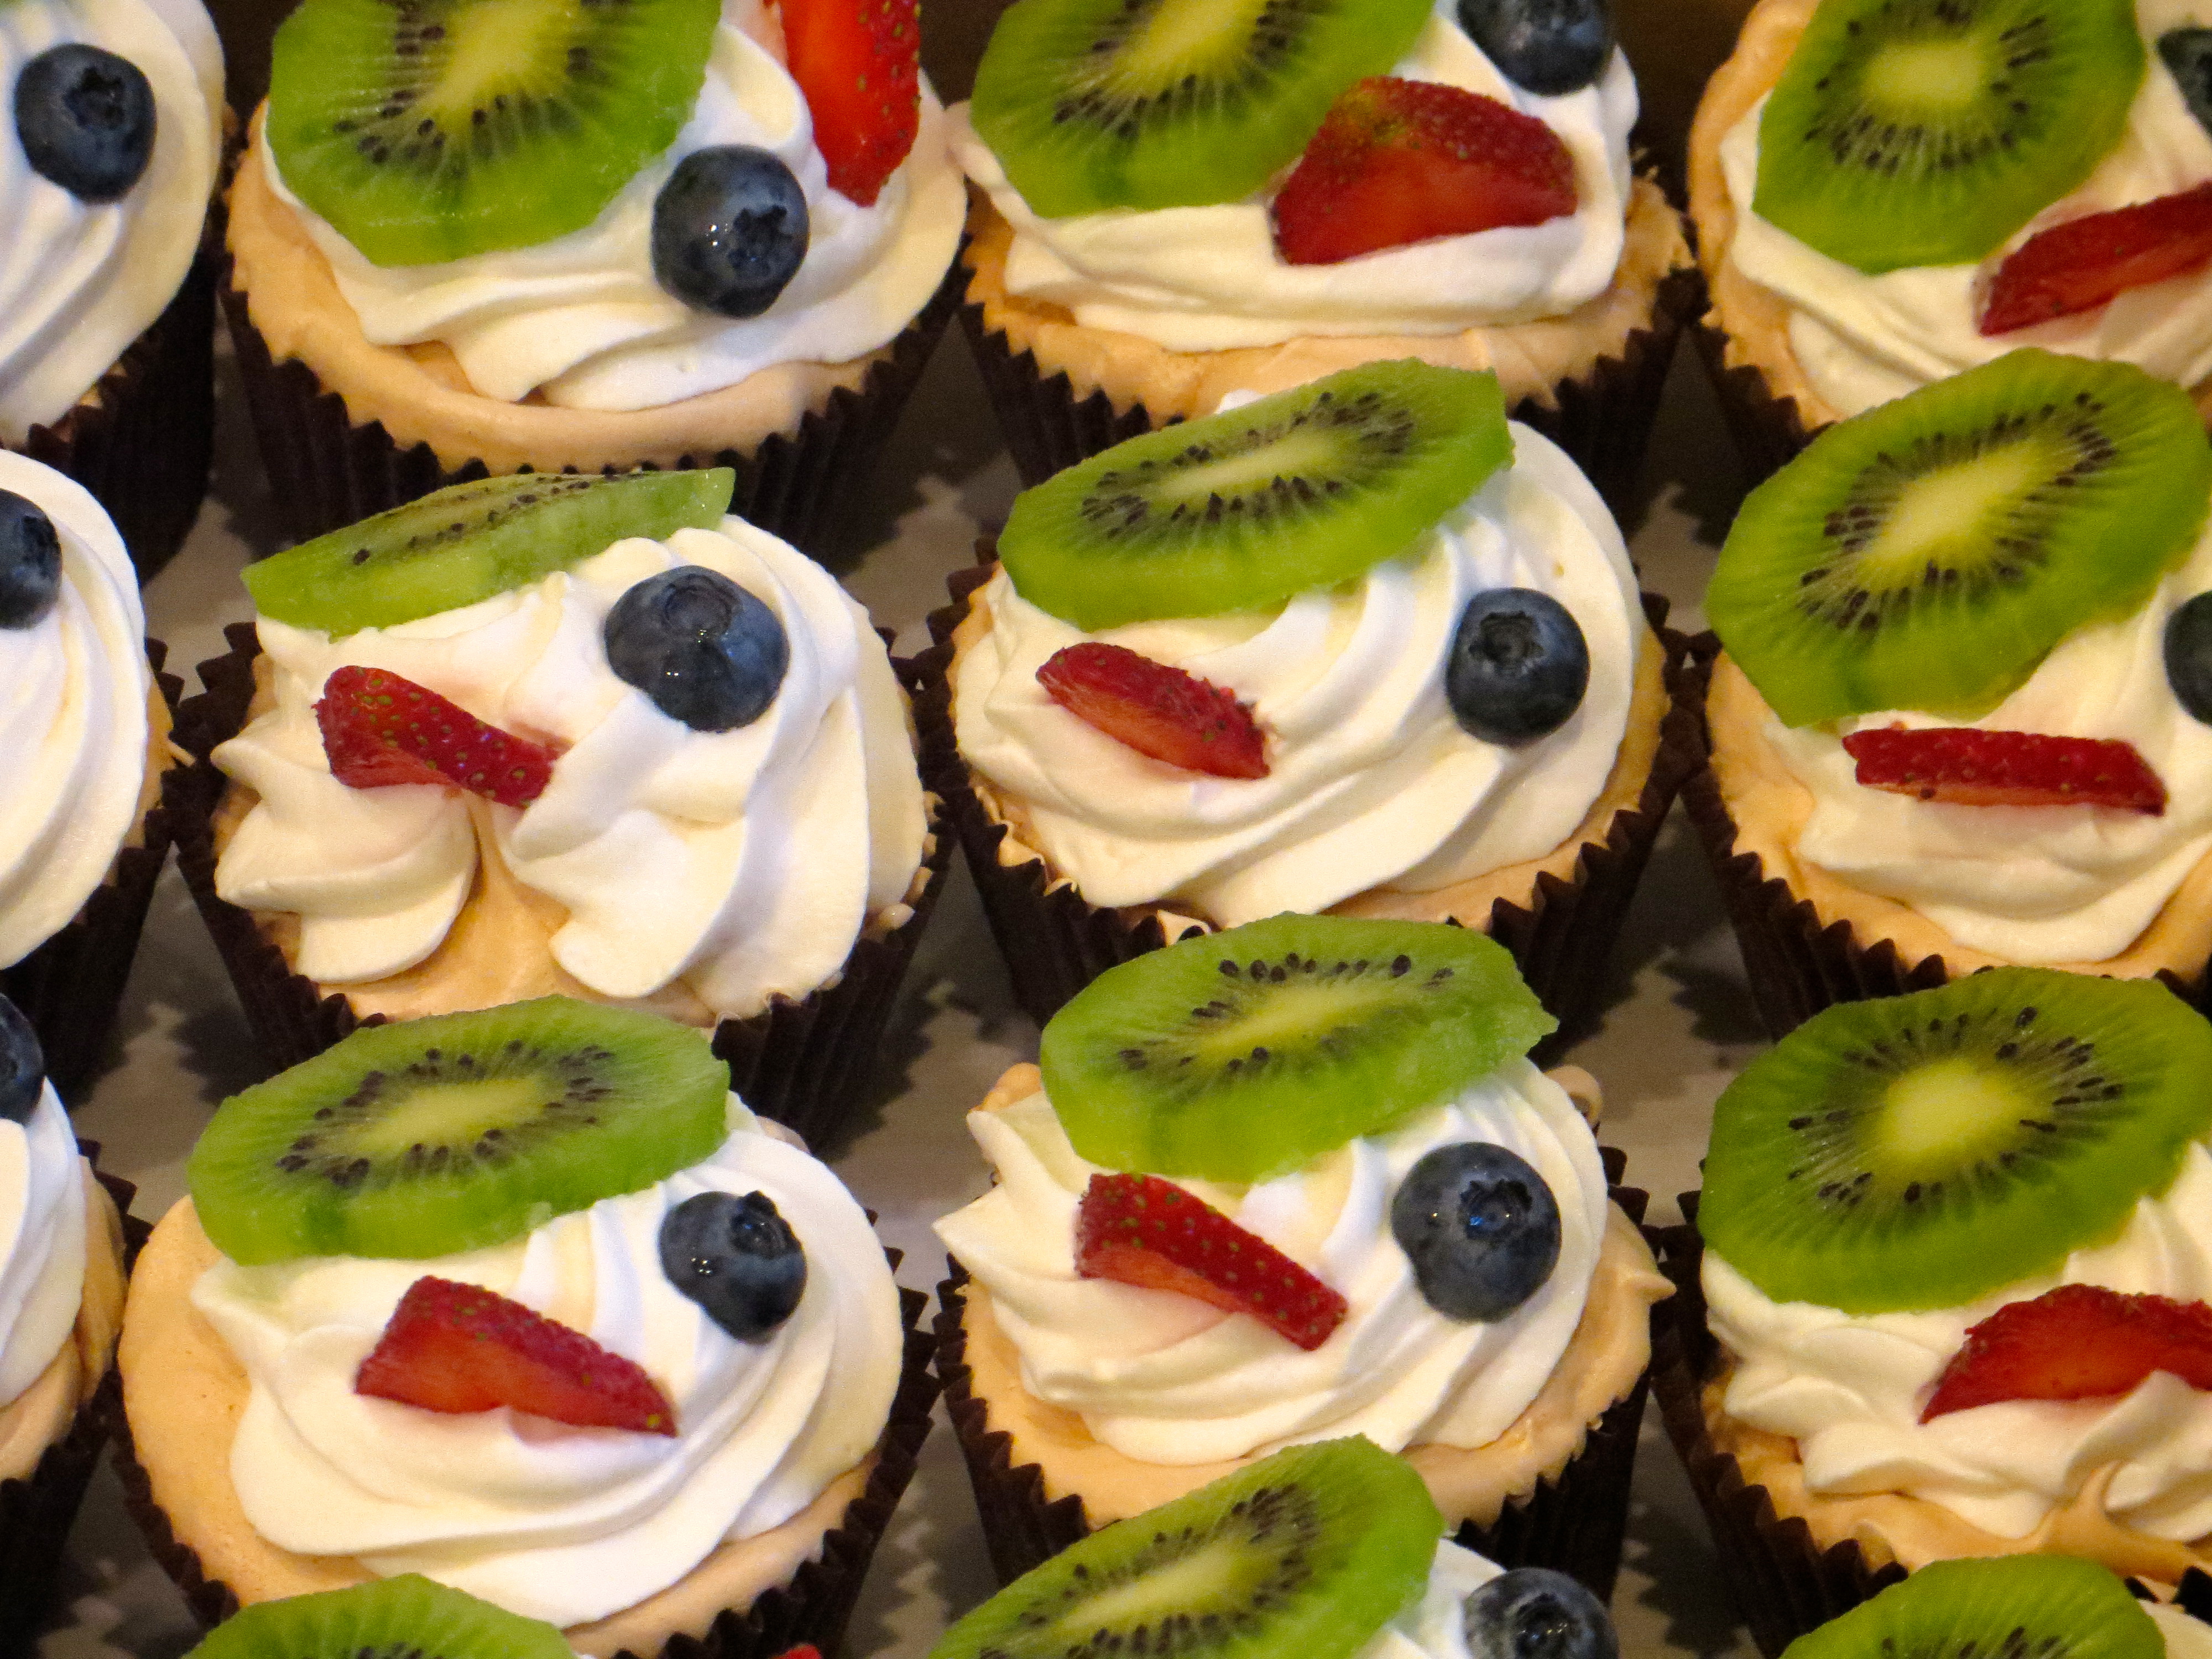
I spooned the whipped cream on top for the full-size Pavlova, but for the mini ones I piped the whipped cream on with a pastry bag and large closed star tip.  As for the fruit, you can make it as decorative (or not) as you would like.  It will taste great either way!


Pavlova

Serves 8 as pie or 24 cupcakes (you can’t eat just 1!)

1/2 cup egg whites, at room temperature (from about 4 eggs)
1/8 teaspoon cream of tartar
1/8 teaspoon salt
1 cup granulated sugar
1 1/2 teaspoons cornstarch
1 tablespoon raspberry vinegar or red wine vinegar
1/2 teaspoon pure vanilla extract
1 1/4 cups heavy whipping cream
2 tablespoons light brown sugar, packed
2 kiwi fruits, peeled and thinly sliced or 1 cup of another ripe fruit, such as peaches or nectarines
10 strawberries, green parts trimmed off, thinly sliced or other berries, such as raspberries or blackberries

Preheat oven to 350 degrees.

In a mixer fitted with a whisk attachment (or using a hand mixer), whip the egg whites, cream of tartar and salt in a clean, dry bowl until foamy. Add the granulated sugar, cornstarch, vinegar, and vanilla and continue whipping until stiff, smooth and glossy, about 8 minutes more. On a sheet of parchment paper cut to fit a sheet pan, use a pencil to draw or trace a circle 9-inches in diameter. Line the sheet pan with the parchment, pencil side down (you should still be able to see the circle). Spoon the egg whites into the circle, using the back of the spoon to smooth the top and sides of the disk (use a wet spoon for best results). Bake in the center of the oven for 10 minutes, then reduce the heat to 300 degrees and bake until the meringue has puffed up and cracked on the top and the surface is lightly browned to the color of cafe au lait, about 45 minutes more. Turn off the oven, prop the oven door open, and let the Pavlova cool in the oven at least 30 minutes, to room temperature. This ensures a gradual cooling, which protects the delicate meringue.

Whip the cream and brown sugar together until stiff. Spoon it in the center of the cooled Pavlova and spread out to within 1/2-inch of the edge. Arrange the slices of kiwi around the edge. Arrange the slices of strawberry in the middle. To serve, slice into wedges with a serrated knife.


Recipe by Gale Gand, courtesy of the Food Network.


IMG_1234

The Date Night Dress

9 Jan

So here it is — my big sewing accomplishment from the New Year’s holiday.  I am so pleased with how this make turned out.  I didn’t copy a particular RTW design but I do think it looks a lot like some Kate Spade dresses I have seen.  What do you think?

IMG_1166

Necklace: Nine and Co.
Clutch: Cruise ship duty free shop
Shoes: Donald J Pliner

This dress is made from New Look 6457 and I used one of my NYC fabrics — a luscious silk Dupioni/Shantung with a white background, large grey and black paisleys, and scattered black and dark cobalt/navy sequins.

IMG_1188

It is trimmed with black satin (self-made) piping at the princess seams, neckline, armholes, waistline, and hem.  I finished it with a handpicked lapped center back zipper and handstitched invisible hem (with grey lace hem tape).

IMG_1179

My first lapped and handpicked zipper!

As far as alterations go, I used the bodice front pieces from Simplicity 2648 (see Peplum Top from last week) because I knew they already fit.  I lowered the front neckline 1.5″ and the back neckline 3″.  I took 0.5″ off the bodice length.

IMG_1171

I added piping to the princess seams because I like the look, although this wasn’t called for in the pattern.  The pattern called for a gathered, Dirndl skirt, but I wanted something with a cleaner look, so I cut the pattern skirt pieces but converted the gathers to box pleats in the front and regular pleats in the back and lined them up with the princess seams.

I learned several new techniques while making this dress — how to make piping from scratch, how to insert a lapped zipper, how to handpick a zipper, how to insert a zipper guard, how to apply hem tape, how to insert a hook and eye, and how to insert a dress lining without any hand stitching (yay!).

IMG_1169

I fully lined the dress, the bodice with a stretch satin because it feels so good slipping on and off, and the skirt with Bemberg rayon.  I hemmed the skirt lining by machine and frilled it up with grey lace hem tape to match the dress skirt.

IMG_1189

I applied a zipper guard to keep the zipper from eating up the lining or dress fabric.

IMG_1194

On the dress’ first outing, my husband and I went to one of our favorite “fancy” restaurants in town.  Toward the end of the meal my husband said a casual hello to another man as he was walking out and told me “that’s Larry the Cable Guy.”  I was like “Oh, okay, huh?”  After a moment of my husband explaining things to me and after we had paid our tab, we met “Larry,” who is really Dan, outside the restaurant, chatted for a few moments, then snapped a pic so I could show y’all that this dress also attracts celebrities 🙂


IMG_1421

Here is a view of how I wore the dress for its second outing (to church and brunch), plus an action shot of me ironing some invisible fabric.  I topped it with a chunkier necklace (The Limited), RTW black ponte jacket with leather trim (Elie Tahari), and black suede tall boots (Stuart Weitzman).  And fresh hair and make-up.

IMG_1175

So while there are a few things that are not perfect about my dress, I will not be pointing those things out to you and I dare you to spot them (well, I don’t really dare you, but you know what I mean).  I am so glad I have finally made something substantial I am proud of and will wear over and over again.

IMG_1173

And because I promised a glimpse of what’s on my sewing table, Gertie’s shirtwaist dress, as a shirt with a peplum (are you tired of those yet?).  This is a wearable muslin and if it turns out, I will be making the dress next.  What’s on your sewing table?

IMG_1417

Caesar Salad

7 Jan

IMG_1006


I know some of you are probably trying to eat better right now, so me giving you a salad recipe counts as helping, right?  I don’t know about you, but Caesar salad has become one of my favorite comfort foods.  I think I could eat it nearly every day.  A few years ago I had found what I thought was the best bottled dressing — a little creamy and tangy — but then I found this recipe a few weeks ago and I don’t think I will ever buy the supermarket kind again.  This dressing is so easy to throw together and all of the ingredients are probably on hand except the anchovy paste, but once you buy that, you’ll have it ready at a moment’s notice, too.  And before you ask, yes, anchovy paste (or anchovy fillets) is necessary for Caesar dressing.  Without it, it wouldn’t be Caesar dressing 🙂

I have found that one batch of dressing will coat three hearts of Romaine and that’s how they seem to come packaged at the grocery store.  I cut the end off each head, slice it in half longways, then cut it crossways into bite size pieces — a quick wash and you have fresh salad greens in less than 5 minutes.  No more bagged lettuce either 🙂

Of course this salad is a great start to your meal but it also makes a delicious light entrée.  We topped it with leftover rotisserie chicken for a quick weeknight meal and my (teenage) stepson ate almost an entire serving bowl portion by himself.

I know I mentioned another sewing project from my New Year’s holiday sewing marathon and I promise it’s coming up next, but I felt it would have been bad manners of me to keep yammering on about sewing and not give you a little something to eat.  I’ll be back later this week with a post on my other recent sewing victory as well as what’s on my sewing table right now.  Have a great Monday!


Caesar Salad Dressing

Yield:  1 1/3 cups

  • 2 small garlic cloves, minced
  • 1 teaspoon anchovy paste (found near the tuna fish in the supermarket)
  • 2 tablespoons freshly squeezed lemon juice, from one lemon
  • 1 teaspoon Dijon mustard
  • 1 teaspoon Worcestershire sauce
  • 1 cup mayonnaise
  • 1/2 cup freshly grated Parmigiano-Reggiano cheese
  • 1/4 teaspoon salt
  • 1/4 teaspoon freshly ground black pepper

In a medium bowl, whisk together the garlic, anchovy paste, lemon juice, Dijon mustard and Worcestershire sauce. Add the mayonnaise, Parmigiano-Reggiano, salt, and pepper and whisk until well combined.  Serve immediately with Romaine lettuce, shave Parmesan, and crispy croutons, or keep refrigerated for up to 1 week.


Adapted from Once Upon a Chef.

Knit Peplum Top

2 Jan

Happy New Year everyone!  I hope you had an excellent holiday season and your mind is full of exciting resolutions 🙂

I have taken the last few days off of work and have spent it doing little other than sewing.  I have to tell you it has been wonderful!  I had gotten a little disgruntled with my sewing because I had been having some trouble with sorting out my fitting issues but I made two garments over the break that I think fit perfectly.  This accomplishment was just what I needed to get my “sewjo” back and I am ready to tackle more projects now.


IMG_1157


On a side note, I participated in the Christmas sewing swap hosted by Vicki Kate and I was paired up with Rebecca from Sew Tiger Sew all the way over in San Francisco.  She sent me this gorgeous grey and white sheer cotton from Britex Fabrics.  I may be making an Alma blouse with it if I buy the pattern or I may use a pattern from my stash — we’ll see.  You’ll have to wait to see what I sent Rebecca when she reveals it on her blog.


IMG_1139


A few days ago, I was checking out a new local high-end women’s boutique.  I saw several cute knit peplum tops on the racks, all in the $250 and up price range.  Aside from remarking to my husband on the outrageous price tag for something that was fabricated in China, I also noted the simple construction techniques that had been used to make the tops and exclaimed that I could make one myself — and for a lot less than $250!  So I set out to do just that.


IMG_1137


For this top, I used Simplicity 2648, an Amazing Fit dress pattern.  I had made it once before in the preblog days before I knew how much ease the Big 4 pattern companies add to their patterns.  I recut the pattern in a smaller size and bust cup and the fit was much better.  I still did a little bit of tweaking, I think mostly because I used a knit (albeit very stable and sturdy Eileen Fisher white ponte knit), and took the seams in a tad under the bust and at the sides, but overall the 12C pattern fit me well.  I also shortened the bodice by 1″ for my short waist.  I drafted my own 1/2 circle peplum to fit once I had perfected the fit of the bodice.


IMG_1143


For construction, I serged all the seams with a 4-thread overlock.  I then topstitched the princess seams and back darts as well as the waist seam.


IMG_1160


I fully lined the top with a silky tricot I picked up at a local fabric salvage shop for a song.  I edge stitched the neck and armhole openings to echo the topstitching and to help keep the lining in place.


IMG_1162


Overall, I LOVE my top and plan to wear it a ton.  I think I will also be making more knit tops like this but don’t know that I will be lining all of them, especially if they are not in a see-through color.


IMG_1140


As an added bonus, I  now have a princess bodice block that fits me and I will be showing you the second project of my mini holiday break that I created using the pattern soon but in the meantime here is a sneak peek!


IMG_1156


Styling Notes

Top:  Me Made!

Skirt:  CAbi

Tights:  Spanx

Shoes:  Donald J Pliner

Necklace:  Kenneth Cole

Holiday Dirndl Skirt à la Gertie

24 Dec

IMG_1327

I bet you were thinking I had given up sewing.  I have actually been doing a fair amount of sewing I just haven’t had time to get things photographed and blogged.  I did have a chance to snap a few pics of this skirt, though, the other Sunday when we went out for brunch and a wonderful Christmas jazz concert.

IMG_1324

I made this skirt last year using Gertie’s Dirndl skirt tutorial and it is such a quick and easy project, especially if you are a new seamstress or don’t have a lot of time to dedicate to a project.  My fabric is a beautiful green silk dupioni with large tonal polka dots (which are hard to see in the photos).

I did stray from Gertie’s tutorial a little bit in two ways.  One, I made the waistband from one piece of fabric.  If you are going to sew two pieces together, why not just cut one and fold it in half?  Two, I don’t really think a pattern is necessary for this skirt.  I just tear my fabric on grain to get my skirt panels in the desired length, then I fold them in half and cut any excess width off after making sure the edge is straight.  Other than that, I followed the directions she outlines.

If you are looking for a quick and satisfying make or a beginning sewing project, I definitely recommend this skirt.

IMG_1326


Styling Notes:

Top and black bead necklace: The Limited

Cardigan:  Talbots

Shoes:  Cole Haan

Belt:  Target

Crinoline slip:  Trashy Diva

Lipstick:  MAC Russian Red

Crack(er) Candy

23 Dec

IMG_0981

Merry Christmas, everyone!  I am going to keep this post short and sweet and will just tell you that you should add this to your holiday sweets table ASAP.  And that will be easy to do because all of the ingredients will probably be on hand and it takes no time to throw together.  Plus, it is the most delicious and addictive stuff.  Trust me, I have been getting requests for this candy and the recipe left and right.  This candy is the perfect combination of crunchy, salty, and sweet.  No one can believe that it all starts with Saltine crackers!!

I hope everyone enjoys some relaxing time with their loved ones over the next week and safe travels to those who will be on the road.


Crack(er) Candy

1-2 sleeves Saltine crackers

2 sticks unsalted butter

1 cup packed brown sugar

1/2 teaspoon vanilla extract

generous pinch salt

12 ounce bag semisweet chocolate chips

coarse sea salt for garnish (or toasted nuts or crushed pretzels if you prefer)


Preheat oven to 350F.  Line the bottom and sides of a 11″ x 17″ or 12″ x 18″ jelly roll pan with foil then lay a piece of parchment paper cut to fit in the bottom of the pan.  Arrange the Saltine crackers in straight rows and columns in a single layer in the pan, making sure they are all touching.  (My 12″ x 18″ pan holds about 48 crackers.)  In a medium saucepan heat the butter and sugar to a boil.  Boil and stir continuously for 3 minutes.  Remove from the heat and stir in the vanilla and pinch of salt.  Immediately spread the sugar mixture evenly over the crackers.  Bake in the preheated oven for 12-15 minutes, until bubbly but not starting to burn.  Remove from the oven and spread the chocolate chips evenly over the crackers.  Allow to set for 2 to 3 minutes then use an offset spatula to spread the melted chips over the crackers.  If desired, used a fork to swirl a pattern into the chocolate.  Sprinkle the coarse sea salt (or nuts or crushed pretzels) over the top and allow to set at room temperature overnight for the chocolate to harden before breaking or cutting into squares.  If you can’t wait that long (and honestly, who can?), chill the pan in the fridge until the chocolate is set, then return to room temperature for 30 minute before cutting or breaking into squares.  Now share with your friends before you eat the whole batch yourself.


Adapted from Smitten Kitchen.

Thirsty Thursday — Perfect Eggnog

20 Dec

IMG_0963

I hope everyone is having a wonderful holiday season so far.  Is your calendar full of engagements with family and friends?  We are trying to lay low this year during the holidays and are succeeding moderately so.  We decided not to host our annual Christmas party because we have been so very busy recently.  We plan to pick the tradition back up next year.  That doesn’t keep me from sharing some of my favorite holiday entertaining recipes with you, though, and this eggnog is one of those.  We served it this past weekend at our (much smaller) supper club Christmas gathering and it garnered rave reviews as usual.

My husband initially found the recipe and I have adopted it in recent years.  I typically am not a fan of things that contain eggs or bourbon as a central flavor but I must say that this cocktail is quite tasty and will warm you up on a cold winter night.  I suggest you whip up a batch for your next gathering, large or small.  I have not measured the recipe exactly, but a full batch goes in my 2 gallon punch bowl and a half batch (which I made for our supper club group of 11), fit into my crystal salad bowl with just a little left over.

If you are concerned about raw eggs, please see this link for information about safely pasteurizing your eggs to reduce the risk of Salmonella transmission.  I have to point out, though, that the risk of Salmonella from US store-bought eggs is about 1 in 30,000 (source) versus the risk of dying in a car crash in your lifetime which is about 1 in 100 (source).  Sometimes I pasteurize, sometimes I don’t.  But I always wear my seatbelt so maybe I should just always pasteurize my eggs, too…

As written, the ‘nog is slightly stout.  Feel free to add half the alcohol then adjust up from there the first time you make it.  Or if you know your crowd will want it tame, leave out half the bourbon.  It will mellow out as it sits in the fridge, though.

Perfect Eggnog

Serves 24

12 eggs, separated

4 1/2 cups sugar

750 ml bourbon

375 ml dark rum

1 1/2 quarts whipping cream

2 cups whole milk

1 1/2 cups brandy

1 tablespoon freshly grated nutmeg (optional, if you hate the stuff like I do)

With an electric mixer, beat egg yolks and sugar until thick and light-colored.  Slowly blend in bourbon and rum then mix until sugar is dissolved.  Let stand one hour.  Whip the egg whites in a separate bowl until stiff peaks form.  Stir the whipping cream and milk into the egg yolk mixture until thoroughly blended.  Slowly stir in the brandy.  Fold in the egg whites, blending evenly.  Cover and refrigerate overnight (or at least two hours) before serving.  Serve in small cups dusted with nutmeg (if desired, of course).  May be stored in the refrigerator for one week.

Adapted from Allrecipes

Cheez-It Crack

28 Nov

Howdy Friends!  I hope everyone has been well and had a wonderful Thanksgiving holiday (if that is the tradition in your country).  I am sharing a quick recipe with you today that will revolutionize your snacking habits — it will cause you to have the most intense cravings and desires at strange hours of the day — hence the name Cheez-It Crack.

You might think Cheez-It crackers are kind of plain.  You got over those when you were a kid.  Well, with the addition of a select few spices and some olive oil and a brief stint in a low oven, your lowly childhood crackers will be turned into your adulthood snacking drug of choice.  This salty-tooth satisfier takes about 3 minutes to put together and another 20 to bake.  Your friends will beg you to make them more and you won’t deny them because you know you need more yourself.  So go ahead and whip up a batch for yourself this weekend and find out what all the fuss is about!

Cheez-It Crack

2 boxes Cheez-It crackers

2/3 cup olive oil

1 packet dry Ranch dressing mix

1/2 teaspoon garlic powder

1/2 teaspoon lemon pepper seasoning

1/2 teaspoon cayenne pepper

Preheat oven to 250F.  Combine all ingredients in a large bowl and toss well to coat.  Spread crackers on a large cookie sheet and bake in the preheated oven for 20 minutes, stirring halfway through.

Source:  An addict never tells… Really, though, my friend Lee gave me the recipe 😉

How to Make a Mess of Granny-Style Green Beans

15 Oct

Growing up, there was never a shortage of home-cooked, heart-warming, comfort food on the table.  Between my mom and my grandmother across the street, we always had a hot meal for supper every night and for lunch on the weekends.  Strangely, though, as much as I was around all this food and women cooking it, I was never officially “taught” to cook by either of these women.  That means that all of the cooking you see going on here has been self-taught with just an influence from my forewomen.  Since I was never given the specifics on the art of country cooking (and let’s face it, that’s probably a good thing — who wants a mug of bacon grease in their fridge?!?), I have had to sort out my own method for recreating those comforting favorites that I ate as a child.

When Mr. Homemaker and I returned from our recent European vacation, we were both craving some home cooking.  Normally I would call my mom or grandmother and request something but on this occasion we were just too tired to leave the house.  So the next day, I went to the grocery store and picked up the essentials to make roasted chicken (recipe coming), mac and cheese, buttermilk biscuits, and these green beans.  Now, since I do not keep the above-referenced mug of bacon grease in my fridge, this recipe is not exactly the same method by which my mom and grandmother prepare their green beans.  I like to think my version is perhaps a bit healthier?  I’m not kidding anyone — I know there’s bacon fat in these beans and they’re cooked down to a non-bright green, but I just feel better that I don’t put a big scoop of congealed fat in mine 🙂

So without any further ado, an actual written recipe for creating a soul-satisfying “mess” of deep-South, homestyle green beans!

Granny-Style Green Beans

Serves 8

3 slices bacon

1/2 cup diced onion

1/4 cup white wine

2 pounds frozen flat green beans (Italian-style, or “pole beans”)

1-2 cups water

1 teaspoon salt, or to taste

1/2 teaspoon freshly ground black pepper, or to taste

Cook bacon in large pan until some of the fat has rendered but do not cook until crisp.  You just want there to be some grease in the bottom of the skillet to sauté the onion.

Add the onions and saute until golden and tender.  By now your pan probably has a nice coating of brown stuff stuck to the bottom so we will use the wine to deglaze it and scrape up all the savory bits.

Push all the onions and bacon to one side of your pan.  Pour in the wine and scrape the bottom of the pan to remove the stuck-on goodness.

Once the bottom of the pan looks reasonably clean and all the wine has evaporated, add the green beans and enough water to cover.  Stir in salt and pepper to taste.

Bring to a boil, reduce to a simmer and cook uncovered until reduced, about 1 hour to 1 hour 30 minutes.  You want your beans to be nice and soft.  You can cover them for the last 20-30 minutes of cooking or add more liquid if needed.  Enjoy!

Shorts! Simplicity 1808

12 Oct

Because the genetic code passed on to me by my parents included sequencing for excessive junk in my trunk, I have always had a hard time finding bottoms to fit — things that fit in the waist are too tight in the hips and if something fits in the hips it gapes in the waist. Shorts seem to be exceptionally tricky for some reason, so when I started sewing, shorts were high on my list of must-makes. I recently saw these cute shorts on the Nordstrom blog and thought I would try to recreate them.

20120908-124456.jpgsource

They have cute pleats in the front which I think are more flattering for my fuller front thigh, and the back waistband (couldn’t find a pic), is elasticized. Then I came across this pattern:

20120908-130016.jpg

and decided that it could be easily adapted to suit my goals. I did make a few alterations. First, I omitted the tie belt. Second, I stopped the elastic at the side seam instead of carrying it around as depicted in the pattern. Third, I separated the pocket piece into two so I could have my pocket lined in a different fabric.

In terms of fit, I made a muslin first in a slightly stretchy cotton woven. The shorts ended up being really big (I could have taken an inch out of each side seam), so for this pair I cut a size smaller.

20120908-122954.jpg

Unfortunately, when I made my fashion fabric pair, I couldn’t pull them up over my hips. Luckily, letting out all the waist seams to the max and tapering it down gave me just enough room to shimmy into these if I do it just right. I can’t explain this.

20120908-123033.jpg

Here’s a pic of the front pleat and pocket detail.  Dark clothes are hard to photograph so I tried to lighten it up a bit to show the details — still not a great photo.

20120908-123047.jpg

A view from the side showing how the elastic portion of the waistband stops at the side seam.

20120908-123100.jpg

Now the back view — ugh!  Will not be wearing these with my shirt tucked in!!  I would like to add welt pockets and belt loops but I don’t know if that would fix the crumpled paper bag appearance of my back side.  After I finished my shorts, I saw Lauren’s version where she used a single wide elastic and stitched over it with a 3 part zigzag.  I think her back waistband looks much better so if I make these again I will employ that technique.

20120908-123015.jpg

A view of my cute silk charmeuse pockets.

Overall, I am pleased with my shorts and feel like I have made some progress in my sewing and pattern alteration skills.  I would like to try the Thurlow pattern by Sewaholic next to see if I can get a finished product that works with a shirt tucked in 🙂

20120908-122937.jpg

Pattern:  Simplicity 1808

Fabric:  Carolina Herrera cotton sateen (shorts), print silk charmeuse (pocket and waistband lining)

Notions:  1/4″ elastic

Finishes used:  Serged seam allowances, machine blind hemmed, stitched in the ditch to secure waistband facing

Top:  Oldie from Target

Shoes:  Seychelles from earlier this year

Necklace:  Premier

Bracelets:  Kenneth Cole from Dillard’s