Christmas Party Dress — Simplicity 2178 Again

8 Feb

Sorry for the blurry iPhone pics. My camera battery was dead.


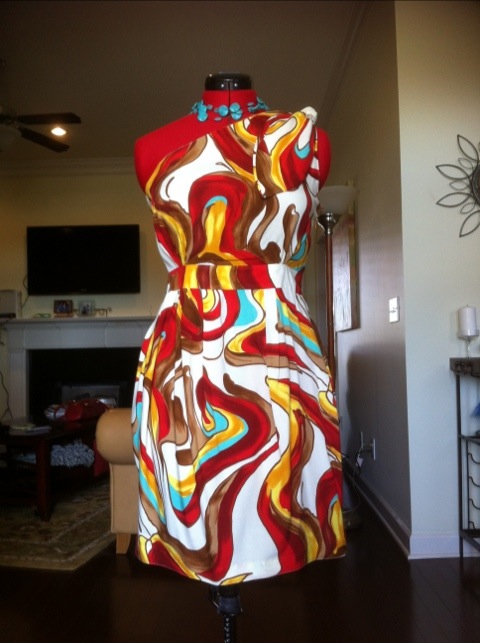
Here is my second attempt at the Simplicity 2178 — much better technique and results this go-around.  I decided to use three different silks for the different parts of the dress.  The peau de soie from the waistband also faced the shoulder ties to provide some contrast.  I wish I had used it for the hem facing also because that would have felt much better against my skin.  I still didn’t realize I need a full bust adjustment so the waistband sits a little higher in the front than in the back, but all in all I am happy with the fit and I got tons of compliments on the dress when I wore it at my Christmas party.

I promise it wasn't wrinkled when I wore it. It has been hanging in my closet for the past two months post-party.

Speaking of the Christmas party, every year for the past three years, my husband and I, with the help of several wonderful friends, host 50+ of our closest friends at our (too small) home.  Being raised by a family of gracious Southern hostesses, I always insist on overdoing it and going overboard with the menu.  This year I tried to delegate a little more and I think I did a pretty good job.  Our menu included ham and turkey carving stations, fruit/veggie/cheese trays, West Indes salad (a local creation!), several dips, crab rangoon, assorted cupcakes and other desserts, a champagne bar and beer, my husband’s famous eggnog, and a very popular Apple Pie Moonshine — whew!  I will be posting some of the recipes soon, next up will be a variation of an old family favorite — Red Velvet — so stay tuned!

Sewing Debut Dress — Simplicity 2178

7 Feb

20120207-104509.jpg

Back in September, my husband and I attend a benefit for our local schools with my sister, cousins, and some friends. This event featured a Bobby Flay style cooking showdown with some of our area’s best chefs (and lots of tasting, of course!). There was also a fashion show hosted by several local boutiques featuring their latest styles. During the fashion show, glam ladies passed around lip gloss minis from an awesome local makeup line, carrying them like cocktails on silver trays–so cute! It was this fashionable aspect of the event that inspired me to make my own dress for the evening. I wanted something cute and trendy, something maybe a bit different than everything else in my closet, so I chose Simplicity 2178. Plus, this would be my first time to wear a me-made garment into public.

20120207-110231.jpg

The fabric is a synthetic woven from Hancock Fabrics that was not ideal for a new sewist because of its drapiness but it all worked out. I cut a straight 14 in this pattern, but in hindsight, I needed a full bust adjustment. Some of the instructions weren’t clear to me at the time, like understitching the facing and how to position the invisible zip. I also didn’t pay enough attention to the pattern markings on the seams where the waistband joins the bodice and skirt. I have made this dress again with much better technique and I will post pictures of that one soon.

I omitted the shoulder strap because I didn’t like it and the dress was fine without it. I used a little doublesided tape just to be safe:)

The best part of the evening was dancing the night away with my honey to eighties tunes covered by one of our best local bands. To top it all off, my dress got its picture in not one, but two, local magazines!

20120207-115531.jpg
On the “pink” carpet. I think most, if not all, of the other ladies featured in this spread were wearing clothes from the fashion show.

20120207-115626.jpg

I definitely recommend this pattern and may still make the two strap version with the longer skirt at some point.

More finished sewing projects to come soon as well as some Mardi Gras festivities so stay tuned!

Chocolate Workshop Part One — Cappuccino Chip Crumble Muffins

6 Feb

This past Friday evening I attended a chocolate workshop at a local culinary school.  I should tell y’all that I’m a cooking nerd — I love studying the science of what happens in the kitchen — so this class was a blast.  Who doesn’t love cooking and having someone else clean up the mess?!?  I got to hang out with some cool folks, and I came home with 7 new recipes, 6 of which we tasted during the class–score!

Each person was assigned a different recipe to prepare and mine was the Cappuccino Chip Crumble Muffins from Chocolatier October 1996.  I will be posting each of the six recipes (with permission of the instructor) in the upcoming weeks as well as a bonus recipe.

These muffins are easy to assemble, delicious with your morning coffee, and received the husband stamp of approval.  While the original recipe yields 11 jumbo muffins, it will also make about 20 regular-sized muffins if you don’t have a jumbo muffin tin.

Enjoy!

 
Cappuccino Chip Crumble Muffins
Yield: 11 jumbo or 20 regular muffins

Crumble:
3/4 cup all-purpose flour
2 teaspoons ground cinnamon
3/4 teaspoon nutmeg*
1/2 cup firmly packed light brown sugar
3 tablespoons granulated sugar
1 cup walnuts, chopped
6 tablespoons butter, cut into 1/2″ cubes

Batter:
1 1/2 cups milk, divided
2 tablespoons instant espresso powder
3 1/2 cups all-purpose flour
4 teaspoons baking powder
1 teaspoon salt
1 tablespoon cinnamon
1/2 teaspoon nutmeg*
1 cup granulated sugar
9 ounces semisweet chocolate chips
9 tablespoons unsalted butter, melted and cooled
1/4 cup firmly packed dark brown sugar
4 large eggs
1 tablespoon vanilla extract

Position rack in center of oven and preheat to 375F. Spray 11 jumbo or 20 regular muffin tins with nonstick cooking spray or line with paper liners.

Combine all crumble ingredients and blend with a fork (or your fingers) until crumbly. Set aside.

Scald 1/2 cup milk in small sauce pan. Remove from heat and stir in espresso powder. Pour into a medium mixing bowl, add remaining 1 cup milk, and set aside to cool completely.

Whisk flour, baking powder, salt, cinnamon, nutmeg*, and granulated sugar together in a large mixing bowl. Toss in the chocolate chips.

Whisk the melted butter, dark brown sugar, eggs, and vanilla extract into the cooled milk mixture. Pour over the dry ingredients and stir until just combined.

Divide batter between muffin cups, filling each cup a generous ¾ of the way full. Lightly press about ¼ cup of the crumb mixture onto the top of each muffin (each cup will now be filled to the brim but don’t worry—you will have beautiful muffin tops!).

Bake for 25 minutes, or until a toothpick inserted into the center comes out with a few moist crumbs clinging to it. Cool in the pan on a wire rack for 10 minutes then remove from the pan and cool completely.

Source: Chocolatier October 1996

*Nutmeg is one of the most disgusting flavors to me so I omitted it from the recipe with good results 😉

Keeping It Simple — Simple Syrup

30 Jan

So I decided to keep my first post “simple.”  I am always amazed to see bottles of simple syrup on the shelf at the grocery store on sale for exorbitant amounts ($5-6 for the one pictured below).


Simple syrup is just a supersaturated water and sugar solution.  You combine equal parts of granulated sugar and water together in a heatproof container and heat it until all the sugar is dissolved.  You can do this in the microwave or on the stove.  You could even do it over an open flame if the need arose.  Then let the solution cool and use as desired.  Store it in the fridge where it will keep for at least two weeks but I’ve used it a month later and it still tastes fine — it is just sugar and water after all.

You can create custom flavored simple syrups for different purposes.  I like to make a lime zest-infused one for my homemade margaritas but you could also infuse with basil, lavender, etc.  Alternately, I mix it with a little rum to brush on my cakes before frosting them to keep them extra moist and flavorful.  You could also infuse it with some vanilla beans for cakes or drinks.  Simple syrup is also great for sweetening iced tea since the sugar is already dissolved.  The sky is the limit where this is concerned.

Some of my upcoming posts will feature recipes that make use of this handy kitchen staple, so stay tuned…

About me…

23 Jan

I am a full-time pediatrician and manage my own medical practice.  In my “spare” time, I love spending time at home with my family and practicing my domestic skills.  I am best at baking and hostessing but have been dabbling in canning, sewing, gardening, jewelry making, and painting.  Through this blog I hope to share some of my creations and encourage other working women to take up the dying arts of domestication.