Hi, friends! I hope you are warm and toasty wherever you are today. Here in the Deep South/Alabama Gulf Coast, we are freezing our little tushies off! It has been quite an adventure with below freezing temps for the past 2 days and various types of wintry precipitation all around (only sleet and ice at our house, sadly). The weather has been so “extreme” by our standards, that most businesses, including my office, have been closed since yesterday afternoon and will remain closed until at least tomorrow.
After this little experience, I cannot start to imagine how people survive in the far northern states where it regularly drops 20-30 degrees below zero during the winter. We Southerners wouldn’t know how to function! I have to admit, I would take 95 degrees and 100% humidity any day of the week.

Our little house with its dusting of ice/sleet.
But don’t you worry, all this down time has given me the opportunity to sew and bake like crazy. Over the past two weeks, I have baked 4 loaves of bread, 1 batch of dinner rolls, sewn 5 (!!!) garments (more on those to come), and made these delicious King Cake Cupcakes. What else can you do when it is “Snowmageddon” outside? (As sarcastically dubbed by a local radio station in response to the media frenzy.)
Growing up near Mobile, Alabama (the home of Mardi Gras), I have eaten my fair share of King Cakes. I have had cakes shipped in from “authentic” bakeries in New Orleans, local grocery store King Cakes, and even homemade King Cakes (yes, yours, Catherine). I have always been a fan of the yeasty delight reminiscent of cinnamon rolls with cream cheese filling and sweet icing and tri-colored sugar on top. And being the baker that I am, I have never tried to make my own King Cake until now. Boy, am I glad I did! These little delights are tasty! And not that hard to pull off. I will walk you through it below but first a little more history on the King Cake (and if you want to see my other post about Mardi Gras traditions and a delicious drink recipe, click here).
King Cake, as we coastal Southerners know it, first originated in French Louisiana in the 1700s, where it was introduced by colonists from France and Spain. Many European countries still have their own versions of King Cake but it is different from ours. I am only going to highlight the Southern Coastal variety in this post but you can read more about all types of King Cakes in this Wiki article and on the blog, Joe Pastry.
First of all, you are only supposed to make King Cakes after Epiphany (January 6) and before Mardi Gras (Fat Tuesday). Some people might say it was a sacrilege to make them at other times of the year but many bakeries have started adapting the King Cake idea to other holidays.
The simplest King Cake is cinnamon roll-type dough with sugar glaze icing and purple, green, and yellow sprinkles. Most varieties, though, will have a filling (cream cheese — my favorite, praline, cinnamon, or strawberry). All are topped with some form of glaze and traditionally should have a plastic baby trinket inside. This little baby represents the Baby Jesus and the legend goes that whomever gets the piece of cake with the baby has to buy the next cake. When I was a child, I remember the excitement and anticipation surrounding this little toy that might be hidden in your cake (so you had to eat carefully according to your mom, as not to choke on said baby). Nowadays, though, most places will not put the baby in the cake because of the risk of choking — or should I say the risk of a lawsuit. Instead, the baby will be cradled in some excess icing in the center of the cake.
The recipe I am presenting here is a simple brioche-type dough with a brown sugar studded cream cheese filling. The simple powdered sugar glaze has a hint of citrus to balance the sweetness of the cake. While baking with yeast dough can be intimidating, it really is quite simple if you follow the directions given.
I originally found this recipe on the Garden and Gun blog. I would not recommend following the directions on their website, though, because they are not complete. After a little research, I realized their recipe was just a scaled down version of Emeril’s recipe here, but both are apparently variations of the 1983 Southern Heritage Cakes Cookbook. If you want to reference a source, please use the Food Network recipe, not the one on the Garden and Gun website.
To make the King Cake Cupcakes, you start by mixing up an enriched yeast dough.

After it has doubled in size, you punch it down then roll it out into a rectangle.

Next, you spread the dough with the softened cream cheese mixture, then roll it up into a log.

Slice the log into 15 even pieces and place in paper-lined cupcake pans.
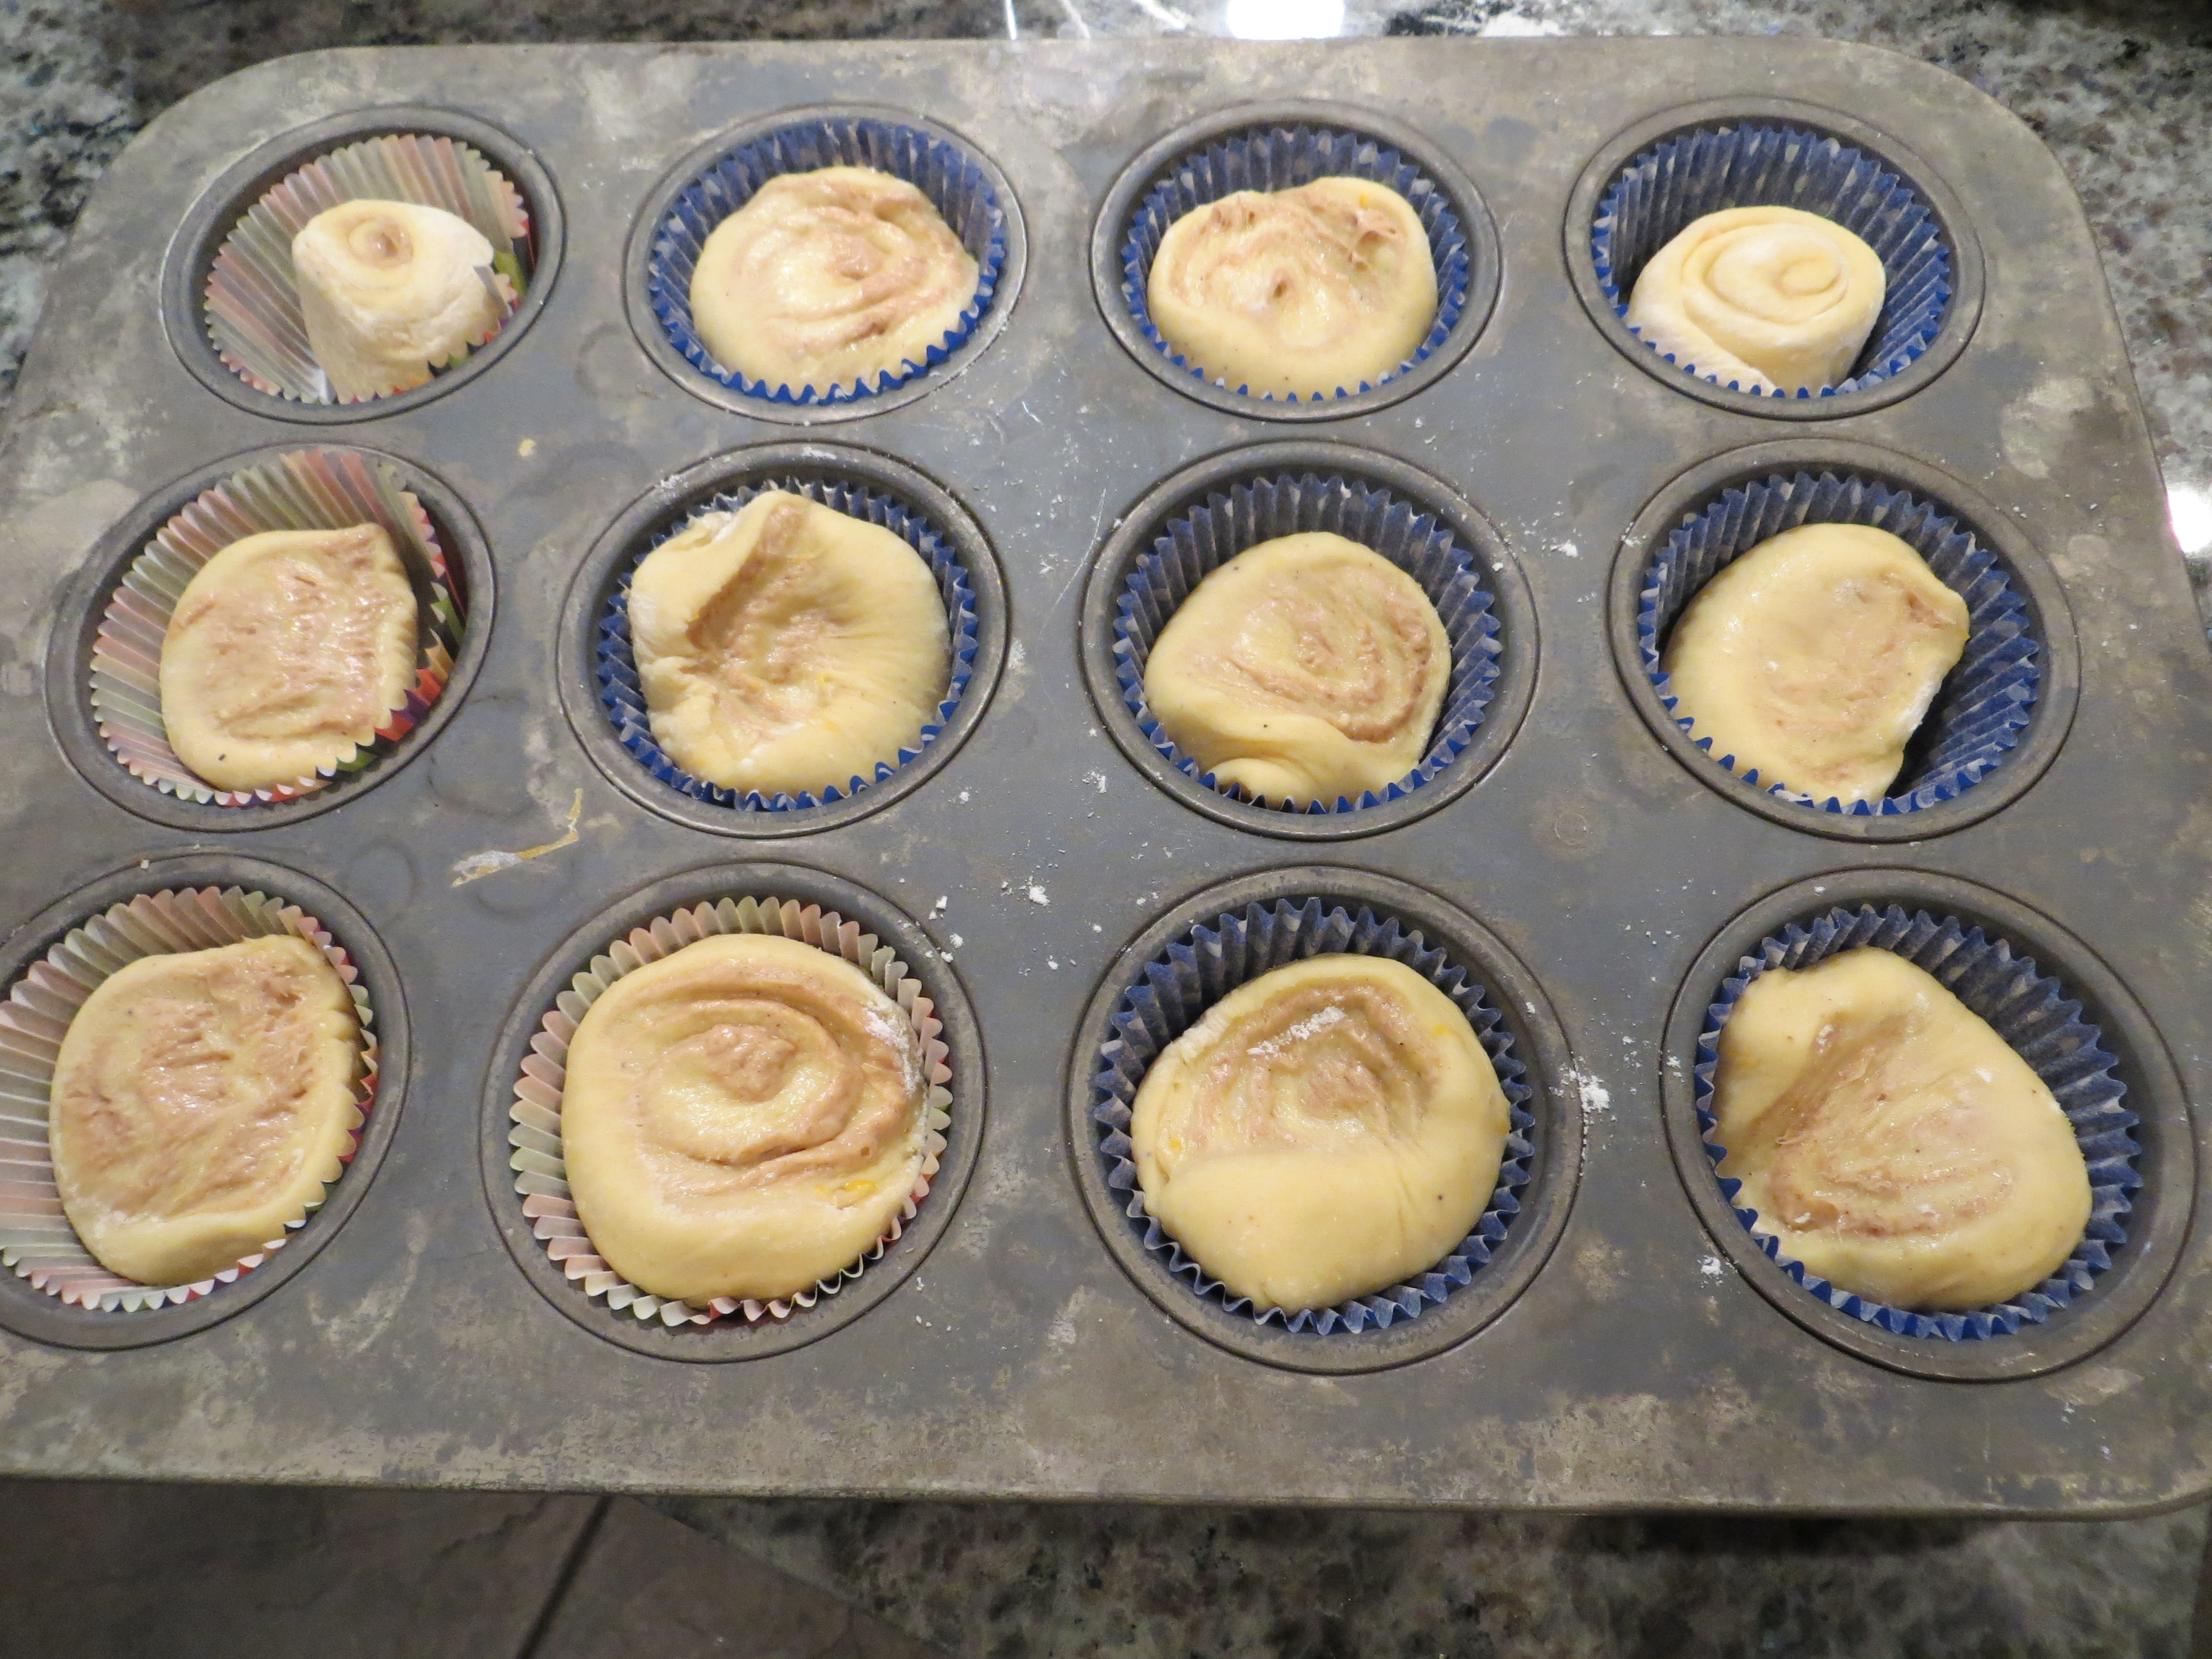
Let the cakes rise one more time,

Then bake them at 325 for 15-20 minutes.
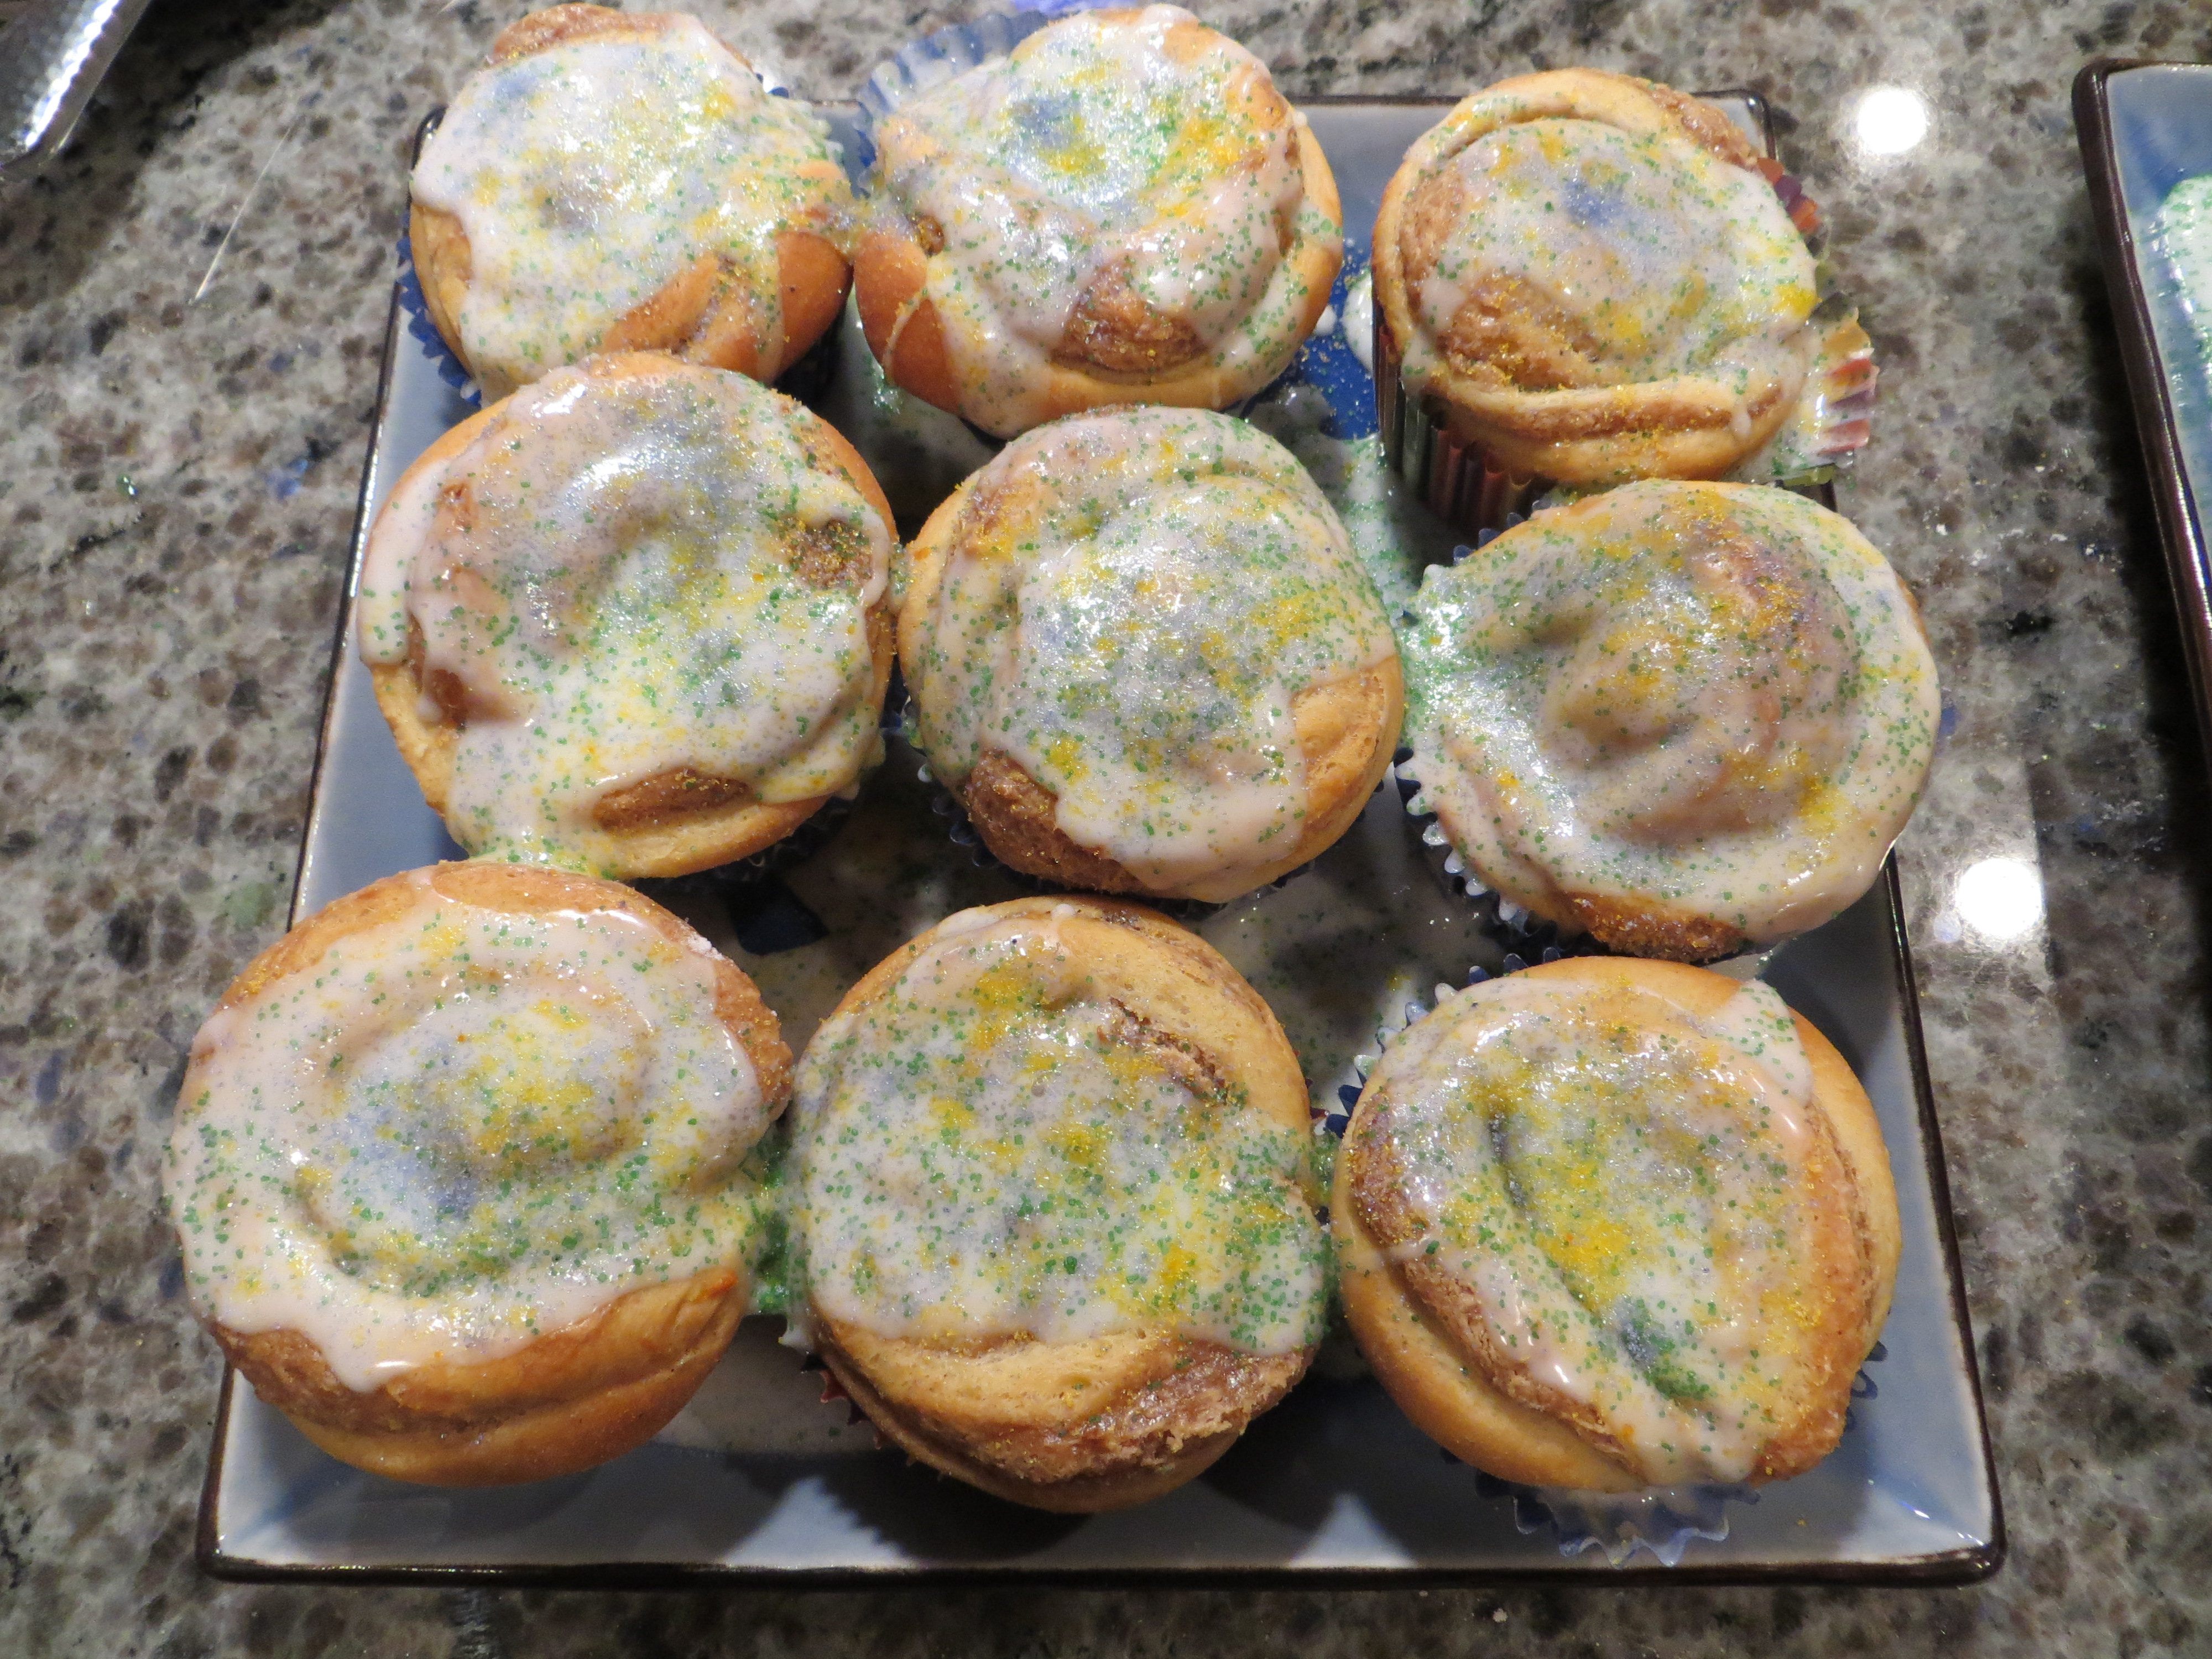
Once they are cooled, drizzle the glaze on top and sprinkle with purple, green, and yellow sanding sugar.
King Cake Cupcakes
Yield: 15 cupcakes
Dough:
- 2 ¼ teaspoons yeast
- ¼ cup warm water
- 1 teaspoon, plus ¼ cup sugar
- 2 cups flour
- 1 teaspoon salt
- ½ teaspoon nutmeg
- ½ teaspoon lemon zest
- ¼ cup warm milk
- 3 egg yolks
- 3 ounces (or 6 Tablespoons) melted butter
Filling:
- 8 ounces cream cheese
- ½ cup brown sugar
- 1 teaspoon cinnamon
Icing:
- 1 ½ cups powdered sugar
- 2 Tablespoons milk
- 1 Tablespoon lemon juice
Decorations:
- Green, purple, and yellow sprinkles or sanding sugar
- Small baby trinket
Whisk together yeast, 1/4 cup warm water, and 1 teaspoon sugar until the dry ingredients are completely dissolved, then let rest until the yeast is foamy, bubbly, and active, about 5 to 10 minutes. Combine flour, salt, 1/4 cup sugar, nutmeg, and lemon zest in the bowl of an electric stand mixer (or you can also mix by hand). Fit mixer with dough hook attachment, turn on low speed, and add milk, egg yolks, and melted butter, a little at a time, until all ingredients are combined; continue mixing on low about 10 minutes (or knead by hand).
At this time, if the dough has not formed a sticky ball in the bowl, add 1 tablespoon of flour at a time, no more than ½ cup total. Scrape down the sides and bottom of the mixer and let mix again for another 10 minutes. Turn onto an oiled surface and knead by hand into a tidy little ball, 5 minutes or so. Place dough in an oiled bowl, cover, and let rise until it doubles in size, about 1 to 2 hours. Stretch and roll your dough into a long rectangle, approximately 12″ x 18″.
Combine the filling ingredients and the spread mixture onto the surface of the rectangle. Roll the dough up starting on a short end, and slice into 15 equal medallions. Place medallions flat side down in lined cupcake tins. Cover, set aside, and let rise again until double, about 30-40 minutes. Bake at 325 for 15 to 20 minutes, or until deep golden brown. Cool completely.
Combine icing ingredients in a mixing bowl and mix until it achieves the desired consistency (adjust with more liquid or more powdered sugar if necessary). You can do this easily with a whisk.
Drizzle the glaze over the cooled cupcakes, hiding a baby trinket or charm inside one of the cupcakes before icing, if desired. Decorate with Mardi Gras beads or yellow, purple, and green sprinkles.


